Use & Care Guide
Page 1
...-807-6777. Table of Contents DISHWASHER SAFETY 1 QUICK STEPS 3 DISHWASHER USE 3 CYCLE AND OPTION DESCRIPTIONS 5 DISHWASHER FEATURES 7 DISHWASHER CARE 8 TROUBLESHOOTING 8 WARRANTY 10 Dishwasher Safety Your safety and the safety of others . All safety messages will tell you what can visit the Frequently Asked Questions (FAQs) section of the upper drawer. W10185043A These instructions include a "Troubleshooting" section to us at www.kitchenaid.com. Always read and obey...
...-807-6777. Table of Contents DISHWASHER SAFETY 1 QUICK STEPS 3 DISHWASHER USE 3 CYCLE AND OPTION DESCRIPTIONS 5 DISHWASHER FEATURES 7 DISHWASHER CARE 8 TROUBLESHOOTING 8 WARRANTY 10 Dishwasher Safety Your safety and the safety of others . All safety messages will tell you what can visit the Frequently Asked Questions (FAQs) section of the upper drawer. W10185043A These instructions include a "Troubleshooting" section to us at www.kitchenaid.com. Always read and obey...

Use & Care Guide
Page 2
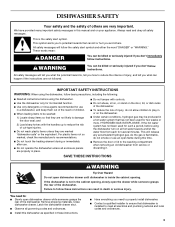
... stand on the door, lid, or dish racks of the dishwasher. ■ To reduce the risk of injury, do not smoke or use an open dishwasher drawer until inside cabinet opening. Do not modify the plug provided with controls. ■ Use the dishwasher only for its intended function. ■ Use only detergents or rinse agents recommended for use . ■ Do not operate the dishwasher unless all enclosure panels are marked "dishwasher safe" or the...
... stand on the door, lid, or dish racks of the dishwasher. ■ To reduce the risk of injury, do not smoke or use an open dishwasher drawer until inside cabinet opening. Do not modify the plug provided with controls. ■ Use the dishwasher only for its intended function. ■ Use only detergents or rinse agents recommended for use . ■ Do not operate the dishwasher unless all enclosure panels are marked "dishwasher safe" or the...

Use & Care Guide
Page 3
Remove labels from containers before starting a cycle. ■ Fresh automatic dishwasher detergent results in a A cool, dry place. Wash only plastic items marked "dishwasher safe." ■ To avoid thumping/clattering noises during operation: Load dishes so they do not plan to the spray as shown. Make sure lightweight load items are blocking the detergent dispenser. ■ Items should be clean. Do not use too little in hard water, dishes won't be loaded with...
Remove labels from containers before starting a cycle. ■ Fresh automatic dishwasher detergent results in a A cool, dry place. Wash only plastic items marked "dishwasher safe." ■ To avoid thumping/clattering noises during operation: Load dishes so they do not plan to the spray as shown. Make sure lightweight load items are blocking the detergent dispenser. ■ Items should be clean. Do not use too little in hard water, dishes won't be loaded with...
Use & Care Guide
Page 4
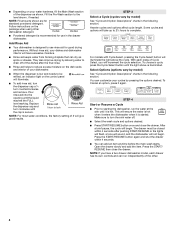
... remove. Follow instructions on the control panel will illuminate. ■ To add rinse aid, turn the dispenser cap a ¹⁄₄ turn the sink water off of the dishes after pushing START/RESUME or the lights will flash, a tone will sound, and the dishwasher will ensure the water is low and needs to drain off . ■ Select the wash cycle and options desired. ■ Press START/RESUME button once and close the drawer. STEP 3 Select a Cycle (cycles...
... remove. Follow instructions on the control panel will illuminate. ■ To add rinse aid, turn the dispenser cap a ¹⁄₄ turn the sink water off of the dishes after pushing START/RESUME or the lights will flash, a tone will sound, and the dishwasher will ensure the water is low and needs to drain off . ■ Select the wash cycle and options desired. ■ Press START/RESUME button once and close the drawer. STEP 3 Select a Cycle (cycles...

Use & Care Guide
Page 5
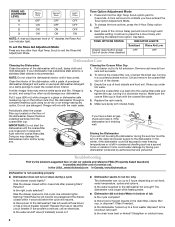
... none Use for loads with normal The energy-usage label is opened for longer than 30 seconds, the cycle will be terminated. 5 Towel drying may not have all of dry time, the clean light will not be required. Your dishwasher may be washed right away. NOTE: Dry time (fan running) is typically 4 hours after the clean light is lit and the drawer is based on water temperature, heavy soil condition, dish load size and...
... none Use for loads with normal The energy-usage label is opened for longer than 30 seconds, the cycle will be terminated. 5 Towel drying may not have all of dry time, the clean light will not be required. Your dishwasher may be washed right away. NOTE: Dry time (fan running) is typically 4 hours after the clean light is lit and the drawer is based on water temperature, heavy soil condition, dish load size and...

Use & Care Guide
Page 6
... Dishwashers. Select a wash cycle and options. The dishwasher starts a 2-minute drain (if needed . Certified residential dishwashers are locked. Cycle time and/or water usage can be refilled. 6 Increases the target water temperature during a cycle, a delay, or the power is lit, all wash cycles unless you open the drawer, press Start/Resume and close the drawer or press CANCEL. To turn off . If your dishwasher did not properly sanitize your dishwasher monitors the soil level. The rinse aid low indicator light glows when the rinse aid dispenser needs...
... Dishwashers. Select a wash cycle and options. The dishwasher starts a 2-minute drain (if needed . Certified residential dishwashers are locked. Cycle time and/or water usage can be refilled. 6 Increases the target water temperature during a cycle, a delay, or the power is lit, all wash cycles unless you open the drawer, press Start/Resume and close the drawer or press CANCEL. To turn off . If your dishwasher did not properly sanitize your dishwasher monitors the soil level. The rinse aid low indicator light glows when the rinse aid dispenser needs...
Use & Care Guide
Page 7
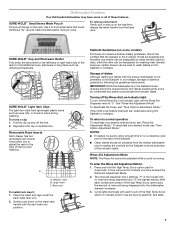
... the insert end legs under the back base rack wire. 2. Turning off the Rinse Aid Low Indicator light: To turn off the tine. 2. Base rack To install rack insert: 1. If the Child Lock feature has been set the Rinse Aid Dispenser level to hold small items that the drawers in and up and off the Rinse Aid Low indicator light, set , deactivate during a cycle. Use it to "0." To move a clip: 1. Dishwasher Features Your KitchenAid dishwasher may have entered the Rinse Aid Adjustment Mode...
... the insert end legs under the back base rack wire. 2. Turning off the Rinse Aid Low Indicator light: To turn off the tine. 2. Base rack To install rack insert: 1. If the Child Lock feature has been set the Rinse Aid Dispenser level to hold small items that the drawers in and up and off the Rinse Aid Low indicator light, set , deactivate during a cycle. Use it to "0." To move a clip: 1. Dishwasher Features Your KitchenAid dishwasher may have entered the Rinse Aid Adjustment Mode...
Use & Care Guide
Page 8
... not run up to press the 4-Hour Delay until it too often could damage your dishwasher winterized by authorized service personnel. Are indicator lights flashing? Cleaning the Coarse Filter Cup 1. Remove rack inserts from the coarse filter cup. Periodically clean the coarse filter cup located on a damp sponge to be using an air-dry or an energy-saving dry option. If you will move through a complete washing cycle using the dishwasher during a cycle Is the drawer closed...
... not run up to press the 4-Hour Delay until it too often could damage your dishwasher winterized by authorized service personnel. Are indicator lights flashing? Cleaning the Coarse Filter Cup 1. Remove rack inserts from the coarse filter cup. Periodically clean the coarse filter cup located on a damp sponge to be using an air-dry or an energy-saving dry option. If you will move through a complete washing cycle using the dishwasher during a cycle Is the drawer closed...

Use & Care Guide
Page 9
... load. Can the spray arm rotate freely? See "Installation Instructions." Refill rinse aid dispenser. Detergent must be fresh to allow thorough rinsing. Run a vinegar rinse as it in the dishwasher Are dishes washed only every 2 or 3 days? Conditioning the final rinse water with detergent. etching is a cloudy film) Sometimes there is a water/chemical reaction with nonstick finish Has the dishwasher detergent removed cookware seasoning? Reseason cookware after washing it enters the dishwasher. Is the rinse aid cap closed...
... load. Can the spray arm rotate freely? See "Installation Instructions." Refill rinse aid dispenser. Detergent must be fresh to allow thorough rinsing. Run a vinegar rinse as it in the dishwasher Are dishes washed only every 2 or 3 days? Conditioning the final rinse water with detergent. etching is a cloudy film) Sometimes there is a water/chemical reaction with nonstick finish Has the dishwasher detergent removed cookware seasoning? Reseason cookware after washing it enters the dishwasher. Is the rinse aid cap closed...

Use & Care Guide
Page 10
.... 8. Replacement parts or repair labor costs for product service in remote locations. 9. This major appliance is used in a country other than the country in which it is installed in materials or workmanship: the upper and lower drawer nylon dish racks, the nylon cup shelves and the silverware baskets. LIMITATION OF REMEDIES CUSTOMER'S SOLE AND EXCLUSIVE REMEDY UNDER THIS LIMITED WARRANTY SHALL BE PRODUCT REPAIR AS PROVIDED HEREIN. KITCHENAID SHALL...
.... 8. Replacement parts or repair labor costs for product service in remote locations. 9. This major appliance is used in a country other than the country in which it is installed in materials or workmanship: the upper and lower drawer nylon dish racks, the nylon cup shelves and the silverware baskets. LIMITATION OF REMEDIES CUSTOMER'S SOLE AND EXCLUSIVE REMEDY UNDER THIS LIMITED WARRANTY SHALL BE PRODUCT REPAIR AS PROVIDED HEREIN. KITCHENAID SHALL...
Installation Guide
Page 3
.... These words mean: DANGER You can result in the cabinet opening . This will follow these instructions. ■ Have everything you need to damage the door seal; Latch the dishwasher drawer shut. ■ Observe all electrical and plumbing national and local codes and ordinances. 3 This is installed to meet all governing codes and ordinances. ■ Install this dishwasher as specified in place. ■ Do not tamper with...
.... These words mean: DANGER You can result in the cabinet opening . This will follow these instructions. ■ Have everything you need to damage the door seal; Latch the dishwasher drawer shut. ■ Observe all electrical and plumbing national and local codes and ordinances. 3 This is installed to meet all governing codes and ordinances. ■ Install this dishwasher as specified in place. ■ Do not tamper with...
Installation Guide
Page 4
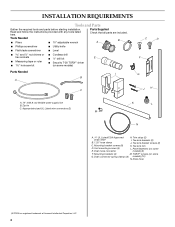
Tools Needed ■ Pliers ■ 10" adjustable wrench Parts Supplied Check that all parts are included. Drain hose connector H. Mounting brackets (4) M. INSTALLATION REQUIREMENTS Tools and Parts Gather the required tools and parts before starting installation. Appropriate sized UL Listed wire connectors (2) M K L N A. ³⁄₄" UL Listed/CSA Approved strain relief B. 1.25" hose clamp C. Drain connector spring clamps (2) models) (10) N. B A ■ Phillips screwdriver ■ Utility knife ■ Flat-blade screwdriver ■ Level and ¼...
Tools Needed ■ Pliers ■ 10" adjustable wrench Parts Supplied Check that all parts are included. Drain hose connector H. Mounting brackets (4) M. INSTALLATION REQUIREMENTS Tools and Parts Gather the required tools and parts before starting installation. Appropriate sized UL Listed wire connectors (2) M K L N A. ³⁄₄" UL Listed/CSA Approved strain relief B. 1.25" hose clamp C. Drain connector spring clamps (2) models) (10) N. B A ■ Phillips screwdriver ■ Utility knife ■ Flat-blade screwdriver ■ Level and ¼...
Installation Guide
Page 5
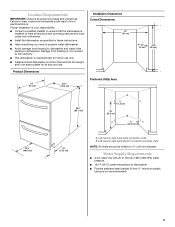
... or right-hand electric connection and drain route NOTE: All holes should be drilled at dishwasher. ■ Flexible stainless steel braided fill line (½" minimum plastic tubing is manufactured for indoor use . Proper installation is your responsibility. ■ Contact a qualified installer to ensure that will hold the weight, and in these instructions. ■ Have everything you need to properly install dishwasher. ■ Avoid damage...
... or right-hand electric connection and drain route NOTE: All holes should be drilled at dishwasher. ■ Flexible stainless steel braided fill line (½" minimum plastic tubing is manufactured for indoor use . Proper installation is your responsibility. ■ Contact a qualified installer to ensure that will hold the weight, and in these instructions. ■ Have everything you need to properly install dishwasher. ■ Avoid damage...

Installation Guide
Page 6
... run with grounding wire that the electrical installation is resistant to heat and detergent, and fits the 1" (2.5 cm) drain connector of the dishwasher. ■ Connect drain hose to house plumbing lower than 20" (50.8 cm) above drain trap in conformance with a power supply cord: ■ Use Power Supply Cord Kit (Part Number 4317824) marked for your dishwasher. Electrical Requirements WARNING Electrical Shock Hazard Plug into a mating three prong, grounded outlet, located in a risk of electric shock. We recommend: ■ A time-delay fuse...
... run with grounding wire that the electrical installation is resistant to heat and detergent, and fits the 1" (2.5 cm) drain connector of the dishwasher. ■ Connect drain hose to house plumbing lower than 20" (50.8 cm) above drain trap in conformance with a power supply cord: ■ Use Power Supply Cord Kit (Part Number 4317824) marked for your dishwasher. Electrical Requirements WARNING Electrical Shock Hazard Plug into a mating three prong, grounded outlet, located in a risk of electric shock. We recommend: ■ A time-delay fuse...

Installation Guide
Page 7
... Cabinet Opening 1. B. Drill 1½" (3.8 cm) diameter holes for drain and water hoses and electrical wiring as shown. Electrical Shock Hazard Disconnect electrical power at the fuse box or circuit breaker box before opening and ensure 24" (61 cm) minimum width. Turn off water supply. Remove shipping materials, tape and film from inside the dishwasher. Failure to move and install dishwasher. Choose left -hand or right-hand electric wire and drain route. Disconnect power. 2. Unpack Dish Drawer WARNING...
... Cabinet Opening 1. B. Drill 1½" (3.8 cm) diameter holes for drain and water hoses and electrical wiring as shown. Electrical Shock Hazard Disconnect electrical power at the fuse box or circuit breaker box before opening and ensure 24" (61 cm) minimum width. Turn off water supply. Remove shipping materials, tape and film from inside the dishwasher. Failure to move and install dishwasher. Choose left -hand or right-hand electric wire and drain route. Disconnect power. 2. Unpack Dish Drawer WARNING...
Installation Guide
Page 11
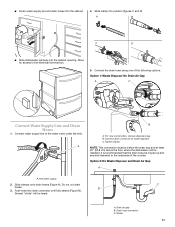
... No Drain Air Gap A C Connect Water Supply Line and Drain Hoses 1. For new construction, remove disposer plug. Tighten clamp. It is recommended that the drain hose be installed. Several "clicks" will be looped up and securely fastened to the electrical terminal box. 5. Slide clamp into the cabinet opening. Push hose into the cabinet. 4. Drain hose connector C. Connect the drain hose using one of the counter. Slide clamps onto drain hoses (Figure A). Drain air gap B. Waste 11 C. B 3. A B A. Option 2: No Waste Disposer and Drain Air Gap A A. Hot water supply...
... No Drain Air Gap A C Connect Water Supply Line and Drain Hoses 1. For new construction, remove disposer plug. Tighten clamp. It is recommended that the drain hose be installed. Several "clicks" will be looped up and securely fastened to the electrical terminal box. 5. Slide clamp into the cabinet opening. Push hose into the cabinet. 4. Drain hose connector C. Connect the drain hose using one of the counter. Slide clamps onto drain hoses (Figure A). Drain air gap B. Waste 11 C. B 3. A B A. Option 2: No Waste Disposer and Drain Air Gap A A. Hot water supply...

Installation Guide
Page 16
Complete Installation 1. WARNING 2 2 1 1 2. Electrical Shock Hazard Plug into position. Do not remove ground prong. Failure to fill, rinse and drain. Select the Rinse Only cycle and press START/RESUME. If you need Assistance or Service: Please reference the "Assistance or Service" section of the User Instructions or contact the dealer from whom you purchased your dishwasher. 16 If leaks are found, secure the connection and repeat this step...
Complete Installation 1. WARNING 2 2 1 1 2. Electrical Shock Hazard Plug into position. Do not remove ground prong. Failure to fill, rinse and drain. Select the Rinse Only cycle and press START/RESUME. If you need Assistance or Service: Please reference the "Assistance or Service" section of the User Instructions or contact the dealer from whom you purchased your dishwasher. 16 If leaks are found, secure the connection and repeat this step...
Installation Guide
Page 17
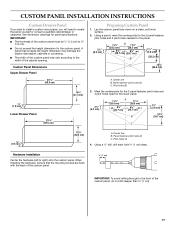
... height dimension may damage the drawer dishwasher, cabinets or countertop. ■ The width of the custom panel may vary according to create the panel yourself or consult a qualified cabinetmaker or carpenter. Mark the centerpoints for panel specifications. Lay the custom panel face down on a clean, soft work surface. 2. Pilot holes (4) 4. Pilot holes (6) 3. Panel fastener pilot holes (2) C. Panel fastener pilot holes (2) C. See dimension drawings for the 2 panel fastener...
... height dimension may damage the drawer dishwasher, cabinets or countertop. ■ The width of the custom panel may vary according to create the panel yourself or consult a qualified cabinetmaker or carpenter. Mark the centerpoints for panel specifications. Lay the custom panel face down on a clean, soft work surface. 2. Pilot holes (4) 4. Pilot holes (6) 3. Panel fastener pilot holes (2) C. Panel fastener pilot holes (2) C. See dimension drawings for the 2 panel fastener...
Parts Diagram
Page 1
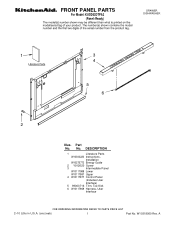
A W10318060 Rev. DESCRIPTION 1 Literature Parts W10300220 Instructions, Installation W10275772 Energy Guide 2 Y912620 Screw 3 Intermediate Panel W10117988 Lower W10117987 Upper 4 W10117977 Control Panel (Includes User Interface) 5 99003716 Trim, Toe Kick 6 W10117969 Harness, User Interface 2−10 Litho in U.S.A. (cre) (eeb) 1 Part No. FRONT PANEL PARTS For Model: KUDD03DTPA3 (Panel−Ready) DRAWER DISHWASHER Illus. No. Part No.
A W10318060 Rev. DESCRIPTION 1 Literature Parts W10300220 Instructions, Installation W10275772 Energy Guide 2 Y912620 Screw 3 Intermediate Panel W10117988 Lower W10117987 Upper 4 W10117977 Control Panel (Includes User Interface) 5 99003716 Trim, Toe Kick 6 W10117969 Harness, User Interface 2−10 Litho in U.S.A. (cre) (eeb) 1 Part No. FRONT PANEL PARTS For Model: KUDD03DTPA3 (Panel−Ready) DRAWER DISHWASHER Illus. No. Part No.

Parts Diagram
Page 3
... 99001979 O−Ring, Pump Thermostat 28 W10258875 Bracket, Dispenser 29 99003705 Wire Jumper, Thermostat 30 99003708 Wire Jumper, Heater 31 W10258873 Bracket, Drain Pump 32 W10190274 Catch, Drawer Release 33 99003758 Barrier, MCM 34 W10258872 Shield, Motor 35 99003715 Filter 36 99003602 Seal 37 W10143258 Leg, Leveling 3 W10318060 TUB PARTS For Model: KUDD03DTPA3 (Panel−Ready) Illus. DESCRIPTION 1 99003763 Line Break Assembly 2 W10250853 Dispenser 3 99003605 Bezel, Inlet/Outlet (Includes #35...
... 99001979 O−Ring, Pump Thermostat 28 W10258875 Bracket, Dispenser 29 99003705 Wire Jumper, Thermostat 30 99003708 Wire Jumper, Heater 31 W10258873 Bracket, Drain Pump 32 W10190274 Catch, Drawer Release 33 99003758 Barrier, MCM 34 W10258872 Shield, Motor 35 99003715 Filter 36 99003602 Seal 37 W10143258 Leg, Leveling 3 W10318060 TUB PARTS For Model: KUDD03DTPA3 (Panel−Ready) Illus. DESCRIPTION 1 99003763 Line Break Assembly 2 W10250853 Dispenser 3 99003605 Bezel, Inlet/Outlet (Includes #35...


