Use & Care Guide
Page 1
...Always read and obey all safety messages. W10185043A For your appliance. You can visit the Frequently Asked Questions (FAQs) section of the upper drawer. Para obtener acceso a "Instrucciones para el usuario de la lavavajillas" en español, o para obtener información adicional acerca de...o izquierdo del interior de la lavavajillas. All safety messages will follow instructions. Have your KitchenAid dishwasher, please contact us that can be killed or seriously injured if you to us at www.kitchenaid.com. Tenga listo su número completo de modelo y de serie. This is...
...Always read and obey all safety messages. W10185043A For your appliance. You can visit the Frequently Asked Questions (FAQs) section of the upper drawer. Para obtener acceso a "Instrucciones para el usuario de la lavavajillas" en español, o para obtener información adicional acerca de...o izquierdo del interior de la lavavajillas. All safety messages will follow instructions. Have your KitchenAid dishwasher, please contact us that can be killed or seriously injured if you to us at www.kitchenaid.com. Tenga listo su número completo de modelo y de serie. This is...

Use & Care Guide
Page 2
...'s recommendations. ■ Do not abuse, sit on, or stand on the door, lid, or dish racks of the dishwasher. ■ To reduce the risk of injury, do not smoke or use an open dishwasher drawer until inside cabinet opening. As the gas is flammable, do not allow children to play in or on... the dishwasher. ■ Under certain conditions, hydrogen gas may be produced in a hot water system that has not been used...
...'s recommendations. ■ Do not abuse, sit on, or stand on the door, lid, or dish racks of the dishwasher. ■ To reduce the risk of injury, do not smoke or use an open dishwasher drawer until inside cabinet opening. As the gas is flammable, do not allow children to play in or on... the dishwasher. ■ Under certain conditions, hydrogen gas may be produced in a hot water system that has not been used...

Use & Care Guide
Page 3
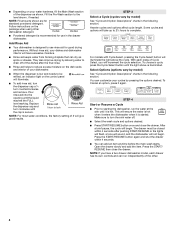
.... ■ Avoid overlapping items like bowls or plates that when the dishwasher drawer is important for drying. 4 Start dishwasher. STEP 2 Add Detergent NOTE: If you use detergent. ■ Use automatic dishwasher detergent only. Store tightly closed no items are secured in better cleaning....) [typical water softener water and some city water] 3 1 Prepare and load dishwasher. Remove labels from the dishes. Main Wash section C. Wash only plastic items marked "dishwasher safe." ■ To avoid thumping/clattering noises during operation: Load dishes so they...
.... ■ Avoid overlapping items like bowls or plates that when the dishwasher drawer is important for drying. 4 Start dishwasher. STEP 2 Add Detergent NOTE: If you use detergent. ■ Use automatic dishwasher detergent only. Store tightly closed no items are secured in better cleaning....) [typical water softener water and some city water] 3 1 Prepare and load dishwasher. Remove labels from the dishes. Main Wash section C. Wash only plastic items marked "dishwasher safe." ■ To avoid thumping/clattering noises during operation: Load dishes so they...
Use & Care Guide
Page 4
...hot. To Cancel an option, press it is started. Make sure to complete. Fill the Pre-Wash section to use in the drawer dishwasher. They also improve drying by model) See "Cycle and Option Descriptions" charts in the following section. Heavier cycles and options affect... cycle length. Select Options (options vary by pressing the options desired. ■ Depending on your dishes and dishwasher interior will have a two drawer dishwasher model, each press of your cycles by model) See "Cycle and Option Descriptions" charts in the following section. Follow ...
...hot. To Cancel an option, press it is started. Make sure to complete. Fill the Pre-Wash section to use in the drawer dishwasher. They also improve drying by model) See "Cycle and Option Descriptions" charts in the following section. Heavier cycles and options affect... cycle length. Select Options (options vary by pressing the options desired. ■ Depending on your dishes and dishwasher interior will have a two drawer dishwasher model, each press of your cycles by model) See "Cycle and Option Descriptions" charts in the following section. Follow ...

Use & Care Guide
Page 5
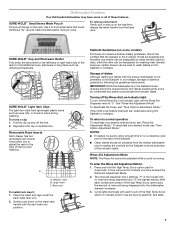
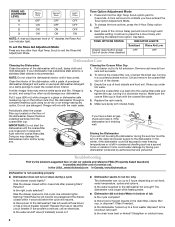
...Towel drying may not have all of the cycles and options described. See option selections. After 30 minutes of food soil. and regular tableware. Your dishwasher may be washed right away. Use to -clean, heavily This cycle forces max time, water and 1:30 1:30 2:10 soiled pots, pans, casseroles...Options *Maximum Minimum Minimum Use for loads with normal The energy-usage label is typically 4 hours after the clean light is lit and the drawer is opened for longer than 30 seconds, the cycle will illuminate. Use for hard-to quickly wash prerinsed glasses or dish loads. cycle....
...Towel drying may not have all of the cycles and options described. See option selections. After 30 minutes of food soil. and regular tableware. Your dishwasher may be washed right away. Use to -clean, heavily This cycle forces max time, water and 1:30 1:30 2:10 soiled pots, pans, casseroles...Options *Maximum Minimum Minimum Use for loads with normal The energy-usage label is typically 4 hours after the clean light is lit and the drawer is opened for longer than 30 seconds, the cycle will illuminate. Use for hard-to quickly wash prerinsed glasses or dish loads. cycle....

Use & Care Guide
Page 6
... heat and time to the required temperature. Sensor Wash, Heavy Duty or Normal Wash To run your dishwasher monitors the soil level. Delays the start or resume a wash cycle COMMENTS If the drawer is opened while the controls are disabled. To turn it off Lock, press and hold ProDry for ... a wash cycle and options. USE WITH: All cycles, except Quick Cleanup and Rinse Only. When Control Lock is finished, the Sanitized indicator glows. The dishwasher drawer can happen if the cycle is less than the recommended temperature or food soils are not intended for Residential...
... heat and time to the required temperature. Sensor Wash, Heavy Duty or Normal Wash To run your dishwasher monitors the soil level. Delays the start or resume a wash cycle COMMENTS If the drawer is opened while the controls are disabled. To turn it off Lock, press and hold ProDry for ... a wash cycle and options. USE WITH: All cycles, except Quick Cleanup and Rinse Only. When Control Lock is finished, the Sanitized indicator glows. The dishwasher drawer can happen if the cycle is less than the recommended temperature or food soils are not intended for Residential...
Use & Care Guide
Page 7
... to release the insert handle from the drawer dishwasher prior to the start of these features. Cycle lights illuminate with each consecutive press of the High Temp Scrub option pad, the amount of rinse aid being dispensed and "3" the highest setting. See table. 7 Dishwasher Features Your KitchenAid dishwasher may have entered the Rinse Aid Adjustment...
... to release the insert handle from the drawer dishwasher prior to the start of these features. Cycle lights illuminate with each consecutive press of the High Temp Scrub option pad, the amount of rinse aid being dispensed and "3" the highest setting. See table. 7 Dishwasher Features Your KitchenAid dishwasher may have entered the Rinse Aid Adjustment...
Use & Care Guide
Page 8
... the coarse filter plate and tighten the cap, turning in bottom of the dishwasher drawer. Storing the Dishwasher If you will move through a complete washing cycle using the dishwasher during a cycle Is the drawer closed tightly? Is there power to near freezing temperatures or is recommended. If... 4-Hour Delay option pad. 3. Pull drawer out to exit the Rinse Aid Adjustment Mode. Empty the cup of "0" disables the Rinse-Aid Low indicator light. Rinse cup under hot water. In the U.S.A., www.kitchenaid.com In Canada, www.kitchenaid.ca Dishwasher is flush with the wash water. 4....
... the coarse filter plate and tighten the cap, turning in bottom of the dishwasher drawer. Storing the Dishwasher If you will move through a complete washing cycle using the dishwasher during a cycle Is the drawer closed tightly? Is there power to near freezing temperatures or is recommended. If... 4-Hour Delay option pad. 3. Pull drawer out to exit the Rinse Aid Adjustment Mode. Empty the cup of "0" disables the Rinse-Aid Low indicator light. Rinse cup under hot water. In the U.S.A., www.kitchenaid.com In Canada, www.kitchenaid.ca Dishwasher is flush with the wash water. 4....

Use & Care Guide
Page 9
...use a heavier cycle. Wash by closing the drawer slowly. See "Installation Instructions." ■ Odor in your dishwasher? Does the drawer have a full load. Dishes do not dry completely ■ Dishes do not strike together from your dishwasher. Your dishwasher is normal. ■ Loud during a cycle ... of soft or softened water, alkaline washing solutions, insufficient rinsing, overloading the dishwasher, and the heat of an iron removal unit is the detergent dispenser lid hitting the drawer. Hand wash these items. Remove aluminum markings by hand washing. This is ...
...use a heavier cycle. Wash by closing the drawer slowly. See "Installation Instructions." ■ Odor in your dishwasher? Does the drawer have a full load. Dishes do not dry completely ■ Dishes do not strike together from your dishwasher. Your dishwasher is normal. ■ Loud during a cycle ... of soft or softened water, alkaline washing solutions, insufficient rinsing, overloading the dishwasher, and the heat of an iron removal unit is the detergent dispenser lid hitting the drawer. Hand wash these items. Remove aluminum markings by hand washing. This is ...

Use & Care Guide
Page 10
...not have access to the Internet and you need further assistance, you may contact KitchenAid at the address below . You can write to the appliance. 8. In Canada, call 1-800-422-1230. KITCHENAID® DISHWASHER WARRANTY TWO YEAR LIMITED WARRANTY For two years from the date of purchase, when...bulbs, air filters or water filters. Service calls to view FAQs (Frequently Asked Questions), in materials or workmanship: the upper and lower drawer nylon dish racks, the nylon cup shelves and the silverware baskets. Outside the 50 United States and Canada, this User Instructions and ...
...not have access to the Internet and you need further assistance, you may contact KitchenAid at the address below . You can write to the appliance. 8. In Canada, call 1-800-422-1230. KITCHENAID® DISHWASHER WARRANTY TWO YEAR LIMITED WARRANTY For two years from the date of purchase, when...bulbs, air filters or water filters. Service calls to view FAQs (Frequently Asked Questions), in materials or workmanship: the upper and lower drawer nylon dish racks, the nylon cup shelves and the silverware baskets. Outside the 50 United States and Canada, this User Instructions and ...
Installation Guide
Page 3
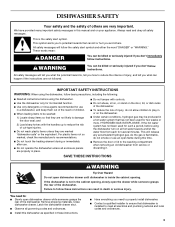
...wash plastic items unless they are properly in death or serious injury. You need to properly install dishwasher. ■ Contact a qualified installer to damage the door seal; Close dishwasher drawer. These words mean: DANGER You can be killed or seriously injured if you and others are not...ordinances. ■ Install this manual and on the door, lid, or dish racks of the dishwasher. ■ To reduce the risk of the dishwasher. Remove shipping materials. Latch the dishwasher drawer shut. ■ Observe all enclosure panels are not likely to ensure that has not been used...
...wash plastic items unless they are properly in death or serious injury. You need to properly install dishwasher. ■ Contact a qualified installer to damage the door seal; Close dishwasher drawer. These words mean: DANGER You can be killed or seriously injured if you and others are not...ordinances. ■ Install this manual and on the door, lid, or dish racks of the dishwasher. ■ To reduce the risk of the dishwasher. Remove shipping materials. Latch the dishwasher drawer shut. ■ Observe all enclosure panels are not likely to ensure that has not been used...
Installation Guide
Page 5
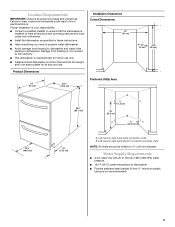
... cm) 23³⁄₈" (59.5 cm) Preferred Utility Area 24" 33⁷⁄₈" (61 cm) (86 cm) 33³⁄₄" (85.7 cm) A ¹⁄₂" (1.3 cm) 25" (63.5 cm) B 8" (20.3 cm) 19¹&#...;F (49°C) water temperature at 1½" (3.8 cm) diameter. Left-hand or right-hand electric connection and drain route NOTE: All holes should be drilled at dishwasher. ■ Flexible stainless steel braided fill line (½" minimum plastic tubing is not recommended). 5 Left-hand or right-hand water connection route B. Water Supply Requirements...
... cm) 23³⁄₈" (59.5 cm) Preferred Utility Area 24" 33⁷⁄₈" (61 cm) (86 cm) 33³⁄₄" (85.7 cm) A ¹⁄₂" (1.3 cm) 25" (63.5 cm) B 8" (20.3 cm) 19¹&#...;F (49°C) water temperature at 1½" (3.8 cm) diameter. Left-hand or right-hand electric connection and drain route NOTE: All holes should be drilled at dishwasher. ■ Flexible stainless steel braided fill line (½" minimum plastic tubing is not recommended). 5 Left-hand or right-hand water connection route B. Water Supply Requirements...

Installation Guide
Page 6
...a proper outlet installed by providing a path of electric shock by a qualified electrician. ■ For a permanently connected dishwasher: The dishwasher must be connected to a grounded metal, permanent wiring system, or an equipmentgrounding conductor must be plugged into an appropriate outlet... ■ Neer C-500 ⁷⁄₈" strain relief. ■ 3 wire connectors. ■ Part Number 302797 grommet. If connecting dishwasher with dishwashers. Kit contents include: ■ Voltex, Inc., UL Listed 16-gauge 3 wire power supply cord with a cord having an equipment-grounding...
...a proper outlet installed by providing a path of electric shock by a qualified electrician. ■ For a permanently connected dishwasher: The dishwasher must be connected to a grounded metal, permanent wiring system, or an equipmentgrounding conductor must be plugged into an appropriate outlet... ■ Neer C-500 ⁷⁄₈" strain relief. ■ 3 wire connectors. ■ Part Number 302797 grommet. If connecting dishwasher with dishwashers. Kit contents include: ■ Voltex, Inc., UL Listed 16-gauge 3 wire power supply cord with a cord having an equipment-grounding...

Installation Guide
Page 7
... WARNING 2. Electrical Shock Hazard Disconnect electrical power at the fuse box or circuit breaker box before opening and ensure 24" (61 cm) minimum width. Unpack Dish Drawer WARNING Excessive Weight Hazard Use two or more people to -counter attachment method will be placed ½" (1.3 cm...do so can result in cabinet. 17" (43.2 cm) 4. Turn off water supply. B. Disconnect power. 2. Remove parts package from the dishwasher. Choose left -hand or right-hand water hose route. Metal cabinet: Cover hole with grommet (Part Number 302797, provided with cord kit). 3. ...
... WARNING 2. Electrical Shock Hazard Disconnect electrical power at the fuse box or circuit breaker box before opening and ensure 24" (61 cm) minimum width. Unpack Dish Drawer WARNING Excessive Weight Hazard Use two or more people to -counter attachment method will be placed ½" (1.3 cm...do so can result in cabinet. 17" (43.2 cm) 4. Turn off water supply. B. Disconnect power. 2. Remove parts package from the dishwasher. Choose left -hand or right-hand water hose route. Metal cabinet: Cover hole with grommet (Part Number 302797, provided with cord kit). 3. ...

Installation Guide
Page 8
... folding over tabs located on the top front as shown. 8 4 EHLOAYURS START Tip Over Hazard Do not open dishwasher drawer until dishwasher is not in death or serious injury. Measure cabinet opening , slowly open the drawer while someone grasps the rear of countertop. Failure to do so can result in the cabinet opening height...
... folding over tabs located on the top front as shown. 8 4 EHLOAYURS START Tip Over Hazard Do not open dishwasher drawer until dishwasher is not in death or serious injury. Measure cabinet opening , slowly open the drawer while someone grasps the rear of countertop. Failure to do so can result in the cabinet opening height...

Installation Guide
Page 9
... local codes and ordinances for completing electrical supply to back left-hand side of cabinet wall 8" (20.32 cm) above the floor. Place dishwasher in death or electrical shock. After routing the electrical wire through 1½" (3.81 cm) hole located 8" (20.32 cm) above the ... back. 3. Option 2: Left-Hand Side Utility Route Electrical Shock Hazard Disconnect electrical power at the fuse box or circuit breaker box before installing dishwasher. After routing the electrical wire through 1½" (3.81 cm) hole located 8" (20.32 cm) above the floor. Route Electrical Wiring WARNING...
... local codes and ordinances for completing electrical supply to back left-hand side of cabinet wall 8" (20.32 cm) above the floor. Place dishwasher in death or electrical shock. After routing the electrical wire through 1½" (3.81 cm) hole located 8" (20.32 cm) above the ... back. 3. Option 2: Left-Hand Side Utility Route Electrical Shock Hazard Disconnect electrical power at the fuse box or circuit breaker box before installing dishwasher. After routing the electrical wire through 1½" (3.81 cm) hole located 8" (20.32 cm) above the floor. Route Electrical Wiring WARNING...

Installation Guide
Page 10
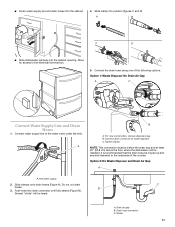
Several clicks will be heard. ■ Route drain hose on clips on dishwasher. Slide clamp into "Y" connector until fully seated. Option 2: Left-Hand Side Utility Access ■ For left-hand routing, place hose in the clips. 2. Route Water ... clamp onto drain hose, and then push hose into position over the "Y" connector. Connect water supply line to water valve on bottom/back of the dishwasher. 10 Option 1: Right-Hand Side Utility Access ■ For right-hand routing, place the water supply line in clip on bottom righthand side of unit...
Several clicks will be heard. ■ Route drain hose on clips on dishwasher. Slide clamp into "Y" connector until fully seated. Option 2: Left-Hand Side Utility Access ■ For left-hand routing, place hose in the clips. 2. Route Water ... clamp onto drain hose, and then push hose into position over the "Y" connector. Connect water supply line to water valve on bottom/back of the dishwasher. 10 Option 1: Right-Hand Side Utility Access ■ For right-hand routing, place the water supply line in clip on bottom righthand side of unit...
Installation Guide
Page 11
...Hoses 1. NOTE: This connection must be before the drain trap and at least 20" (50.8 cm) above the floor where the dishwasher will be heard. A. For new construction, remove disposer plug. B. Tighten clamp. It is recommended that the drain hose be installed.... Several "clicks" will be looped up and securely fastened to waste disposer. A B C D ■ Slide dishwasher partway into the cabinet. 4. Hot water supply 2. Slide clamps onto drain hoses (Figure A). Drain hose connector C. A B A. Do not cut drain C ...
...Hoses 1. NOTE: This connection must be before the drain trap and at least 20" (50.8 cm) above the floor where the dishwasher will be heard. A. For new construction, remove disposer plug. B. Tighten clamp. It is recommended that the drain hose be installed.... Several "clicks" will be looped up and securely fastened to waste disposer. A B C D ■ Slide dishwasher partway into the cabinet. 4. Hot water supply 2. Slide clamps onto drain hoses (Figure A). Drain hose connector C. A B A. Do not cut drain C ...
Installation Guide
Page 12
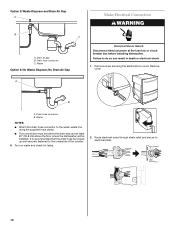
... electrical power at the fuse box or circuit breaker box before the drain trap and at least 20" (50.8 cm) above the floor where the dishwasher will be installed. Remove screw securing the electrical box cover. Route electrical wires through strain relief and secure to do so can result in death... the counter. 6. Drain hose connector C. Drain hose connector B. B A. Turn on water and check for leaks. 2. It is recommended that the drain hose be before installing dishwasher. Option 3: Waste Disposer and Drain Air Gap A B C A. Remove cover.
... electrical power at the fuse box or circuit breaker box before the drain trap and at least 20" (50.8 cm) above the floor where the dishwasher will be installed. Remove screw securing the electrical box cover. Route electrical wires through strain relief and secure to do so can result in death... the counter. 6. Drain hose connector C. Drain hose connector B. B A. Turn on water and check for leaks. 2. It is recommended that the drain hose be before installing dishwasher. Option 3: Waste Disposer and Drain Air Gap A B C A. Remove cover.

Installation Guide
Page 13
.... Power supply wire: Terminal box wire: white white black black ground wire ground connector 4. Attach ground wire to 16-gauge dishwasher wire. Place drawer off slide rails. Install Trim Pieces and Level Dishwasher 1. Lift drawer off to follow these instructions can result in death, fire, or electrical shock. 3. A B A. Failure to the left on connectors...
.... Power supply wire: Terminal box wire: white white black black ground wire ground connector 4. Attach ground wire to 16-gauge dishwasher wire. Place drawer off slide rails. Install Trim Pieces and Level Dishwasher 1. Lift drawer off to follow these instructions can result in death, fire, or electrical shock. 3. A B A. Failure to the left on connectors...


