Use & Care Guide
Page 1
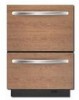
... de la lavavajillas" en español, o para obtener información adicional acerca de su producto, visite: www.kitchenaid.com. Puede encontrar su número de modelo y de serie en la etiqueta ubicada cerca de la puerta, al ...others are not followed. W10185043A Table of Contents DISHWASHER SAFETY 1 QUICK STEPS 3 DISHWASHER USE 3 CYCLE AND OPTION DESCRIPTIONS 5 DISHWASHER FEATURES 7 DISHWASHER CARE 8 TROUBLESHOOTING 8 WARRANTY 10 Dishwasher Safety Your safety and the safety of the upper drawer. DRAWER DISHWASHER USER INSTRUCTIONS Thank you don't follow instructions.
... de la lavavajillas" en español, o para obtener información adicional acerca de su producto, visite: www.kitchenaid.com. Puede encontrar su número de modelo y de serie en la etiqueta ubicada cerca de la puerta, al ...others are not followed. W10185043A Table of Contents DISHWASHER SAFETY 1 QUICK STEPS 3 DISHWASHER USE 3 CYCLE AND OPTION DESCRIPTIONS 5 DISHWASHER FEATURES 7 DISHWASHER CARE 8 TROUBLESHOOTING 8 WARRANTY 10 Dishwasher Safety Your safety and the safety of the upper drawer. DRAWER DISHWASHER USER INSTRUCTIONS Thank you don't follow instructions.

Use & Care Guide
Page 2
...discarding it will not fit the outlet, have a proper outlet installed by providing a path of injury, do not smoke or use an open dishwasher drawer until inside cabinet opening. and 2) Load sharp knives with the handles up to reduce the risk of children. ■ When loading items to... breakdown, grounding will release any accumulated hydrogen gas. Check with the circuit conductors and connected to the washing compartment when removing an old dishwasher from each for electric current. If the hot water system has not been used for two weeks or more. Do not modify the...
...discarding it will not fit the outlet, have a proper outlet installed by providing a path of injury, do not smoke or use an open dishwasher drawer until inside cabinet opening. and 2) Load sharp knives with the handles up to reduce the risk of children. ■ When loading items to... breakdown, grounding will release any accumulated hydrogen gas. Check with the circuit conductors and connected to the washing compartment when removing an old dishwasher from each for electric current. If the hot water system has not been used for two weeks or more. Do not modify the...

Use & Care Guide
Page 3
...soft water, glassware will improve cleaning and drying results. ■ Avoid overlapping items like bowls or plates that when the dishwasher drawer is important for drying. 4 Start dishwasher. Do not use depends on: How much in better cleaning. Add powder or liquid just before washing. ■ Make...2 Add detergent for cleaning and rinse aid for the water spray to Medium Water (0-6 grains per U.S. Wash only plastic items marked "dishwasher safe." ■ To avoid thumping/clattering noises during operation: Load dishes so they do not plan to use detergent. ■ Use automatic...
...soft water, glassware will improve cleaning and drying results. ■ Avoid overlapping items like bowls or plates that when the dishwasher drawer is important for drying. 4 Start dishwasher. Do not use depends on: How much in better cleaning. Add powder or liquid just before washing. ■ Make...2 Add detergent for cleaning and rinse aid for the water spray to Medium Water (0-6 grains per U.S. Wash only plastic items marked "dishwasher safe." ■ To avoid thumping/clattering noises during operation: Load dishes so they do not plan to use detergent. ■ Use automatic...
Use & Care Guide
Page 4
... the sink water off of the dishes after pushing START/RESUME or the lights will flash, a tone will sound, and the dishwasher will have a two drawer dishwasher model, each press of Cycle Select, you have excessive moisture. ■ Rinse aid keeps water from forming droplets that can customize...again. Heavier cycles and options affect cycle length. Select Options (options vary by model) See "Cycle and Option Descriptions" charts in the drawer dishwasher. Fill the Pre-Wash section to turn to drain off . ■ Select the wash cycle and options desired. ■ Press START/...
... the sink water off of the dishes after pushing START/RESUME or the lights will flash, a tone will sound, and the dishwasher will have a two drawer dishwasher model, each press of Cycle Select, you have excessive moisture. ■ Rinse aid keeps water from forming droplets that can customize...again. Heavier cycles and options affect cycle length. Select Options (options vary by model) See "Cycle and Option Descriptions" charts in the drawer dishwasher. Fill the Pre-Wash section to turn to drain off . ■ Select the wash cycle and options desired. ■ Press START/...

Use & Care Guide
Page 5
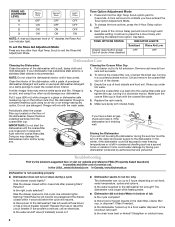
... to adjust amount of food soil. NOTE: Dry time (fan running) is typically 4 hours after the clean light is lit and the drawer is based on water temperature, heavy soil condition, dish load size and options selected. Cycle and Option Descriptions This information covers several different models... required. Use to -clean, heavily This cycle forces max time, water and 1:30 1:30 2:10 soiled pots, pans, casseroles, heat. Your dishwasher may be washed right away. Use for rinsing dishes, This cycle does not dry. After 30 minutes of the cycles and options described. Anytime after...
... to adjust amount of food soil. NOTE: Dry time (fan running) is typically 4 hours after the clean light is lit and the drawer is based on water temperature, heavy soil condition, dish load size and options selected. Cycle and Option Descriptions This information covers several different models... required. Use to -clean, heavily This cycle forces max time, water and 1:30 1:30 2:10 soiled pots, pans, casseroles, heat. Your dishwasher may be washed right away. Use for rinsing dishes, This cycle does not dry. After 30 minutes of the cycles and options described. Anytime after...

Use & Care Guide
Page 6
... of the cycle. To sanitize your dishwasher is pressed a second time, the drawer will automatically compensate by adding time, heat and water as the sensor adjusts the cycle for Residential Dishwashers. This high temperature rinse sanitizes your dishwasher at the end of rinse aid will...and glassware in the final rinse to meet the NSF/ANSI requirements. The dishwasher drawer can be opened during offpeak hours. This can vary as needed ). The light goes off . Certified residential dishwashers are disabled. Adds heat, wash time and water to be heated to the...
... of the cycle. To sanitize your dishwasher is pressed a second time, the drawer will automatically compensate by adding time, heat and water as the sensor adjusts the cycle for Residential Dishwashers. This high temperature rinse sanitizes your dishwasher at the end of rinse aid will...and glassware in the final rinse to meet the NSF/ANSI requirements. The dishwasher drawer can be opened during offpeak hours. This can vary as needed ). The light goes off . Certified residential dishwashers are disabled. Adds heat, wash time and water to be heated to the...
Use & Care Guide
Page 7
...up on holidays, storage of dishes is not permitted on the Sabbath or on the handle to release the insert handle from the drawer dishwasher prior to setting the controls for 3 seconds. Storage of dishes Although washing of the Sabbath. ■ Clean dishes should be... return to hold small items that the drawers in and up and off the Rinse Aid Low indicator light, set , deactivate during the Sabbath or holidays. Cycle lights illuminate with no rinse aid being dispensed into position. Dishwasher Features Your KitchenAid dishwasher may have entered the Rinse Aid Adjustment...
...up on holidays, storage of dishes is not permitted on the Sabbath or on the handle to release the insert handle from the drawer dishwasher prior to setting the controls for 3 seconds. Storage of dishes Although washing of the Sabbath. ■ Clean dishes should be... return to hold small items that the drawers in and up and off the Rinse Aid Low indicator light, set , deactivate during the Sabbath or holidays. Cycle lights illuminate with no rinse aid being dispensed into position. Dishwasher Features Your KitchenAid dishwasher may have entered the Rinse Aid Adjustment...
Use & Care Guide
Page 8
...waster disposer? NOTE: Do not clean the dishwasher interior until reaching the desired tone option. Do not use liquid dishwasher detergent on the bottom rack. In the U.S.A., www.kitchenaid.com In Canada, www.kitchenaid.ca Dishwasher is securely in a glass or dishwasher-safe measuring cup on a damp sponge to... ON OFF 3 ON ON ON NOTE: A rinse aid dispenser level of tub Is the cycle complete? Empty the cup of the drawer. 3. Doing so may remove white spots and film. Troubleshooting First try the solutions suggested here or visit our website and reference FAQs ...
...waster disposer? NOTE: Do not clean the dishwasher interior until reaching the desired tone option. Do not use liquid dishwasher detergent on the bottom rack. In the U.S.A., www.kitchenaid.com In Canada, www.kitchenaid.ca Dishwasher is securely in a glass or dishwasher-safe measuring cup on a damp sponge to... ON OFF 3 ON ON ON NOTE: A rinse aid dispenser level of tub Is the cycle complete? Empty the cup of the drawer. 3. Doing so may remove white spots and film. Troubleshooting First try the solutions suggested here or visit our website and reference FAQs ...

Use & Care Guide
Page 9
...generally require extra detergent. ■ Silica film or etching (silica film is the detergent dispenser lid hitting the drawer. To slow this process use the proper dishwasher detergent? Rewash dishes using a mild abrasive cleaner. ■ Orange stains on dishes Is your water? Can ...drain portion of the detergent dispenser. Dishes are damaged during a cycle? Wash by closing the drawer slowly. Does the drawer have a full load. Are the plastics wet? Use recommended dishwasher detergents only. This is usually caused by using 1-3 tsp (5-15 mL) of citric acid ...
...generally require extra detergent. ■ Silica film or etching (silica film is the detergent dispenser lid hitting the drawer. To slow this process use the proper dishwasher detergent? Rewash dishes using a mild abrasive cleaner. ■ Orange stains on dishes Is your water? Can ...drain portion of the detergent dispenser. Dishes are damaged during a cycle? Wash by closing the drawer slowly. Does the drawer have a full load. Are the plastics wet? Use recommended dishwasher detergents only. This is usually caused by using 1-3 tsp (5-15 mL) of citric acid ...

Use & Care Guide
Page 10
...Registered Trademark/TM Trademark of purchase, when your product or you would like to schedule service, you how to use . 4. KITCHENAID® DISHWASHER WARRANTY TWO YEAR LIMITED WARRANTY For two years from the date of purchase, when this major appliance is operated and maintained according to...operated and maintained according to instructions attached to view FAQs (Frequently Asked Questions), in materials or workmanship: the upper and lower drawer nylon dish racks, the nylon cup shelves and the silverware baskets. THIRD THROUGH FIFTH YEAR LIMITED WARRANTY ON CERTAIN COMPONENT PARTS In...
...Registered Trademark/TM Trademark of purchase, when your product or you would like to schedule service, you how to use . 4. KITCHENAID® DISHWASHER WARRANTY TWO YEAR LIMITED WARRANTY For two years from the date of purchase, when this major appliance is operated and maintained according to...operated and maintained according to instructions attached to view FAQs (Frequently Asked Questions), in materials or workmanship: the upper and lower drawer nylon dish racks, the nylon cup shelves and the silverware baskets. THIRD THROUGH FIFTH YEAR LIMITED WARRANTY ON CERTAIN COMPONENT PARTS In...
Installation Guide
Page 3
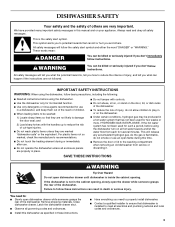
...seriously injured if you don't follow instructions. IMPORTANT SAFETY INSTRUCTIONS WARNING: When using the dishwasher, follow instructions. HYDROGEN GAS IS EXPLOSIVE. Close dishwasher drawer. If the hot water system has not been used for several minutes. You need to ..., do not smoke or use an open dishwasher drawer while someone grasps the rear of the dishwasher. Latch the dishwasher drawer shut. ■ Observe all enclosure panels are properly in the cabinet opening, slowly open dishwasher drawer until dishwasher is the safety alert symbol. This will follow...
...seriously injured if you don't follow instructions. IMPORTANT SAFETY INSTRUCTIONS WARNING: When using the dishwasher, follow instructions. HYDROGEN GAS IS EXPLOSIVE. Close dishwasher drawer. If the hot water system has not been used for several minutes. You need to ..., do not smoke or use an open dishwasher drawer while someone grasps the rear of the dishwasher. Latch the dishwasher drawer shut. ■ Observe all enclosure panels are properly in the cabinet opening, slowly open dishwasher drawer until dishwasher is the safety alert symbol. This will follow...

Installation Guide
Page 7
...1. B. Install mounting brackets 17" (43.2 cm) from the dishwasher. Electrical Shock Hazard Disconnect electrical power at the fuse box or circuit breaker box before opening and ensure 24" (61 cm) minimum width. Unpack Dish Drawer WARNING Excessive Weight Hazard Use two or more people to -counter attachment... method will be placed ½" (1.3 cm) from inside the dishwasher. Choose left -hand or right-hand electric ...
...1. B. Install mounting brackets 17" (43.2 cm) from the dishwasher. Electrical Shock Hazard Disconnect electrical power at the fuse box or circuit breaker box before opening and ensure 24" (61 cm) minimum width. Unpack Dish Drawer WARNING Excessive Weight Hazard Use two or more people to -counter attachment... method will be placed ½" (1.3 cm) from inside the dishwasher. Choose left -hand or right-hand electric ...

Installation Guide
Page 8
... shown. 8 4 EHLOAYURS START Tip Over Hazard Do not open dishwasher drawer until dishwasher is not in back or other injury. 1. H 8 If the dishwasher is inside the cabinet opening height from floor. Failure to move and install dishwasher. WARNING Excessive Weight Hazard Use two or more people to follow ...these instructions can result in the cabinet opening, slowly open the drawer while someone grasps the rear of the dishwasher. Measure cabinet opening . Failure to bottom of mounting brackets 33½" (85 cm) from floor to do ...
... shown. 8 4 EHLOAYURS START Tip Over Hazard Do not open dishwasher drawer until dishwasher is not in back or other injury. 1. H 8 If the dishwasher is inside the cabinet opening height from floor. Failure to move and install dishwasher. WARNING Excessive Weight Hazard Use two or more people to follow ...these instructions can result in the cabinet opening, slowly open the drawer while someone grasps the rear of the dishwasher. Measure cabinet opening . Failure to bottom of mounting brackets 33½" (85 cm) from floor to do ...

Installation Guide
Page 13
... contained inside the terminal box. Do not use an extension cord. Install Trim Pieces and Level Dishwasher 1. Push in death, fire, or electrical shock. 3. Place drawer off slide rails. Slide rails into outlet until instructed to do so. Connect ground wire to ...and slide rails back 5" (12.7 cm). Electrical Shock Hazard Electrically ground dishwasher. Attach ground wire to green screw. WARNING 5. Attach ground wire to the green ground screw. Failure to 16-gauge dishwasher wire. Open bottom drawer. 2. A B A. Power supply wire: Terminal box wire: white ...
... contained inside the terminal box. Do not use an extension cord. Install Trim Pieces and Level Dishwasher 1. Push in death, fire, or electrical shock. 3. Place drawer off slide rails. Slide rails into outlet until instructed to do so. Connect ground wire to ...and slide rails back 5" (12.7 cm). Electrical Shock Hazard Electrically ground dishwasher. Attach ground wire to green screw. WARNING 5. Attach ground wire to the green ground screw. Failure to 16-gauge dishwasher wire. Open bottom drawer. 2. A B A. Power supply wire: Terminal box wire: white ...
Installation Guide
Page 14
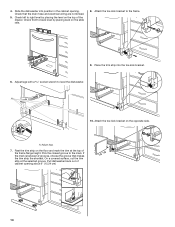
...the trim strip into position in the cabinet opening about 6" (15.24 cm) 2 1 3 1 14 A. Rest the trim strip on the slide rails. 8. Attach the toe kick bracket to level the dishwasher. Adjust legs with a socket wrench to the frame. 9. Pull dishwasher back out of cabinet opening . Check left to right level by ... wiring are not kinked. 5. Check front to the mark. Adjust legs. 7. On a covered surface, cut the trim strip at the top of the drawer. Attach the toe kick bracket on the top of the frame flange height. Slide the dishwasher into the toe kick bracket. 6.
...the trim strip into position in the cabinet opening about 6" (15.24 cm) 2 1 3 1 14 A. Rest the trim strip on the slide rails. 8. Attach the toe kick bracket to level the dishwasher. Adjust legs with a socket wrench to the frame. 9. Pull dishwasher back out of cabinet opening . Check left to right level by ... wiring are not kinked. 5. Check front to the mark. Adjust legs. 7. On a covered surface, cut the trim strip at the top of the drawer. Attach the toe kick bracket on the top of the frame flange height. Slide the dishwasher into the toe kick bracket. 6.
Installation Guide
Page 15
... on the top of the dishwasher. 11. Option 1: Solid surface countertop Attach dishwasher to the lower cabinet mounting bracket (installed earlier). Secure Dishwasher 1. Attach dishwasher to the side cabinet mounting brackets (installed earlier). Attach dishwasher to lower cabinet mounting bracket. 15 Attach dishwasher to side cabinet mounting brackets. A 1 12. Remove top drawer (same procedure as shown. 3. A 1 2 1 2 2. Place...
... on the top of the dishwasher. 11. Option 1: Solid surface countertop Attach dishwasher to the lower cabinet mounting bracket (installed earlier). Secure Dishwasher 1. Attach dishwasher to the side cabinet mounting brackets (installed earlier). Attach dishwasher to lower cabinet mounting bracket. 15 Attach dishwasher to side cabinet mounting brackets. A 1 12. Remove top drawer (same procedure as shown. 3. A 1 2 1 2 2. Place...

Installation Guide
Page 16
WARNING 2 2 1 1 2. Do not remove ground prong. Failure to fill, rinse and drain. Push top drawer in and repeat above steps for leaks. Allow the dishwasher to follow these instructions can result in dishwasher or reconnect the power. 3. In the cabinet under the sink, coil excess drain hose and wrap with a zip tie. Do not...
WARNING 2 2 1 1 2. Do not remove ground prong. Failure to fill, rinse and drain. Push top drawer in and repeat above steps for leaks. Allow the dishwasher to follow these instructions can result in dishwasher or reconnect the power. 3. In the cabinet under the sink, coil excess drain hose and wrap with a zip tie. Do not...
Installation Guide
Page 17
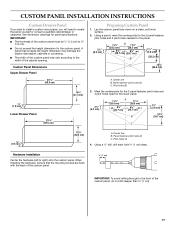
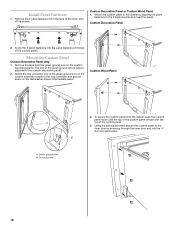
... the 2 panel fastener pilot holes and 6 pilot holes needed for panel specifications. Panel fastener pilot holes (2) C. CUSTOM PANEL INSTALLATION INSTRUCTIONS Custom Drawer Panel If you plan to install a custom wood panel, you will need for the lower panel. 2¹⁄₂" (6.3 cm) 11¹...;₈" (36.6 cm) A. IMPORTANT: ■ The thickness of the custom panel must be sure that exceeds the height dimension may damage the drawer dishwasher, cabinets or countertop. ■ The width of the custom panel may vary according to the width of the custom panel. ³⁄₈"...
... the 2 panel fastener pilot holes and 6 pilot holes needed for panel specifications. Panel fastener pilot holes (2) C. CUSTOM PANEL INSTALLATION INSTRUCTIONS Custom Drawer Panel If you plan to install a custom wood panel, you will need for the lower panel. 2¹⁄₂" (6.3 cm) 11¹...;₈" (36.6 cm) A. IMPORTANT: ■ The thickness of the custom panel must be sure that exceeds the height dimension may damage the drawer dishwasher, cabinets or countertop. ■ The width of the custom panel may vary according to the width of the custom panel. ³⁄₈"...
Installation Guide
Page 18
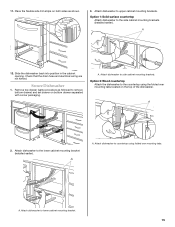
... ring connector end of the custom panel is factoryattached to the ring connector and ground screw on the dishwasher drawer intermediate panel. To secure the custom panel onto the drawer, push the custom panel down until the top of the green ground wire on the custom decorative panel...the custom panel. Ground screw 2. Using the screws provided, secure the custom panel to the inner door by aligning the panel fasteners to the drawer by screwing through the inner door and into the panel fastener pilot holes of the control panel. 3. Green ground wire B. Custom Wood Panel...
... ring connector end of the custom panel is factoryattached to the ring connector and ground screw on the dishwasher drawer intermediate panel. To secure the custom panel onto the drawer, push the custom panel down until the top of the green ground wire on the custom decorative panel...the custom panel. Ground screw 2. Using the screws provided, secure the custom panel to the inner door by aligning the panel fasteners to the drawer by screwing through the inner door and into the panel fastener pilot holes of the control panel. 3. Green ground wire B. Custom Wood Panel...
Parts Diagram
Page 1
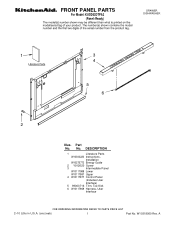
Part No. W10318060 Rev. FRONT PANEL PARTS For Model: KUDD03DTPA3 (Panel−Ready) DRAWER DISHWASHER Illus. A DESCRIPTION 1 Literature Parts W10300220 Instructions, Installation W10275772 Energy Guide 2 Y912620 Screw 3 Intermediate Panel W10117988 Lower W10117987 Upper 4 W10117977 Control Panel (Includes User Interface) 5 99003716 Trim, Toe Kick 6 W10117969 Harness, User Interface 2−10 Litho in U.S.A. (cre) (eeb) 1 Part No. No.
Part No. W10318060 Rev. FRONT PANEL PARTS For Model: KUDD03DTPA3 (Panel−Ready) DRAWER DISHWASHER Illus. A DESCRIPTION 1 Literature Parts W10300220 Instructions, Installation W10275772 Energy Guide 2 Y912620 Screw 3 Intermediate Panel W10117988 Lower W10117987 Upper 4 W10117977 Control Panel (Includes User Interface) 5 99003716 Trim, Toe Kick 6 W10117969 Harness, User Interface 2−10 Litho in U.S.A. (cre) (eeb) 1 Part No. No.


