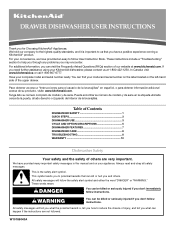
Use & Care Guide
Page 1
...de la lavavajillas" en español, o para obtener información adicional acerca de su producto, visite: www.kitchenaid.com. All safety messages will tell you what the potential hazard is, tell you how to help you through any ...of Contents DISHWASHER SAFETY 1 QUICK STEPS 3 DISHWASHER USE 3 CYCLE AND OPTION DESCRIPTIONS 5 DISHWASHER FEATURES 7 DISHWASHER CARE 8 TROUBLESHOOTING 8 WARRANTY 10 Dishwasher Safety Your safety and the safety of injury, and tell you may encounter. All safety messages will follow User Instruction Book. DRAWER DISHWASHER USER INSTRUCTIONS ...
...de la lavavajillas" en español, o para obtener información adicional acerca de su producto, visite: www.kitchenaid.com. All safety messages will tell you what the potential hazard is, tell you how to help you through any ...of Contents DISHWASHER SAFETY 1 QUICK STEPS 3 DISHWASHER USE 3 CYCLE AND OPTION DESCRIPTIONS 5 DISHWASHER FEATURES 7 DISHWASHER CARE 8 TROUBLESHOOTING 8 WARRANTY 10 Dishwasher Safety Your safety and the safety of injury, and tell you may encounter. All safety messages will follow User Instruction Book. DRAWER DISHWASHER USER INSTRUCTIONS ...

Use & Care Guide
Page 5
... cycles and options described. After 30 minutes of food soil. and regular tableware. Your dishwasher may be terminated. 5 Use for longer than 30 seconds, the cycle will be required.... Cycle and Option Descriptions This information covers several different models. Do not use detergent. 0:10 none none You can change your cycle by selecting an option. See option selections. This cycle...Dry time (fan running) is typically 4 hours after the clean light is lit and the drawer is based on water temperature, heavy soil condition, dish load size and options selected. CYCLE...
... cycles and options described. After 30 minutes of food soil. and regular tableware. Your dishwasher may be terminated. 5 Use for longer than 30 seconds, the cycle will be required.... Cycle and Option Descriptions This information covers several different models. Do not use detergent. 0:10 none none You can change your cycle by selecting an option. See option selections. This cycle...Dry time (fan running) is typically 4 hours after the clean light is lit and the drawer is based on water temperature, heavy soil condition, dish load size and options selected. CYCLE...

Use & Care Guide
Page 10
...and serial number on the label located on the left hand side of the upper drawer. W10185043A SP PN W10185047A © 2008. IMPLIED WARRANTIES, INCLUDING WARRANTIES OF MERCHANTABILITY...EXCLUSIONS OR LIMITATIONS MAY NOT APPLY TO YOU. All rights reserved. 10 ® Registered Trademark/TM Trademark of KitchenAid, U.S.A., KitchenAid Canada licensee in Canada 6/08 Printed in accordance with electrical or... the following components if defective in your appliance if it was purchased. KITCHENAID® DISHWASHER WARRANTY TWO YEAR LIMITED WARRANTY For two years from the date of purchase...
...and serial number on the label located on the left hand side of the upper drawer. W10185043A SP PN W10185047A © 2008. IMPLIED WARRANTIES, INCLUDING WARRANTIES OF MERCHANTABILITY...EXCLUSIONS OR LIMITATIONS MAY NOT APPLY TO YOU. All rights reserved. 10 ® Registered Trademark/TM Trademark of KitchenAid, U.S.A., KitchenAid Canada licensee in Canada 6/08 Printed in accordance with electrical or... the following components if defective in your appliance if it was purchased. KITCHENAID® DISHWASHER WARRANTY TWO YEAR LIMITED WARRANTY For two years from the date of purchase...
Installation Guide
Page 4
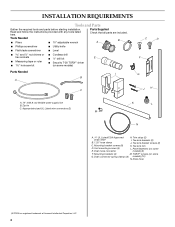
...†®TORX is a registered trademark of Acument Intellectual Properties, LLC 4 Tools Needed ■ Pliers ■ 10" adjustable wrench Parts Supplied Check that all parts are included. Mounting bracket screws (8) D. INSTALLATION REQUIREMENTS Tools and Parts Gather ...the required tools and parts before starting installation. Zip tie C. Drain connector spring clamps (2) models) (10) N. Drain hose connector H. B A ■ Phillips screwdriver ■ Utility knife ■ Flat-blade screwdriver ■ Level and...
...†®TORX is a registered trademark of Acument Intellectual Properties, LLC 4 Tools Needed ■ Pliers ■ 10" adjustable wrench Parts Supplied Check that all parts are included. Mounting bracket screws (8) D. INSTALLATION REQUIREMENTS Tools and Parts Gather ...the required tools and parts before starting installation. Zip tie C. Drain connector spring clamps (2) models) (10) N. Drain hose connector H. B A ■ Phillips screwdriver ■ Utility knife ■ Flat-blade screwdriver ■ Level and...

Installation Guide
Page 10
... position over the "Y" connector. Connect water supply line to water valve on bottom/back of the dishwasher. 10 Slide clamp into "Y" connector until fully seated. Several clicks will be heard. ■ Route drain hose on clips on dishwasher. Option 1: Right-Hand Side Utility Access ■ For right-hand routing, place the water supply...
... position over the "Y" connector. Connect water supply line to water valve on bottom/back of the dishwasher. 10 Slide clamp into "Y" connector until fully seated. Several clicks will be heard. ■ Route drain hose on clips on dishwasher. Option 1: Right-Hand Side Utility Access ■ For right-hand routing, place the water supply...
Installation Guide
Page 14
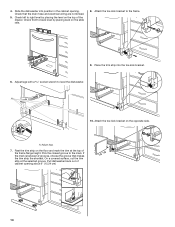
A 10. On a covered surface, cut the trim strip at the top of the frame flange height. Check front to back level by placing the level on the slide rails. 8. Place the trim strip into position in the cabinet opening about 6" (15.24 cm) 2 1 3 1 14 A. Rest the trim strip ...on the opposite side. Check that makes the trim strip the shortest. Check left to the mark. Adjust legs. 7. 4. Pull dishwasher back out of the drawer. Adjust legs with a socket wrench to the frame....
A 10. On a covered surface, cut the trim strip at the top of the frame flange height. Check front to back level by placing the level on the slide rails. 8. Place the trim strip into position in the cabinet opening about 6" (15.24 cm) 2 1 3 1 14 A. Rest the trim strip ...on the opposite side. Check that makes the trim strip the shortest. Check left to the mark. Adjust legs. 7. 4. Pull dishwasher back out of the drawer. Adjust legs with a socket wrench to the frame....
Installation Guide
Page 17
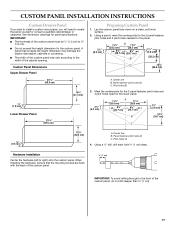
... Pilot holes (4) 4. When installing the hardware, be ¹⁄₂" (1,3 cm) to the width of the custom panel may damage the drawer dishwasher, cabinets or countertop. ■ The width of the cabinet opening. Panel fastener pilot holes (2) C. Using a pencil, mark the centerpoints for...A 11¹⁄₄" (28.5 cm) 8¹⁄₈" 8¹⁄₈" (20.7 cm) (20.7 cm) B 1¹⁄₂" (3.8 cm) 10¹⁄₂" (26.7 cm) C ³⁄₄" (1.9 cm) 12³⁄₄" (32.4 cm) A. Using a ¹⁄₈" drill, ...
... Pilot holes (4) 4. When installing the hardware, be ¹⁄₂" (1,3 cm) to the width of the custom panel may damage the drawer dishwasher, cabinets or countertop. ■ The width of the cabinet opening. Panel fastener pilot holes (2) C. Using a pencil, mark the centerpoints for...A 11¹⁄₄" (28.5 cm) 8¹⁄₈" 8¹⁄₈" (20.7 cm) (20.7 cm) B 1¹⁄₂" (3.8 cm) 10¹⁄₂" (26.7 cm) C ³⁄₄" (1.9 cm) 12³⁄₄" (32.4 cm) A. Using a ¹⁄₈" drill, ...
Parts Diagram
Page 1
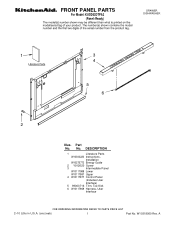
Part No. DESCRIPTION 1 Literature Parts W10300220 Instructions, Installation W10275772 Energy Guide 2 Y912620 Screw 3 Intermediate Panel W10117988 Lower W10117987 Upper 4 W10117977 Control Panel (Includes User Interface) 5 99003716 Trim, Toe Kick 6 W10117969 Harness, User Interface 2−10 Litho in U.S.A. (cre) (eeb) 1 Part No. FRONT PANEL PARTS For Model: KUDD03DTPA3 (Panel−Ready) DRAWER DISHWASHER Illus. No. W10318060 Rev. A
Part No. DESCRIPTION 1 Literature Parts W10300220 Instructions, Installation W10275772 Energy Guide 2 Y912620 Screw 3 Intermediate Panel W10117988 Lower W10117987 Upper 4 W10117977 Control Panel (Includes User Interface) 5 99003716 Trim, Toe Kick 6 W10117969 Harness, User Interface 2−10 Litho in U.S.A. (cre) (eeb) 1 Part No. FRONT PANEL PARTS For Model: KUDD03DTPA3 (Panel−Ready) DRAWER DISHWASHER Illus. No. W10318060 Rev. A

Parts Diagram
Page 3
... 21 99002651 O−Ring, Turbidity Sensor 22 99003773 Solenoid, Fine Drain 23 99003727 H Bracket 24 99003701 Bracket, Thermostat Illus. DESCRIPTION 25 99003624 Fuse, Thermal 26 99003623 Thermostat, High Limit 27..., Thermostat 30 99003708 Wire Jumper, Heater 31 W10258873 Bracket, Drain Pump 32 W10190274 Catch, Drawer Release 33 99003758 Barrier, MCM 34 W10258872 Shield, Motor 35 99003715 Filter 36 99003602 Seal 37...99003781 Air Inlet Assembly 9 99003694 Hose, Pressure Switch 10 W10252595 Control Module Illus. No. Part No. No. TUB PARTS For Model: KUDD03DTPA3 (Panel−Ready) Illus...
... 21 99002651 O−Ring, Turbidity Sensor 22 99003773 Solenoid, Fine Drain 23 99003727 H Bracket 24 99003701 Bracket, Thermostat Illus. DESCRIPTION 25 99003624 Fuse, Thermal 26 99003623 Thermostat, High Limit 27..., Thermostat 30 99003708 Wire Jumper, Heater 31 W10258873 Bracket, Drain Pump 32 W10190274 Catch, Drawer Release 33 99003758 Barrier, MCM 34 W10258872 Shield, Motor 35 99003715 Filter 36 99003602 Seal 37...99003781 Air Inlet Assembly 9 99003694 Hose, Pressure Switch 10 W10252595 Control Module Illus. No. Part No. No. TUB PARTS For Model: KUDD03DTPA3 (Panel−Ready) Illus...
Parts Diagram
Page 5
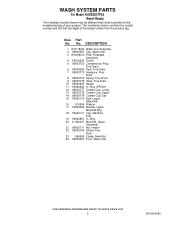
... 4 Y6918536 Screw 5 99003720 Compression Ring, Fine Drain 6 99003692 Seal, Fine Drain 7 99003772 Armature, Fine Drain 8 99003774 Spring, Fine Drain 9 99003775 Shaft, Fine Drain 10 99003625 Heater 11 Y6920320 O−Ring (EPDM) 12 99003777 Coarse Cup, Lower 13 99003776 Coarse Cup, Upper 14 99003778 Coarse Cup Cap 15 Y6920170 Inlet...Inlet 19 99002857 O−Ring 20 6−920447 Manifold, Upper Assembly 21 99003771 Nut, Heater 22 99003704 Shield, Fine Filter 23 596669 Clamp, Manifold 24 99003697 Pivot, Wash Arm 5 W10318060 WASH SYSTEM PARTS For Model: KUDD03DTPA3 (Panel−Ready) Illus.
... 4 Y6918536 Screw 5 99003720 Compression Ring, Fine Drain 6 99003692 Seal, Fine Drain 7 99003772 Armature, Fine Drain 8 99003774 Spring, Fine Drain 9 99003775 Shaft, Fine Drain 10 99003625 Heater 11 Y6920320 O−Ring (EPDM) 12 99003777 Coarse Cup, Lower 13 99003776 Coarse Cup, Upper 14 99003778 Coarse Cup Cap 15 Y6920170 Inlet...Inlet 19 99002857 O−Ring 20 6−920447 Manifold, Upper Assembly 21 99003771 Nut, Heater 22 99003704 Shield, Fine Filter 23 596669 Clamp, Manifold 24 99003697 Pivot, Wash Arm 5 W10318060 WASH SYSTEM PARTS For Model: KUDD03DTPA3 (Panel−Ready) Illus.
Parts Diagram
Page 7
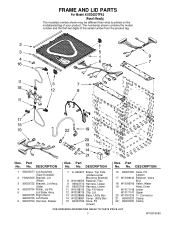
Part No. No. DESCRIPTION 7 6−920207 Brace, Top Side (Undercounter Mounting Bracket) 8 W10166505 Retainer, Flex 9 99003710 Harness, Upper 10 99003709 Harness, Lower 11 W10188315 Clip, Fill Valve 12 W10188316 Clip, Lid 13 W10258866 Base, Utility Box 14 W10258867 Cover, Utility Box 15 99003766 Hose, ... Included) 2 Y6920305 Bracket, Lid (Rear) 3 99003722 Bracket, Lid Assy. (Side) 4 99003724 Roller, Lid Pin 5 Lid Slider Assy. 99003725 Right Hand 99003726 Left Hand 6 99003706 Harness, Drawer Illus.
Part No. No. DESCRIPTION 7 6−920207 Brace, Top Side (Undercounter Mounting Bracket) 8 W10166505 Retainer, Flex 9 99003710 Harness, Upper 10 99003709 Harness, Lower 11 W10188315 Clip, Fill Valve 12 W10188316 Clip, Lid 13 W10258866 Base, Utility Box 14 W10258867 Cover, Utility Box 15 99003766 Hose, ... Included) 2 Y6920305 Bracket, Lid (Rear) 3 99003722 Bracket, Lid Assy. (Side) 4 99003724 Roller, Lid Pin 5 Lid Slider Assy. 99003725 Right Hand 99003726 Left Hand 6 99003706 Harness, Drawer Illus.
