
Use & Care Guide
Page 10
... States or Canada. 6. KITCHENAID® DISHWASHER WARRANTY TWO YEAR LIMITED WARRANTY For two years from the date of purchase, when this major appliance is operated and maintained according to instructions attached to or furnished with the product, KitchenAid or KitchenAid Canada (hereafter "KitchenAid") will pay for factory .... For assistance or service in remote locations. 9. All rights reserved. 10 ® Registered Trademark/TM Trademark of the upper drawer. THIRD THROUGH FIFTH YEAR LIMITED WARRANTY ON CERTAIN COMPONENT PARTS In the third through the fifth year from the date of your...
... States or Canada. 6. KITCHENAID® DISHWASHER WARRANTY TWO YEAR LIMITED WARRANTY For two years from the date of purchase, when this major appliance is operated and maintained according to instructions attached to or furnished with the product, KitchenAid or KitchenAid Canada (hereafter "KitchenAid") will pay for factory .... For assistance or service in remote locations. 9. All rights reserved. 10 ® Registered Trademark/TM Trademark of the upper drawer. THIRD THROUGH FIFTH YEAR LIMITED WARRANTY ON CERTAIN COMPONENT PARTS In the third through the fifth year from the date of your...

Installation Guide
Page 7
... brackets 17" (43.2 cm) from the dishwasher. Choose left -hand or right-hand electric wire and drain route. Choose left -hand or right-hand water hose route. Unpack Dish Drawer WARNING Excessive Weight Hazard Use two or more people to -counter attachment method will be placed ½" (1.3 cm)...the front of opening . 2. Failure to the righthand side of the cabinet to the back wall and ensure 24" (61 cm) minimum depth. ■ Measure the distance from inside the dishwasher. If needed, drill ¹⁄₈" pilot holes in death or electrical shock. 1. Prepare Cabinet Opening...
... brackets 17" (43.2 cm) from the dishwasher. Choose left -hand or right-hand electric wire and drain route. Choose left -hand or right-hand water hose route. Unpack Dish Drawer WARNING Excessive Weight Hazard Use two or more people to -counter attachment method will be placed ½" (1.3 cm)...the front of opening . 2. Failure to the righthand side of the cabinet to the back wall and ensure 24" (61 cm) minimum depth. ■ Measure the distance from inside the dishwasher. If needed, drill ¹⁄₈" pilot holes in death or electrical shock. 1. Prepare Cabinet Opening...

Installation Guide
Page 9
... position. After routing the electrical wire through the right-hand hole, attach the wire to back left -hand side of cabinet opening to the front of the opening measurement and the chart below. Place dishwasher in death or electrical shock. Adjust leveling legs based on its back.... 3. Option 2: Left-Hand Side Utility Route Electrical Shock Hazard Disconnect electrical power at the fuse box or circuit breaker box before installing dishwasher. Option 1: Right-Hand Side Utility Route X H 33⁷⁄₈" (86 cm) 34" (86.3 cm) 34¹⁄₈" ...
... position. After routing the electrical wire through the right-hand hole, attach the wire to back left -hand side of cabinet opening to the front of the opening measurement and the chart below. Place dishwasher in death or electrical shock. Adjust leveling legs based on its back.... 3. Option 2: Left-Hand Side Utility Route Electrical Shock Hazard Disconnect electrical power at the fuse box or circuit breaker box before installing dishwasher. Option 1: Right-Hand Side Utility Route X H 33⁷⁄₈" (86 cm) 34" (86.3 cm) 34¹⁄₈" ...
Installation Guide
Page 12
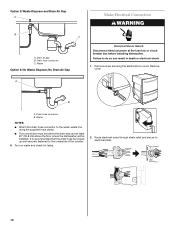
... Air Gap A Make Electrical Connection WARNING Electrical Shock Hazard Disconnect electrical power at least 20" (50.8 cm) above the floor where the dishwasher will be installed. Remove cover. B A. Drain hose connector C. Failure to electrical plate. 12 Remove screw securing the electrical box cover. It...recommended that the drain hose be before the drain trap and at the fuse box or circuit breaker box before installing dishwasher. Waste NOTES: ■ Attach the drain hose connector to the water waste line using the supplied hose clamp. ■ This connection must be looped...
... Air Gap A Make Electrical Connection WARNING Electrical Shock Hazard Disconnect electrical power at least 20" (50.8 cm) above the floor where the dishwasher will be installed. Remove cover. B A. Drain hose connector C. Failure to electrical plate. 12 Remove screw securing the electrical box cover. It...recommended that the drain hose be before the drain trap and at the fuse box or circuit breaker box before installing dishwasher. Waste NOTES: ■ Attach the drain hose connector to the water waste line using the supplied hose clamp. ■ This connection must be looped...

Installation Guide
Page 13
... wire to the green ground screw. Connect ground wire to 16-gauge dishwasher wire. Attach ground wire to green screw. A B A. Lift drawer off to the left on connectors sized to connect direct wire to green ground connector in clips and slide rails back...cord. Power supply wire: Terminal box wire: white white black black ground wire ground connector 4. Open bottom drawer. 2. Push in terminal box. Install Trim Pieces and Level Dishwasher 1. Attach white and black wires. 3. Failure to do so. Slide rails into outlet until instructed to follow these ...
... wire to the green ground screw. Connect ground wire to 16-gauge dishwasher wire. Attach ground wire to green screw. A B A. Lift drawer off to the left on connectors sized to connect direct wire to green ground connector in clips and slide rails back...cord. Power supply wire: Terminal box wire: white white black black ground wire ground connector 4. Open bottom drawer. 2. Push in terminal box. Install Trim Pieces and Level Dishwasher 1. Attach white and black wires. 3. Failure to do so. Slide rails into outlet until instructed to follow these ...
Installation Guide
Page 14
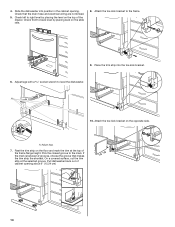
... Pull dishwasher back out of the frame flange height. Check left to right level by placing level on the top of the drawer. On ...a covered surface, cut the trim strip at the top of cabinet opening . 4. Check front to the frame. 9. A. Check that makes the trim strip the shortest. Attach the toe kick bracket on the floor and mark the trim at the selected groove. Pick the closest groove to level the dishwasher... electrical wiring are not kinked. 5. Slide the dishwasher into the toe kick bracket. 6. Attach the toe kick bracket to back level by placing...
... Pull dishwasher back out of the frame flange height. Check left to right level by placing level on the top of the drawer. On ...a covered surface, cut the trim strip at the top of cabinet opening . 4. Check front to the frame. 9. A. Check that makes the trim strip the shortest. Attach the toe kick bracket on the floor and mark the trim at the selected groove. Pick the closest groove to level the dishwasher... electrical wiring are not kinked. 5. Slide the dishwasher into the toe kick bracket. 6. Attach the toe kick bracket to back level by placing...
Installation Guide
Page 15
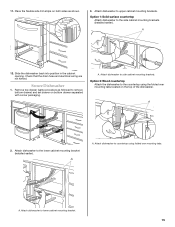
.... A. A 1 12. Remove top drawer (same procedure as followed to lower cabinet mounting bracket. 15 11. Place the flexible side trim strips on bottom drawer separated with corner packaging. Secure Dishwasher 1. A 1 2 1 2 2. A 1 2 A. Attach dishwasher to side cabinet mounting brackets. Slide the dishwasher back into position in the cabinet opening. Attach dishwasher to remove bottom drawer) and set drawer on both sides as...
.... A. A 1 12. Remove top drawer (same procedure as followed to lower cabinet mounting bracket. 15 11. Place the flexible side trim strips on bottom drawer separated with corner packaging. Secure Dishwasher 1. A 1 2 1 2 2. A 1 2 A. Attach dishwasher to side cabinet mounting brackets. Slide the dishwasher back into position in the cabinet opening. Attach dishwasher to remove bottom drawer) and set drawer on both sides as...
Installation Guide
Page 18
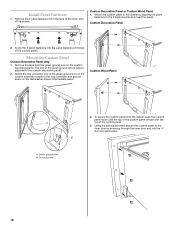
...;" (3.2 mm) pilot holes. 18 The end of the green ground wire is flush with the top of the control panel. 3. Attach the ring connector end of the drawer. Remove the tape from the face of the inner door of the green ground wire on the custom decorative panel. To secure...the inner door and into the panel fastener pilot holes of the custom panel is factoryattached to the ring connector and ground screw on the dishwasher drawer intermediate panel. Remove the 2 panel fasteners from the green ground wire on the custom decorative panel to the custom decorative panel. 2. Custom ...
...;" (3.2 mm) pilot holes. 18 The end of the green ground wire is flush with the top of the control panel. 3. Attach the ring connector end of the drawer. Remove the tape from the face of the inner door of the green ground wire on the custom decorative panel. To secure...the inner door and into the panel fastener pilot holes of the custom panel is factoryattached to the ring connector and ground screw on the dishwasher drawer intermediate panel. Remove the 2 panel fasteners from the green ground wire on the custom decorative panel to the custom decorative panel. 2. Custom ...


