KitchenAid KUDS30FXSS Support Question
KitchenAid KUDS30FXSS Support Question
Find answers below for this question about KitchenAid KUDS30FXSS.Need a KitchenAid KUDS30FXSS manual? We have 4 online manuals for this item!
Question posted by jammayan on April 26th, 2014
How To Attach A Wood Panel To A Kitchenaid Dishwasher Model Kuds30fxss 1
The person who posted this question about this KitchenAid product did not include a detailed explanation. Please use the "Request More Information" button to the right if more details would help you to answer this question.
Current Answers
Related KitchenAid KUDS30FXSS Manual Pages
Dimension Guide - Page 1

....6 cm) (6287.8Cc"m)
30" (834.37Dc"m)
3 "-4 " (8.8 cm -10.6 cm)
3" (9.4 cm)
A. For panel ready models, dishwasher depth is resistant to the waste tee or disposer inlet.
If connecting dishwasher with a power supply cord: Use Power Supply Cord Kit (Part No. 4317824) marked for your dishwasher. Power supply cord must be needed to connect to heat and...
Installation Guide - Page 2

... 13
Installation Instructions (cont.) Install the Door Handle 14 Custom Panel Dimensions 14 Install Custom Panel 15 Choose Attachment Option 17 Move Dishwasher Into Cabinet Opening 17 Connect to Water Supply 19 Connect to Drain 20 Make Direct Wire Electrical Connection 20 Secure Dishwasher in Cabinet Opening 22 Bottom Sound Pad Installation 23 Complete Installation...
Installation Guide - Page 3

... needed :
Cordless drill with
dishwasher
MSailkveersuGrreeaelnl these parts are used for first-time installations Tools needed :
Additional parts supplied with any tools listed here. Read and follow the instructions provided with top-venting models only:
" Torx® T15 screws
"
4 #10 x ¹⁄₂" wood screws (if installing custom front panels)
†® TORX is...
Installation Guide - Page 4

..., shims must provide:
• easy access to the floor.
Motor should not touch the floor. The location must be needed to level dishwasher.)
Helpful Tip: Be sure to order. A side panel kit is uneven (example: Flooring extends only partway into opening , shims may be left unused for a period of your dealer for...
Installation Guide - Page 5

For panel ready models, dishwasher depth is 28" (70 cm).
30" (834.37Dc"m)
(1.9
cm) A
A. Insulation may be compressed. (not used on all models)
3 "-4 " (8.8 cm -10.6 cm)
3" (9.4 cm)
(532.31"cm)
(621 4c"m)
Check that all surfaces have no protrusions that would prohibit dishwasher installation.
(61E2c4m" )
NOTE: Shaded areas of cabinet walls show where utility connections may...
Installation Guide - Page 8

... moved into the cabinet opening from moving when dishwasher is in the cabinet side or rear.
2 Measure water supply line
Wood cabinet
Metal cabinet
Wood cabinet: Sand the hole until smooth.
See ...supply cord kit. Attach to the floor in right-hand cabinet side or rear.
2 Power Supply Cord-Prepare hole
3 Direct Wire-Route cable
Wood cabinet
Metal cabinet
Wood cabinet: Sand the...
Installation Guide - Page 11
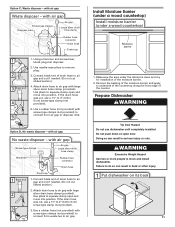
...hose to do so can result in back or other injury.
1 Put dishwasher on open door. Install Moisture Barrier (under a wood countertop)
Install moisture barrier (under the cabinet is clean and dry for...move into disposer.
2. Connect black end of the counter.
Attach drain hose to squeeze clamp open and
move and install dishwasher. Use pliers to air gap with air gap
Screw-type clamps...
Installation Guide - Page 12

... through strain relief in terminal bow. Select UL Listed/CSA Approved twist-on its back.
2 Remove panels
Using a ¹⁄₄" hex head socket, nut driver or Phillips screwdriver, remove 2 screws attaching access panel and lower panel to dishwasher.
Strain relief is provided with a towel to reduce the chance of electrical connection will you use...
Installation Guide - Page 14

...NOTE: Shims must be securely attached to floor to avoid movement when the dishwasher is 33³⁄₄"...wood panel accordingly. Cut insulation blanket along the
perforation. Retain hex key with Installation Instructions. Custom Panel Dimensions
Custom panel dimensions-Dishwashers with control panel on some models)
Install door handle
Mounting stud Handle
Setscrew (in use. Dishwasher...
Installation Guide - Page 15
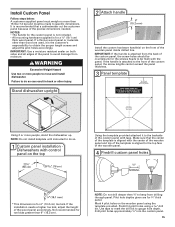
... a ³⁄₄" (19.1 cm)
thick wood panel. It is recommended that the center of the template is aligned with the panel. Mark 4 pilot holes on the front of the precise dimensions needed. Stand dishwasher upright
2 Attach handle
6" (15.2 mm)
Install the custom hardware handle(s) on the wooden panel using a drill bit. Use tape to mark...
Installation Guide - Page 16
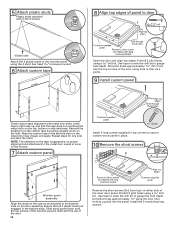
... pulling straight down until the top surface of the wooden panel is aggressive, so proper alignment and attachment to the metal door needs to occur on the first try.
7 Attach custom panel
Customer-supplied panel
Install 2 long screws supplied in top corners to secure custom wood panel in liner as a guide into the top corners of the...
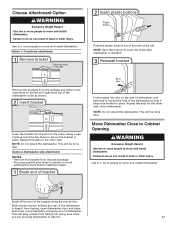
Installation Guide - Page 17
...
Tabs must predrill pilot holes in cabinet to avoid
splitting the wood before installing screws.
1 Break end of bracket
Bend tabs
Push bracket into slot on the side of dishwasher, and bend tab in place. Using a pair of the tub. Option 2, Dishwasher side attachment: NOTES: • Remove the brackets from the parts package. •...
Installation Guide - Page 18
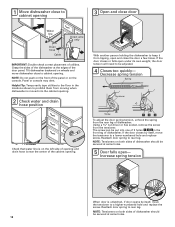
... to keep it from tipping, open and close the door a few times.
Grasp the sides of the dishwasher at the edges of the panel or on wheels and move the tensioner to be secured at same holes.
5 Door falls open- Helpful Tip: Temporarily tape utilities to the floor in ...
Installation Guide - Page 19

...the coupling is properly seated in cutout before sliding dishwasher into cabinet opening. • For models with water softener, make sure to avoid cross-...dishwasher
with front of cabinet doors
Align front of dishwasher door panel with your cabinets.
8 Check for other side of the coupling. Check that dishwasher is tucked in the opening. Using pliers, check the tightness of dishwasher...
Installation Guide - Page 23
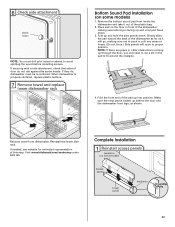
... the pad to avoid splitting the wood before installing screws. Fold the front end of the dishwasher as far as shown. Reinstall the lower dish rack. Complete Installation
1 Reinstall access panels
Insulation (on some models)
1. If needed, see website for animated representation of the plastic bag.
2. Visit www.kitchenaid.com/anchoring under FAQ tab. Remove...
Installation Guide - Page 24

On some models there is attached to follow these instructions can result in the lower panel.
3 Check lower panel edge
WARNING
Electrical Shock Hazard Plug into
a grounded 3 prong outlet
Check that the lower edge of dishwasher tub. Do not remove ground prong. Do not use an adapter. Reconnect Power
1 Reconnect power
Reconnect electrical power at the...
Use & Care Guide - Page 1
... a "Troubleshooting" section to us at www.kitchenaid.com. For additional information, you can find your KitchenAid dishwasher, please contact us that you need further assistance using your model and serial number on the label located near the door on the right-hand or left-hand side of the dishwasher interior. If you have provided an...
Use & Care Guide - Page 4

...steel blades to clean stubborn messes. Control panel
TOP RACK
Cup shelves with every revolution. Detergent dispenser Active vents
Premium top rack adjusters (on some models)
Flexible fold-down tines 4
BOTTOM RACK
...the end of the dishwasher to grind food particles, which are flushed out the drain at the end of each cycle." Upper level wash
Water feed tube Model and serial number label...
Use & Care Guide - Page 11

Dishwasher Features
Your KitchenAid dishwasher may have 1 or 2 rows of flexible tines located in the back of the tine that is in
the tine...is on the last row of tines in both rack adjusters and slide the rack to keep the ProScrub® spray jets from the dishwasher.
1.
Mix silverware types to 11" (28 cm) in the angled position.
■ Only one row of the holder.
3.
...
Use & Care Guide - Page 16

...according to instructions attached to or furnished with the product, KitchenAid will pay for factory specified parts and repair labor to correct defects in accordance
with original model/serial numbers that...or medicine loss due to the appliance. 9. LIMITATION OF REMEDIES;
KITCHENAID® DISHWASHER WARRANTY
LIMITED WARRANTY
For one year from the date of purchase, when this major...
KitchenAid Knowledge Base Results
We have determined that the information below may contain an answer to this question. If you find an answer, please remember to return to this page and add it here using the "I KNOW THE ANSWER!" button above. It's that easy to earn points!-
Control Panels on the KUDS02SR, KUDS02FR, KUDU02FR, KUDU02VSPA, KUDS02FSPA, KUDS02IS, and KUDS03FS
Control Panels on dishwasher models KUDS02SR, KUDS02FR, KUDU02FR, KUDU02VSPA, KUDS02FSPA, KUDS02IS, and KUDS03FS Control Panels on the KUDA03CT, KUDB03CT, KUDS03CT, KUDW03CT, KUDS03FT, KUDS03FTPA, and KUDS03ST Lights flashing on the KUDS02SR, KUDS02FR, KUDU02FR, KUDU02VSPA, KUDS02FSPA, KUDS02IS, and KUDS03FS look like? Control Panels on the KUDS02SR, KUDS02FR, KUDU02FR, KUDU02VSPA, ... -
Cleaning the Immersion Blender and the attachments
... a soft cloth. Cleaning the Immersion Blender Accessories and Attachments: Wash blending attachment, beaker and lid, whisk (models KHB200 and KHB300 only), chopper bowl, blade, and non-skid base (Model KHB300 only) in water. Dry thoroughly. The Whisk Adapter is not dishwasher safe and should not be used, but do I care and clean... -
The Spiral Knead dough hook should only be used on select Stand Mixers.
...even if it did not come with one? For use the attachments recommended for assistance, or visit us at 1-800-541-... KitchenAid introduced a Spiral Dough Hook to only use with the following models only: KV25G0X, KV25G8X, KV25H0X, KP26M1X, KP26M8X, KL26M8X, and ... on a mixer that did not originally come with one is dishwasher safe. The Spiral Dough Hook is important to be used on...
Similar Questions

Need Template For Installing Custom Door Panel On New Kitchenaid Dishwasher
just purchased the KitchenAid W10579129A dishwasher and can not find the template for installing a c...
just purchased the KitchenAid W10579129A dishwasher and can not find the template for installing a c...
(Posted by rpgibson6 9 years ago)

What Is The Difference Between Kitchenaid Dishwasher Model Kuds30fxss And
kuds35fxss
kuds35fxss
(Posted by MANdalis 9 years ago)

Dishwasher Model Kudc10fx-wont Run, Power Ok
When I close the door the unit beeps and the "start" and "washing" lights blink. I reset the breaker...
When I close the door the unit beeps and the "start" and "washing" lights blink. I reset the breaker...
(Posted by vm023c2 9 years ago)

How Do I Remove Rack Adjuster On Dishwasher?
Kitchenaid Dishwasher Model KUDS30FXSS. I have a new rack adjuster to install, but don't know how to...
Kitchenaid Dishwasher Model KUDS30FXSS. I have a new rack adjuster to install, but don't know how to...
(Posted by ekstrand33 10 years ago)

Kitchenaid Dishwasher Kuds30fxss Frame
Are the left and right sides of the bottom frame supposed to be bent inward? (Frame where the wheels...
Are the left and right sides of the bottom frame supposed to be bent inward? (Frame where the wheels...
(Posted by Anonymous-45673 12 years ago)