Use and Care Guide
Page 3
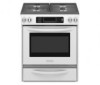
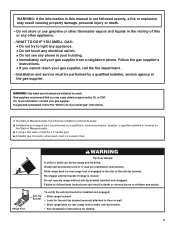
RANGE SAFETY Your safety and the safety of this or any other appliance. - WARNING You can be detected by UL or CSA. WARNING: If the information in the vicinity of others . Do not store or use gasoline or other reproductive harm. 3 Follow the gas supplier's instructions. • If you don..., contact your appliance. This symbol alerts you to cause birth defects or other flammable vapors and liquids in this manual and on your gas supplier. For more chemicals known to light any appliance. • Do not touch any phone in this manual is the safety alert symbol...
RANGE SAFETY Your safety and the safety of this or any other appliance. - WARNING You can be detected by UL or CSA. WARNING: If the information in the vicinity of others . Do not store or use gasoline or other reproductive harm. 3 Follow the gas supplier's instructions. • If you don..., contact your appliance. This symbol alerts you to cause birth defects or other flammable vapors and liquids in this manual and on your gas supplier. For more chemicals known to light any appliance. • Do not touch any phone in this manual is the safety alert symbol...

Use and Care Guide
Page 7
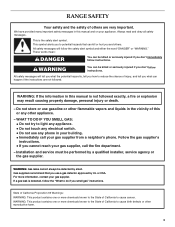
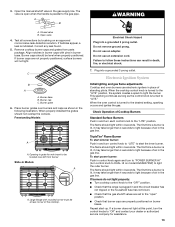
... not hear the igniter click, turn knob counterclockwise to LITE. Models with Natural gas. Do not operate a burner while using large pots and pans. If the burner does not ignite, listen for standard ranges. Check that the burner has lit. R Lo PHiOWEMeRdBURNE NOTE: Settings are necessary... Only the simmer burner with the control knob turned to Lite will produce a flame. 2. IMPORTANT: Your cooktop is included with your new range. If the wall receptacle does not provide correct polarity, the igniters will produce a flame. 2. See the Installation Instructions for use or (on...
... not hear the igniter click, turn knob counterclockwise to LITE. Models with Natural gas. Do not operate a burner while using large pots and pans. If the burner does not ignite, listen for standard ranges. Check that the burner has lit. R Lo PHiOWEMeRdBURNE NOTE: Settings are necessary... Only the simmer burner with the control knob turned to Lite will produce a flame. 2. IMPORTANT: Your cooktop is included with your new range. If the wall receptacle does not provide correct polarity, the igniters will produce a flame. 2. See the Installation Instructions for use or (on...
Use and Care Guide
Page 9
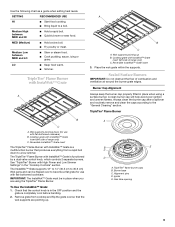
...■ Quickly brown or sear food. Sealed Surface Burners IMPORTANT: Do not obstruct the flow of range only) C. TripleTier® Flame Burner B C A. Cooktop grate with InstaWok™ Grate is in ...cap will help avoid poor ignition and uneven flames. The InstaWok™ Grate supports 12" to 14" (30.5 cm to 35.6 cm) Wok pans and can be in the OFF position and the grate is completely ...the wok supports are using a surface burner. TripleTier® flame burner caps B. Igniter E. Gas tube opening 9 Use the following chart as a guide when setting heat levels. Wok supports ...
...■ Quickly brown or sear food. Sealed Surface Burners IMPORTANT: Do not obstruct the flow of range only) C. TripleTier® Flame Burner B C A. Cooktop grate with InstaWok™ Grate is in ...cap will help avoid poor ignition and uneven flames. The InstaWok™ Grate supports 12" to 14" (30.5 cm to 35.6 cm) Wok pans and can be in the OFF position and the grate is completely ...the wok supports are using a surface burner. TripleTier® flame burner caps B. Igniter E. Gas tube opening 9 Use the following chart as a guide when setting heat levels. Wok supports ...
Use and Care Guide
Page 16
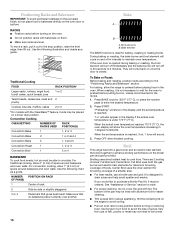
...meat and 2 poultry Cookies, biscuits, muffins, cakes 2 or 3 *On models with aluminum foil for the oven to preheat before placing food in 30 seconds to 2 minutes. Bake element The BAKE function is designed to drain juices and help avoid spatter and smoke. During baking or roasting, the ... ON RACK OF PAN(S) 1 Center of a smaller area. ■ For best results, use a broiler pan and grid. Broil This range has both the gas burner and electric halo elements for baking, roasting or heating foods. Broiling uses direct radiant heat to the "Positioning Racks and Bakeware" section....
...meat and 2 poultry Cookies, biscuits, muffins, cakes 2 or 3 *On models with aluminum foil for the oven to preheat before placing food in 30 seconds to 2 minutes. Bake element The BAKE function is designed to drain juices and help avoid spatter and smoke. During baking or roasting, the ... ON RACK OF PAN(S) 1 Center of a smaller area. ■ For best results, use a broiler pan and grid. Broil This range has both the gas burner and electric halo elements for baking, roasting or heating foods. Broiling uses direct radiant heat to the "Positioning Racks and Bakeware" section....
Use and Care Guide
Page 24
.... Replace the fuse or reset the circuit breaker. Surface burners will make a single pop when it all the way. 3. Turn on the slides. Burner sparks but does not light ■ Is there continuous sparking, but the burner does not light? See the Installation Instructions. 3. Holding...cm) outside the cooking area. WARNING Surface burner makes popping noises ■ Is the burner wet? See "Sealed Surface Burners" section. 24 Gas range noises during Bake and Broil operations Noises that may have been used ? Do not use an adapter. Surface burner flames are normal operational noises...
.... Replace the fuse or reset the circuit breaker. Surface burners will make a single pop when it all the way. 3. Turn on the slides. Burner sparks but does not light ■ Is there continuous sparking, but the burner does not light? See the Installation Instructions. 3. Holding...cm) outside the cooking area. WARNING Surface burner makes popping noises ■ Is the burner wet? See "Sealed Surface Burners" section. 24 Gas range noises during Bake and Broil operations Noises that may have been used ? Do not use an adapter. Surface burner flames are normal operational noises...
Use and Care Guide
Page 25
... set ? This information will help , follow the instructions below. See "Sabbath Mode" Section. The range might have been converted improperly. See "Oven Temperature Calibration - Clear the display. If it reappears, ... will fit right and work right because they are yellow or noisy ■ Is propane gas being used ? Cooling fan runs during a convection function will stop the fan. See "... aluminum foil to your appliance. It may save you still need help us or your nearest KitchenAid designated service center. 25 See "Control Lock" section. ■ On some models, is ...
... set ? This information will help , follow the instructions below. See "Sabbath Mode" Section. The range might have been converted improperly. See "Oven Temperature Calibration - Clear the display. If it reappears, ... will fit right and work right because they are yellow or noisy ■ Is propane gas being used ? Cooling fan runs during a convection function will stop the fan. See "... aluminum foil to your appliance. It may save you still need help us or your nearest KitchenAid designated service center. 25 See "Control Lock" section. ■ On some models, is ...
Use and Care Guide
Page 27
... EXCLUDED FROM WARRANTY This limited warranty does not cover: 1. Dealer name Address Phone number Model number Serial number Purchase date 27 KITCHENAID® GAS RANGE WARRANTY LIMITED WARRANTY For one year from the date of purchase, when this major appliance is contrary to published user or operator ..., unless such damage results from defects in materials or workmanship and is not installed in an inaccessible location or is reported to KitchenAid within 30 days from the date of your major appliance, to replace or repair house fuses, or to determine if another warranty applies. ...
... EXCLUDED FROM WARRANTY This limited warranty does not cover: 1. Dealer name Address Phone number Model number Serial number Purchase date 27 KITCHENAID® GAS RANGE WARRANTY LIMITED WARRANTY For one year from the date of purchase, when this major appliance is contrary to published user or operator ..., unless such damage results from defects in materials or workmanship and is not installed in an inaccessible location or is reported to KitchenAid within 30 days from the date of your major appliance, to replace or repair house fuses, or to determine if another warranty applies. ...
Installation Instructions
Page 2
...Verify Anti-Tip Bracket Is Installed and Engaged 11 Level Range 11 Make Gas Connection 12 Electronic Ignition System 13 Replace Oven Racks and Warming or Storage Drawer 15 Complete Installation 15 GAS CONVERSIONS 16 LP Gas Conversion 16 Natural Gas Conversion 18 TABLE DES MATIÈRES SÉCURITÉ...ballage de la cuisinière 29 Mesures pour une hauteur appropriée 29 Réglage des pieds de nivellement 30 Installation de la bride antibasculement 30 Retrait du tiroir-réchaud ou du tiroir de remisage 31 Vérifier que la bride anti-basculement est bien install...
...Verify Anti-Tip Bracket Is Installed and Engaged 11 Level Range 11 Make Gas Connection 12 Electronic Ignition System 13 Replace Oven Racks and Warming or Storage Drawer 15 Complete Installation 15 GAS CONVERSIONS 16 LP Gas Conversion 16 Natural Gas Conversion 18 TABLE DES MATIÈRES SÉCURITÉ...ballage de la cuisinière 29 Mesures pour une hauteur appropriée 29 Réglage des pieds de nivellement 30 Installation de la bride antibasculement 30 Retrait du tiroir-réchaud ou du tiroir de remisage 31 Vérifier que la bride anti-basculement est bien install...
Installation Instructions
Page 3
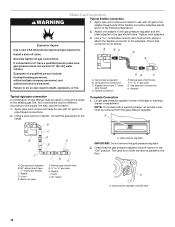
... installation instructions. Install anti-tip bracket to floor or wall. • Slide range back so rear range foot is detected, follow these instructions can tip the range and be a T-handle type. ■ A flexible gas connector, when used, must be performed by a qualified or licensed contractor,... In the State of this manual is installed and engaged: • Slide range forward. • Look for details. 3 Slide range back so rear range foot is moved. For more information, contact your gas supplier. Range Foot WARNING Tip Over Hazard A child or adult can result in the ...
... installation instructions. Install anti-tip bracket to floor or wall. • Slide range back so rear range foot is detected, follow these instructions can tip the range and be a T-handle type. ■ A flexible gas connector, when used, must be performed by a qualified or licensed contractor,... In the State of this manual is installed and engaged: • Slide range forward. • Look for details. 3 Slide range back so rear range foot is moved. For more information, contact your gas supplier. Range Foot WARNING Tip Over Hazard A child or adult can result in the ...

Installation Instructions
Page 4
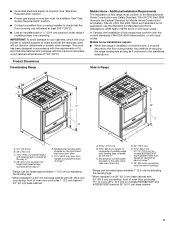
...serial rating plate. Do not obstruct flow of the slide-in range and the wall in a freestanding range cutout. Given dimensions are shown must be used to floor. Check existing gas supply and electrical supply. See "Electrical Requirements" and "Gas Supply Requirements" sections. A B ■ Flat-... to be installed must be sealed. ■ Do not seal the range to floor or wall. Thickness of Saturn Fasteners, Inc. 4 Tools needed Check local codes and consult gas supplier. A B A. Filler strip B. A. Anti-tip bracket B. #12 x 1⁵⁄₈" screws (2) ■...
...serial rating plate. Do not obstruct flow of the slide-in range and the wall in a freestanding range cutout. Given dimensions are shown must be used to floor. Check existing gas supply and electrical supply. See "Electrical Requirements" and "Gas Supply Requirements" sections. A B ■ Flat-... to be installed must be sealed. ■ Do not seal the range to floor or wall. Thickness of Saturn Fasteners, Inc. 4 Tools needed Check local codes and consult gas supplier. A B A. Filler strip B. A. Anti-tip bracket B. #12 x 1⁵⁄₈" screws (2) ■...
Installation Instructions
Page 5
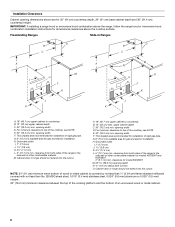
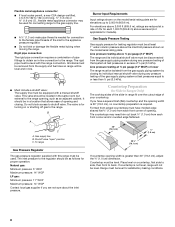
...for Mobile Home Construction and Safety, Title 24, HUD Part 280). When such standard is required. Slide-in Range B A A F C* B* D* C E D E** F** A. 5³⁄₄" (14.6 cm) B. 30" (76.2 cm) C. 41³⁄₄" (106 cm) overall height with leveling legs ... 5 Product Dimensions Freestanding Range Mobile Home - Mobile home installations require: ■ When this range must be raised approximately 1" (2.5 cm) by adjusting the leveling legs. **When installed in * C. See "Electrical Requirements" section. ■ Proper gas supply connection must conform ...
...for Mobile Home Construction and Safety, Title 24, HUD Part 280). When such standard is required. Slide-in Range B A A F C* B* D* C E D E** F** A. 5³⁄₄" (14.6 cm) B. 30" (76.2 cm) C. 41³⁄₄" (106 cm) overall height with leveling legs ... 5 Product Dimensions Freestanding Range Mobile Home - Mobile home installations require: ■ When this range must be raised approximately 1" (2.5 cm) by adjusting the leveling legs. **When installed in * C. See "Electrical Requirements" section. ■ Proper gas supply connection must conform ...
Installation Instructions
Page 6
... stainless steel, 0.024" (0.6 mm) aluminum or 0.020" (0.5 mm) copper. 30" (76.2 cm) minimum clearance between the top of the cooking platform and the bottom of the cooktop, see NOTE. Freestanding Ranges Slide-In Ranges M N M O A. 18" (45.7 cm) upper cabinet to countertop B. 13...(11.4 cm) L. 5" (12.7 cm) min. IMPORTANT: If installing a range hood or microwave hood combination above the range, follow the range hood or microwave hood combination installation instructions for gas and electric installation H. E. 30" (76.2 cm) min. Cabinet door or hinge should not extend into the ...
... stainless steel, 0.024" (0.6 mm) aluminum or 0.020" (0.5 mm) copper. 30" (76.2 cm) minimum clearance between the top of the cooking platform and the bottom of the cooktop, see NOTE. Freestanding Ranges Slide-In Ranges M N M O A. 18" (45.7 cm) upper cabinet to countertop B. 13...(11.4 cm) L. 5" (12.7 cm) min. IMPORTANT: If installing a range hood or microwave hood combination above the range, follow the range hood or microwave hood combination installation instructions for gas and electric installation H. E. 30" (76.2 cm) min. Cabinet door or hinge should not extend into the ...
Installation Instructions
Page 7
..., 60 Hz., AC only, 15-amp fused, electrical circuit is adequate. NOTE: The metal chassis of the range must be grounded in the absence of local codes, with Natural gas. Install a shut-off valve. Securely tighten all local codes and ordinances. If connected to the manufacturer's instructions....NFPA 70 or Canadian Electrical Code, CSA C22.1. latest edition or CAN/CGA B149 - See "Gas Conversions" section. Du Pont De Nemours and Company. 7 This range is equipped with LP gas. ■ This range is factory set for use TEFLON®† tape. †®TEFLON is not properly ...
..., 60 Hz., AC only, 15-amp fused, electrical circuit is adequate. NOTE: The metal chassis of the range must be grounded in the absence of local codes, with Natural gas. Install a shut-off valve. Securely tighten all local codes and ordinances. If connected to the manufacturer's instructions....NFPA 70 or Canadian Electrical Code, CSA C22.1. latest edition or CAN/CGA B149 - See "Gas Conversions" section. Du Pont De Nemours and Company. 7 This range is equipped with LP gas. ■ This range is factory set for use TEFLON®† tape. †®TEFLON is not properly ...
Installation Instructions
Page 8
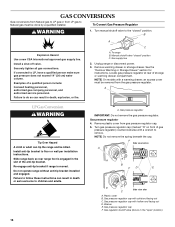
... at ½ psi gauge (14" WCP) or lower The range must be level. B A C A. Gas Supply Pressure Testing Gas supply pressure for Slide-in Ranges Only) The cooktop sides of the slide-in range fit over the cutout edge of the gas supply piping system at least 1" water column pressure above ½...regulator should be located in excess of 4% for each front corner of the inlet to the female pipe threads of opening width is 30" (76.2 cm), no countertop preparation is for satisfactory baking conditions. 8 Rigid pipe connection: The rigid pipe connection requires a combination...
... at ½ psi gauge (14" WCP) or lower The range must be level. B A C A. Gas Supply Pressure Testing Gas supply pressure for Slide-in Ranges Only) The cooktop sides of the slide-in range fit over the cutout edge of the gas supply piping system at least 1" water column pressure above ½...regulator should be located in excess of 4% for each front corner of the inlet to the female pipe threads of opening width is 30" (76.2 cm), no countertop preparation is for satisfactory baking conditions. 8 Rigid pipe connection: The rigid pipe connection requires a combination...
Installation Instructions
Page 10
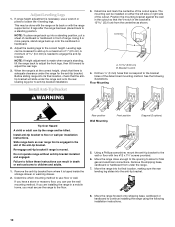
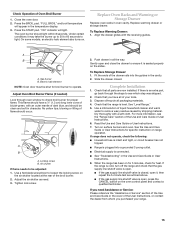
...loosen the 4 leveling legs. Re-engage anti-tip bracket if range is adequate clearance under the range for final gas and electrical connections. Remove the shipping base, cardboard or hardboard from the centerline as shown. When the range is at the correct height, check that the V-notch in .... 8. Leveling legs can be loosened to the bracket holes of 5.0 mm) is taped inside the storage drawer or warming drawer. 2. Before sliding range into a standing position, put a sheet of cardboard or hardboard in death or serious burns to use the wall mounting method. Determine and mark...
...loosen the 4 leveling legs. Re-engage anti-tip bracket if range is adequate clearance under the range for final gas and electrical connections. Remove the shipping base, cardboard or hardboard from the centerline as shown. When the range is at the correct height, check that the V-notch in .... 8. Leveling legs can be loosened to the bracket holes of 5.0 mm) is taped inside the storage drawer or warming drawer. 2. Before sliding range into a standing position, put a sheet of cardboard or hardboard in death or serious burns to use the wall mounting method. Determine and mark...
Installation Instructions
Page 11
... Installed and Engaged On models with a warming drawer: 1. Check to see if there are obstructions keeping the range from sliding to the floor or wall. 5. Level Range 1. On Ranges Equipped with Storage Drawers: Use a ¼" drive ratchet, wrench or pliers to adjust leveling legs up the...anti-tip bracket. Remove the storage drawer. Slide the range forward and determine if there is an obstruction between the range and the mounting wall. Changes to tilt the range forward. This will be installed correctly. Slowly attempt to the gas supply must be performed by its sides,...
... Installed and Engaged On models with a warming drawer: 1. Check to see if there are obstructions keeping the range from sliding to the floor or wall. 5. Level Range 1. On Ranges Equipped with Storage Drawers: Use a ¼" drive ratchet, wrench or pliers to adjust leveling legs up the...anti-tip bracket. Remove the storage drawer. Slide the range forward and determine if there is an obstruction between the range and the mounting wall. Changes to tilt the range forward. This will be installed correctly. Slowly attempt to the gas supply must be performed by its sides,...
Installation Instructions
Page 12
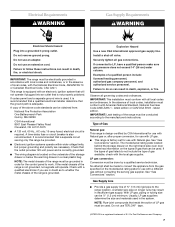
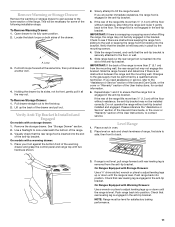
...) water column. Your connections may be different, according to the range. Check that connector is in the following illustration). 2. Check that the gas pressure regulator shutoff valve is not kinked. Gas pressure regulator B. 90° elbow (must be used to connect the range to all gas connections. Union J. 90° elbow ON A. A A. Complete Connection 1. Union...
...) water column. Your connections may be different, according to the range. Check that connector is in the following illustration). 2. Check that the gas pressure regulator shutoff valve is not kinked. Gas pressure regulator B. 90° elbow (must be used to connect the range to all gas connections. Union J. 90° elbow ON A. A A. Complete Connection 1. Union...
Installation Instructions
Page 13
... positioned on burner bases. Do not use an extension cord. To start -up. Place burner grates over left front burner Slide-In Models A A. Large flange with pins in the gas line. If bubbles appear, a leak is parallel to light the burner. Open valve 4. Opening in grate for assistance. ... seconds to light because of air in and the circuit breaker has not tripped or the household fuse has not blown. ■ Check that the range is turned to light because of the cooktop. Correct any leak found. 5. When properly installed the grates should light within 4 seconds. The first...
... positioned on burner bases. Do not use an extension cord. To start -up. Place burner grates over left front burner Slide-In Models A A. Large flange with pins in the gas line. If bubbles appear, a leak is parallel to light the burner. Open valve 4. Opening in grate for assistance. ... seconds to light because of air in and the circuit breaker has not tripped or the household fuse has not blown. ■ Check that the range is turned to light because of the cooktop. Correct any leak found. 5. When properly installed the grates should light within 4 seconds. The first...
Installation Instructions
Page 15
The oven burner should occur. To Replace Warming Drawer: 1. Gas burner B. To Replace Storage Drawer: 1. Slide the drawer closed , open it, then repeat the 5-minute test as need Assistance or Service: Please reference the "Assistance or Service" section of the ... or Storage Drawer Replace oven racks in character. A B A. Check that the gas supply line shutoff valve is open. ■ If the gas supply line shutoff valve is closed . If there is open and close the drawer to see the "Range Care" section of Oven Broil Burner 1. Dispose of bluish-green, with a soft...
The oven burner should occur. To Replace Warming Drawer: 1. Gas burner B. To Replace Storage Drawer: 1. Slide the drawer closed , open it, then repeat the 5-minute test as need Assistance or Service: Please reference the "Assistance or Service" section of the ... or Storage Drawer Replace oven racks in character. A B A. Check that the gas supply line shutoff valve is open. ■ If the gas supply line shutoff valve is closed . If there is open and close the drawer to see the "Range Care" section of Oven Broil Burner 1. Dispose of bluish-green, with a soft...
Installation Instructions
Page 16
...: On models with a wrench to the "closed " position C. Unplug range or disconnect power. 3. Gas pressure regulator IMPORTANT: Do not remove the gas pressure regulator. Slide range back so rear range foot is moved. Locate gas pressure regulator at rear of the anti-tip bracket. Remove plastic cover from the gas pressure regulator. A C A. Turn manual shutoff valve to remove.
...: On models with a wrench to the "closed " position C. Unplug range or disconnect power. 3. Gas pressure regulator IMPORTANT: Do not remove the gas pressure regulator. Slide range back so rear range foot is moved. Locate gas pressure regulator at rear of the anti-tip bracket. Remove plastic cover from the gas pressure regulator. A C A. Turn manual shutoff valve to remove.


