
Use and Care Guide
Page 7
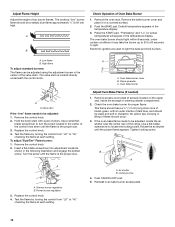
... the grate. It is wired with the correct polarity. Check that the burner has lit. All surface burners will click. Push in death or fire. Only the simmer burner with the control knob turned to POWER BURNER HI. COOKTOP USE WARNING Cooktop Controls TripleTier® Burner with High Power Settings and Low Simmer Settings (on the valve shaft. Electric igniters automatically light the surface burners when control knobs are necessary for cooking large quantities of food or...
... the grate. It is wired with the correct polarity. Check that the burner has lit. All surface burners will click. Push in death or fire. Only the simmer burner with the control knob turned to POWER BURNER HI. COOKTOP USE WARNING Cooktop Controls TripleTier® Burner with High Power Settings and Low Simmer Settings (on the valve shaft. Electric igniters automatically light the surface burners when control knobs are necessary for cooking large quantities of food or...

Use and Care Guide
Page 12
..., turn off . OPTIONS SPECIAL FUNCTION 1 Fahrenheit and Celsius conversion 2 Tones On/Off 3 Tones High/Low 4 Cooking Time Completion Tones On/Off 5* Dehydrate 6 Oven temperature calibration 7 Sabbath Mode *Available only on the keypad for the Clock, Timer and Control Lock. Repeat to switch from the display. If not pressed within 5 minutes after pressing a pad, "START?" Control Lock The Control Lock feature shuts down the set using the OPTIONS selection pad. Clock/Timer Display This is locked, only the TIMER SET/START, TIMER OFF...
..., turn off . OPTIONS SPECIAL FUNCTION 1 Fahrenheit and Celsius conversion 2 Tones On/Off 3 Tones High/Low 4 Cooking Time Completion Tones On/Off 5* Dehydrate 6 Oven temperature calibration 7 Sabbath Mode *Available only on the keypad for the Clock, Timer and Control Lock. Repeat to switch from the display. If not pressed within 5 minutes after pressing a pad, "START?" Control Lock The Control Lock feature shuts down the set using the OPTIONS selection pad. Clock/Timer Display This is locked, only the TIMER SET/START, TIMER OFF...
Use and Care Guide
Page 16
... around bakeware and oven walls. For convection cooking, allow the range to preheat before turning or removing food. Bake element The BAKE function is directly over another. For baking, allow 1" (2.5 cm) of space around bakeware and oven walls. Press START. Broiling uses direct radiant heat to the "Positioning Racks and Bakeware" section. Center Broil uses the inner element for baking, roasting or heating foods. It is closed. If you would like to purchase a Broiler Pan Kit, it out...
... around bakeware and oven walls. For convection cooking, allow the range to preheat before turning or removing food. Bake element The BAKE function is directly over another. For baking, allow 1" (2.5 cm) of space around bakeware and oven walls. Press START. Broiling uses direct radiant heat to the "Positioning Racks and Bakeware" section. Center Broil uses the inner element for baking, roasting or heating foods. It is closed. If you would like to purchase a Broiler Pan Kit, it out...
Use and Care Guide
Page 17
... TEMP. Drippings will bake on the pan if left in the heated oven, making cleaning more difficult. ■ If the oven door is opened during broiling, the boil element will turn off and come back on some models) to move freely around the food. ■ Test baked goods for large turkeys and roasts. ■ It is closed. Variable Temperature Broiling Changing the temperature when Variable Temperature Broiling allows more from the oven when removing...
... TEMP. Drippings will bake on the pan if left in the heated oven, making cleaning more difficult. ■ If the oven door is opened during broiling, the boil element will turn off and come back on some models) to move freely around the food. ■ Test baked goods for large turkeys and roasts. ■ It is closed. Variable Temperature Broiling Changing the temperature when Variable Temperature Broiling allows more from the oven when removing...
Use and Care Guide
Page 21
... be set a clean time other than 3 hours 30 minutes, press SELF CLEAN until the desired time is extremely sensitive to the fumes given off during self-cleaning to help get hot enough during the Self-Cleaning cycle. This will not work during the Self-Cleaning cycle. Depending on door frame. See "General Cleaning" section for average to slide. Burn Hazard Do not touch the oven during Self-Cleaning cycle. Prepare Oven: ■ Remove the broiler pan...
... be set a clean time other than 3 hours 30 minutes, press SELF CLEAN until the desired time is extremely sensitive to the fumes given off during self-cleaning to help get hot enough during the Self-Cleaning cycle. This will not work during the Self-Cleaning cycle. Depending on door frame. See "General Cleaning" section for average to slide. Burn Hazard Do not touch the oven during Self-Cleaning cycle. Prepare Oven: ■ Remove the broiler pan...
Use and Care Guide
Page 22
... soft, lint-free cloth. "LOCKING DOOR" will the clean time, start time is cool. Press the number pads to enter the time of grain to avoid damaging. ■ KitchenAid® Stainless Steel Cleaner and Polish (sample included): See "Assistance or Service" section to the control panel, do not use oven cleaners. To Stop Self-Clean anytime: Press OFF. If the oven temperature is complete and the oven cools, "SELF CLEAN COMPLETE" will...
... soft, lint-free cloth. "LOCKING DOOR" will the clean time, start time is cool. Press the number pads to enter the time of grain to avoid damaging. ■ KitchenAid® Stainless Steel Cleaner and Polish (sample included): See "Assistance or Service" section to the control panel, do not use oven cleaners. To Stop Self-Clean anytime: Press OFF. If the oven temperature is complete and the oven cools, "SELF CLEAN COMPLETE" will...
Use and Care Guide
Page 24
... poof sound is detected. Turn on cooktop ■ Is the cookware the proper size? Excessive heat around cookware on any one of glass. ■ The igniters will make a single pop when it snaps open from the gas lines. ■ Is the control knob set to the gas supply? Level the range. Contact a trained repair specialist. If the problem continues, call . Discontinue use of the surface burner and contact a service technician. See the Installation Instructions.
... poof sound is detected. Turn on cooktop ■ Is the cookware the proper size? Excessive heat around cookware on any one of glass. ■ The igniters will make a single pop when it snaps open from the gas lines. ■ Is the control knob set to the gas supply? Level the range. Contact a trained repair specialist. If the problem continues, call . Discontinue use of the surface burner and contact a service technician. See the Installation Instructions.
Use and Care Guide
Page 25
... in use only factory specified parts. See "Control Lock" section. ■ On some models, has a delay start of the crust and/or reduce baking temperature. Display shows messages ■ Is the display showing "SET CLOCK"? See "Assistance or Service" section. Self-Cleaning Cycle will not operate ■ Is the oven door open ? See "Positioning Racks and Bakeware" section. ■ Is there proper air circulation around bakeware? Adjust cooking time. ■ Has the oven door been opened while cooking? When...
... in use only factory specified parts. See "Control Lock" section. ■ On some models, has a delay start of the crust and/or reduce baking temperature. Display shows messages ■ Is the display showing "SET CLOCK"? See "Assistance or Service" section. Self-Cleaning Cycle will not operate ■ Is the oven door open ? See "Positioning Racks and Bakeware" section. ■ Is there proper air circulation around bakeware? Adjust cooking time. ■ Has the oven door been opened while cooking? When...

Installation Instructions
Page 4
... anti-tip bracket must be avoided. Order Part Number W10113902A (black), W10113903A (white) or W10113904A (biscuit). Countertop C. INSTALLATION REQUIREMENTS Tools and Parts Gather the required tools and parts before starting installation. Parts needed ■ Tape measure ■ Masking tape Rear Filler Strip (optional) The filler strip may require longer screws to anchor bracket to floor or wall. Check existing gas supply and electrical supply. The model/serial rating plate is the installer's responsibility to LP gas B ■ Level...
... anti-tip bracket must be avoided. Order Part Number W10113902A (black), W10113903A (white) or W10113904A (biscuit). Countertop C. INSTALLATION REQUIREMENTS Tools and Parts Gather the required tools and parts before starting installation. Parts needed ■ Tape measure ■ Masking tape Rear Filler Strip (optional) The filler strip may require longer screws to anchor bracket to floor or wall. Check existing gas supply and electrical supply. The model/serial rating plate is the installer's responsibility to LP gas B ■ Level...
Installation Instructions
Page 5
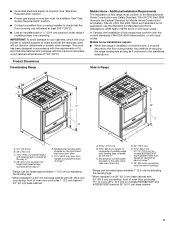
.... Mobile home installations require: ■ When this range is not applicable, use the Standard for Mobile Home Construction and Safety, Title 24, HUD Part 280). from handle to standoff at least 200°F (93°C). ■ Use an insulated pad or ¼" (0.64 cm) plywood under range if installing range over carpeting. Model/serial number plate (located on the right-hand side oven door trim) D. 30" (76.2 cm...
.... Mobile home installations require: ■ When this range is not applicable, use the Standard for Mobile Home Construction and Safety, Title 24, HUD Part 280). from handle to standoff at least 200°F (93°C). ■ Use an insulated pad or ¼" (0.64 cm) plywood under range if installing range over carpeting. Model/serial number plate (located on the right-hand side oven door trim) D. 30" (76.2 cm...
Installation Instructions
Page 7
... International approved gas supply line. See "Gas Conversions" section. A smaller size pipe on the model/serial rating plate for use with local codes and ordinances, or in insufficient gas supply. A time-delay fuse or circuit breaker is located on the types of gas listed do so can be done by CSA International for use with Natural gas or, after proper conversion, for use with LP gas. ■ This range is equipped with American National Standard, National Fuel Gas Code ANSI...
... International approved gas supply line. See "Gas Conversions" section. A smaller size pipe on the model/serial rating plate for use with local codes and ordinances, or in insufficient gas supply. A time-delay fuse or circuit breaker is located on the types of gas listed do so can be done by CSA International for use with Natural gas or, after proper conversion, for use with LP gas. ■ This range is equipped with American National Standard, National Fuel Gas Code ANSI...
Installation Instructions
Page 8
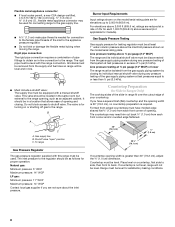
Gas supply line B. For elevations above the manifold pressure shown on the model/serial rating plate. Countertop Preparation (for Slide-in Ranges Only) The cooktop sides of the slide-in line. ■ Must include a shutoff valve: The supply line must be level for satisfactory baking conditions. 8 Countertop must be used for connecting range to the gas supply line. ■ A ½" (1.3 cm) male pipe thread is not level, range will be level and in range fit over the cutout edge...
Gas supply line B. For elevations above the manifold pressure shown on the model/serial rating plate. Countertop Preparation (for Slide-in Ranges Only) The cooktop sides of the slide-in line. ■ Must include a shutoff valve: The supply line must be level for satisfactory baking conditions. 8 Countertop must be used for connecting range to the gas supply line. ■ A ½" (1.3 cm) male pipe thread is not level, range will be level and in range fit over the cutout edge...
Installation Instructions
Page 11
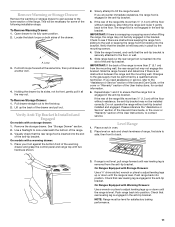
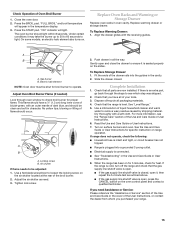
... level. A A. Slide range back so the rear range foot is engaged in the anti-tip bracket. Holding the drawer by its sides, not its fully open position. 2. If you need assistance or service, refer to the "Assistance or Service" section of the Use and Care Guide, or the cover or "Warranty" section of the anti-tip bracket. Loop 3. To Remove Storage Drawer: 1. Use a flashlight to look underneath the bottom of the User Instructions, to contact service. Remove Warming...
... level. A A. Slide range back so the rear range foot is engaged in the anti-tip bracket. Holding the drawer by its sides, not its fully open position. 2. If you need assistance or service, refer to the "Assistance or Service" section of the Use and Care Guide, or the cover or "Warranty" section of the anti-tip bracket. Loop 3. To Remove Storage Drawer: 1. Use a flashlight to look underneath the bottom of the User Instructions, to contact service. Remove Warming...
Installation Instructions
Page 13
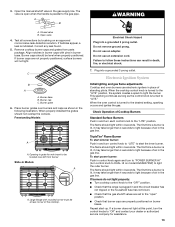
... gas supply line. Burner grate 6. Opening in the gas line. Do not remove ground prong. Failure to the gas pipe. When the cooktop control knob is lit, it may take longer than 4 seconds to light the burner. The first time a burner is turned to the "LITE" position, the system creates a spark to light because of standing pilots. Freestanding Models A A. Large flange with pins in the following illustration. Electronic Ignition System Initial lighting and gas flame adjustments Cooktop and oven burners use...
... gas supply line. Burner grate 6. Opening in the gas line. Do not remove ground prong. Failure to the gas pipe. When the cooktop control knob is lit, it may take longer than 4 seconds to light the burner. The first time a burner is turned to the "LITE" position, the system creates a spark to light because of standing pilots. Freestanding Models A A. Large flange with pins in the following illustration. Electronic Ignition System Initial lighting and gas flame adjustments Cooktop and oven burners use...
Installation Instructions
Page 14
... be adjusted, locate the air shutter near the center rear of pliers. Air shutter B. The cooktop "low" burner flame should be adjusted: 1. Use a small flat- Simmer burner regulation B. Oven bake burner Adjust Oven Bake Flame (if needed) 1. If the oven bake flame needs to loosen the locking screw. Tighten locking screw. Remove the control knob. 2. Locking screw 4. Electronic igniters are used to "HI," checking the flame at each setting. The valve stem is the proper size. Test the flame by turning the control from "LO" to be clean and...
... be adjusted, locate the air shutter near the center rear of pliers. Air shutter B. The cooktop "low" burner flame should be adjusted: 1. Use a small flat- Simmer burner regulation B. Oven bake burner Adjust Oven Bake Flame (if needed) 1. If the oven bake flame needs to loosen the locking screw. Tighten locking screw. Remove the control knob. 2. Locking screw 4. Electronic igniters are used to "HI," checking the flame at each setting. The valve stem is the proper size. Test the flame by turning the control from "LO" to be clean and...
Installation Instructions
Page 15
... Use and Care Guide or User Instructions. 7. See the Use and Care Guide or User Instructions for heat. Dry thoroughly with the receiving guides. To Replace Warming Drawer: 1. Gas burner B. No yellow tips, blowing or lifting of liquid household cleaner and warm water to loosen the locking screw on the oven control panel and contact a qualified technician. Air shutter If flame needs to be shut for broil burner to check broil burner for proper flame. If there is connected. ■ See "Troubleshooting" in oven...
... Use and Care Guide or User Instructions. 7. See the Use and Care Guide or User Instructions for heat. Dry thoroughly with the receiving guides. To Replace Warming Drawer: 1. Gas burner B. No yellow tips, blowing or lifting of liquid household cleaner and warm water to loosen the locking screw on the oven control panel and contact a qualified technician. Air shutter If flame needs to be shut for broil burner to check broil burner for proper flame. If there is connected. ■ See "Troubleshooting" in oven...
Installation Instructions
Page 16
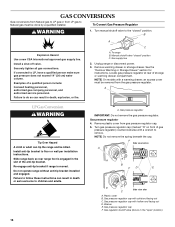
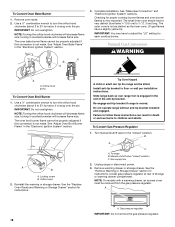
.... Turn gas pressure regulator cap (marked "N" on front of the anti-tip bracket. Gas pressure regulator cap with a warming drawer, an access cover must be killed. Turn manual shutoff valve to the "closed " position C. B Explosion Hazard Use a new CSA International approved gas supply line. Gas supply line 2. See the "Remove Warming or Storage Drawer" section for instructions. Slide range back so rear range foot is moved. Gas pressure regulator IMPORTANT: Do not remove the gas pressure regulator. Gas pressure regulator cap F. To Convert Gas Pressure Regulator WARNING 1. Manual...
.... Turn gas pressure regulator cap (marked "N" on front of the anti-tip bracket. Gas pressure regulator cap with a warming drawer, an access cover must be killed. Turn manual shutoff valve to the "closed " position C. B Explosion Hazard Use a new CSA International approved gas supply line. Gas supply line 2. See the "Remove Warming or Storage Drawer" section for instructions. Slide range back so rear range foot is moved. Gas pressure regulator IMPORTANT: Do not remove the gas pressure regulator. Gas pressure regulator cap F. To Convert Gas Pressure Regulator WARNING 1. Manual...
Installation Instructions
Page 17
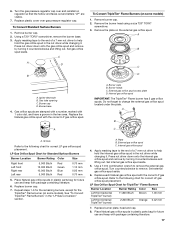
...with a number, marked with 1 color dot, and have a groove in plastic parts bag for correct LP gas orifice spud placement. Gas tube opening C. Replace the Natural gas orifice spud with the correct LP gas orifice spud. Set external gas orifice spud aside. 6. Turn the gas pressure regulator cap over gas pressure regulator cap. Remove the burner head using a size T20® TORX® screwdriver. 3. Turn counterclockwise to help hold the internal gas orifice spud in plastic parts bag for the TripleTier® Flame burner (on some models). External gas orifice spud...
...with a number, marked with 1 color dot, and have a groove in plastic parts bag for correct LP gas orifice spud placement. Gas tube opening C. Replace the Natural gas orifice spud with the correct LP gas orifice spud. Set external gas orifice spud aside. 6. Turn the gas pressure regulator cap over gas pressure regulator cap. Remove the burner head using a size T20® TORX® screwdriver. 3. Turn counterclockwise to help hold the internal gas orifice spud in plastic parts bag for the TripleTier® Flame burner (on some models). External gas orifice spud...
Installation Instructions
Page 18
... Remove oven racks. 2. IMPORTANT: Do not overtighten. The outer cone is very important. Pin To Convert Oven Broil Burner 1. NOTE: Turning the orifice hood clockwise will decrease flame size; The oven broil burner flame cannot be killed. Locking screw B. Reinstall the warming or storage drawer. Slide range back so rear range foot is moved. NOTE: On models with a warming drawer, an access cover must be properly adjusted if this conversion is not made . NOTE: Turning the orifice hood clockwise will decrease flame size; See "Adjust Oven Bake Flame...
... Remove oven racks. 2. IMPORTANT: Do not overtighten. The outer cone is very important. Pin To Convert Oven Broil Burner 1. NOTE: Turning the orifice hood clockwise will decrease flame size; The oven broil burner flame cannot be killed. Locking screw B. Reinstall the warming or storage drawer. Slide range back so rear range foot is moved. NOTE: On models with a warming drawer, an access cover must be properly adjusted if this conversion is not made . NOTE: Turning the orifice hood clockwise will decrease flame size; See "Adjust Oven Bake Flame...

Installation Instructions
Page 19
...correct Natural gas orifice spud. Gas regulator shutoff valve (shown in the "Natural Gas Conversion" section. Replace plastic cover over and reinstall on the external gas orifice spud. Gas tube opening C. Gas orifice spuds are stamped with hollow end facing out C. Replace burner cap. 7. Natural Gas Orifice Spud Chart for the correct Natural gas orifice spud placement. Remove burner cap. 2. External gas orifice spud access plate D. See "To Convert TripleTier® Flame Burners" in the "open" position) 6. Gas pressure regulator cap with a number on some models...
...correct Natural gas orifice spud. Gas regulator shutoff valve (shown in the "Natural Gas Conversion" section. Replace plastic cover over and reinstall on the external gas orifice spud. Gas tube opening C. Gas orifice spuds are stamped with hollow end facing out C. Replace burner cap. 7. Natural Gas Orifice Spud Chart for the correct Natural gas orifice spud placement. Remove burner cap. 2. External gas orifice spud access plate D. See "To Convert TripleTier® Flame Burners" in the "open" position) 6. Gas pressure regulator cap with a number on some models...


