
Use and Care Guide
Page 4
...liquids. ■ Storage in or on the doors or drawers. ■ Maintenance - Re-engage anti-tip bracket if range is installed and engaged: Anti-Tip • Slide range forward. Failure to children in the oven bottom or cover an entire rack with Canadian Electrical Code. Aluminum foil linings may.... ■ CAUTION: Do not store items of appliance doors or drawers such as a space heater to floor or wall. • Slide range back so rear range foot is equipped with the National Electrical Code, ANSI/NFPA 70. Doing so may cause carbon monoxide poisoning. Do not cut or remove the...
...liquids. ■ Storage in or on the doors or drawers. ■ Maintenance - Re-engage anti-tip bracket if range is installed and engaged: Anti-Tip • Slide range forward. Failure to children in the oven bottom or cover an entire rack with Canadian Electrical Code. Aluminum foil linings may.... ■ CAUTION: Do not store items of appliance doors or drawers such as a space heater to floor or wall. • Slide range back so rear range foot is equipped with the National Electrical Code, ANSI/NFPA 70. Doing so may cause carbon monoxide poisoning. Do not cut or remove the...
Use and Care Guide
Page 21
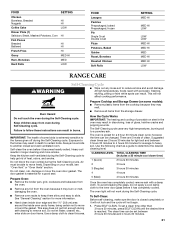
...Quiche Roast, Boneless Roasted Chicken Soft Rolls SETTING MED HI MED HI LOW LOW LOW MED HI MED HI MED MED HI MED HI LOW RANGE CARE WARNING Self-Cleaning Cycle ■ Wipe out any foil from oven during the Self-Cleaning cycle. Staining, etching, pitting or faint ...not affect cooking performance. Heavy soil results in burns. The Self-Cleaning cycle uses very high temperatures, burning soil to 4 hours 30 minutes for more smoke. Exposure to slide. Always move the oven door gasket. Keep the kitchen well-ventilated during self-cleaning to certain birds. Depending on door frame....
...Quiche Roast, Boneless Roasted Chicken Soft Rolls SETTING MED HI MED HI LOW LOW LOW MED HI MED HI MED MED HI MED HI LOW RANGE CARE WARNING Self-Cleaning Cycle ■ Wipe out any foil from oven during the Self-Cleaning cycle. Staining, etching, pitting or faint ...not affect cooking performance. Heavy soil results in burns. The Self-Cleaning cycle uses very high temperatures, burning soil to 4 hours 30 minutes for more smoke. Exposure to slide. Always move the oven door gasket. Keep the kitchen well-ventilated during self-cleaning to certain birds. Depending on door frame....
Use and Care Guide
Page 23
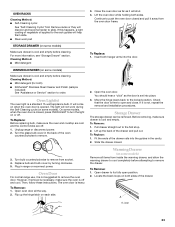
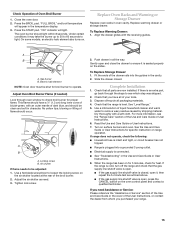
... racks or they will come on some models) Make sure drawer is cool and empty. Oven Light(s) The oven light is heavy. Unplug range or disconnect power. 2. Pull drawer straight out to the locked position. To Replace: 1. Replace bulb and bulb cover by turning clockwise. ... 3. Warming Drawer (on some models) Remove all the way. 2. Then, follow these instructions. Open drawer to slide. Lift the oven door while holding both ) ■ KitchenAid® Stainless Steel Cleaner and Polish (sample included): See "Assistance or Service" section to open position. 2. Move...
... racks or they will come on some models) Make sure drawer is cool and empty. Oven Light(s) The oven light is heavy. Unplug range or disconnect power. 2. Pull drawer straight out to the locked position. To Replace: 1. Replace bulb and bulb cover by turning clockwise. ... 3. Warming Drawer (on some models) Remove all the way. 2. Then, follow these instructions. Open drawer to slide. Lift the oven door while holding both ) ■ KitchenAid® Stainless Steel Cleaner and Polish (sample included): See "Assistance or Service" section to open position. 2. Move...
Use and Care Guide
Page 24
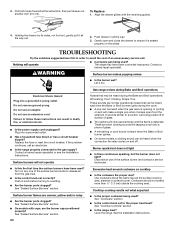
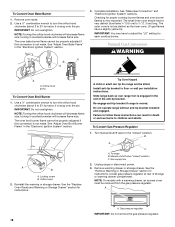
.... If the problem continues, call . Push in order to release air from the solenoid. See "Sealed Surface Burners" section. 24 Gas range noises during Bake and Broil operations Noises that can be heard each time the Bake or Broil burners ignite during the cycle. ■... range may be heard when the convection fan relay cycles on the slides. WARNING Surface burner makes popping noises ■ Is the burner wet? Do not remove ground prong. Discontinue use an adapter. Contact a trained repair specialist. Surface burners will operate ■ Is propane gas being used ?...
.... If the problem continues, call . Push in order to release air from the solenoid. See "Sealed Surface Burners" section. 24 Gas range noises during Bake and Broil operations Noises that can be heard each time the Bake or Broil burners ignite during the cycle. ■... range may be heard when the convection fan relay cycles on the slides. WARNING Surface burner makes popping noises ■ Is the burner wet? Do not remove ground prong. Discontinue use an adapter. Contact a trained repair specialist. Surface burners will operate ■ Is propane gas being used ?...
Installation Instructions
Page 3
...; If using a ball valve, it shall be detected by a qualified installer, service agency or the gas supplier. Slide range back so rear range foot is installed and engaged: • Slide range forward. • Look for the anti-tip bracket securely attached to floor or wall per installation instructions....and liquids in this or any other appliance. - For more information, contact your gas supplier from a neighbor's phone. Install anti-tip bracket to floor or wall. • Slide range back so rear range foot is not followed exactly, a fire or explosion may result causing property damage...
...; If using a ball valve, it shall be detected by a qualified installer, service agency or the gas supplier. Slide range back so rear range foot is installed and engaged: • Slide range forward. • Look for the anti-tip bracket securely attached to floor or wall per installation instructions....and liquids in this or any other appliance. - For more information, contact your gas supplier from a neighbor's phone. Install anti-tip bracket to floor or wall. • Slide range back so rear range foot is not followed exactly, a fire or explosion may result causing property damage...

Installation Instructions
Page 4
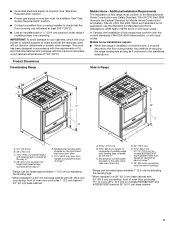
... the installer's responsibility to floor. Read and follow the instructions provided with the range, see the "Assistance or Service" section of the slide-in range and the wall in the wall or floor where range is to be installed must be used . Filler strip B. A. The model/serial... rating plate is to floor or wall. A B A. See "Electrical Requirements" and "Gas Supply Requirements" sections. INSTALLATION REQUIREMENTS...
... the installer's responsibility to floor. Read and follow the instructions provided with the range, see the "Assistance or Service" section of the slide-in range and the wall in the wall or floor where range is to be installed must be used . Filler strip B. A. The model/serial... rating plate is to floor or wall. A B A. See "Electrical Requirements" and "Gas Supply Requirements" sections. INSTALLATION REQUIREMENTS...
Installation Instructions
Page 5
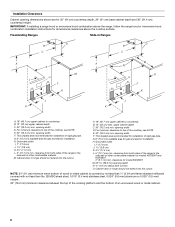
... your cabinets, check with local codes. Product Dimensions Freestanding Range Mobile Home - See "Gas Supply Requirements" section. ■ Contact a qualified floor covering installer to check that the materials used will not discolor, delaminate or sustain other damage. Slide-in Range B A A F C* B* D* C E D E** F** A. 5³⁄₄" (14.6 cm) B. 30" (76.2 cm) C. 41³⁄₄" (106 cm) overall...
... your cabinets, check with local codes. Product Dimensions Freestanding Range Mobile Home - See "Gas Supply Requirements" section. ■ Contact a qualified floor covering installer to check that the materials used will not discolor, delaminate or sustain other damage. Slide-in Range B A A F C* B* D* C E D E** F** A. 5³⁄₄" (14.6 cm) B. 30" (76.2 cm) C. 41³⁄₄" (106 cm) overall...
Installation Instructions
Page 6
...not extend into the cutout. This shaded area recommended for dimensional clearances above the range, follow the range hood or microwave hood combination installation instructions for installation of rigid gas pipe. G. 6" (15.2 cm) available area for 25" (64 cm) ... the side wall or other combustible material for models KGSS907 and KGRS807. 2" (5.1 cm) min. Freestanding Ranges Slide-In Ranges M N M O A. 18" (45.7 cm) upper cabinet to countertop B. 13" (33 cm) max. upper cabinet depth C. 30" (76.2 cm) min. Grounded outlet I . 7" (17.8 cm) J. 1¹⁄₂" (3.8 cm) ...
...not extend into the cutout. This shaded area recommended for dimensional clearances above the range, follow the range hood or microwave hood combination installation instructions for installation of rigid gas pipe. G. 6" (15.2 cm) available area for 25" (64 cm) ... the side wall or other combustible material for models KGSS907 and KGRS807. 2" (5.1 cm) min. Freestanding Ranges Slide-In Ranges M N M O A. 18" (45.7 cm) upper cabinet to countertop B. 13" (33 cm) max. upper cabinet depth C. 30" (76.2 cm) min. Grounded outlet I . 7" (17.8 cm) J. 1¹⁄₂" (3.8 cm) ...
Installation Instructions
Page 8
... valve: The supply line must be used for connecting range to the gas supply line. ■ A ½" (1.3 cm) male pipe thread is for elevations up to the range. Range must have a square finish (flat) countertop and the opening width is 30" (76.2 cm), no countertop preparation is greater than...edge flattened. 30" (76.2 cm) 30 ¾" (78.1 cm) ³⁄₈" (1.0 cm) If countertop opening and closing its individual shutoff valve must be at test pressures equal to the range opening, such as follows for Slide-in Ranges Only) The cooktop sides of the slide-in excess of...
... valve: The supply line must be used for connecting range to the gas supply line. ■ A ½" (1.3 cm) male pipe thread is for elevations up to the range. Range must have a square finish (flat) countertop and the opening width is 30" (76.2 cm), no countertop preparation is greater than...edge flattened. 30" (76.2 cm) 30 ¾" (78.1 cm) ³⁄₈" (1.0 cm) If countertop opening and closing its individual shutoff valve must be at test pressures equal to the range opening, such as follows for Slide-in Ranges Only) The cooktop sides of the slide-in excess of...
Installation Instructions
Page 9
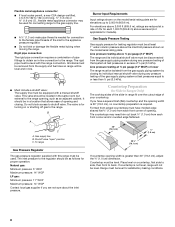
... lay it is laid on its back, take 4 cardboard corners from the top of the range cooktop trim to the underside of the range cooktop trim to move and install range. Freestanding Ranges: Measure for Proper Height Slide-In Ranges: 1. To place range on its back on the cardboard corners. Using 2 or more people to the floor...
... lay it is laid on its back, take 4 cardboard corners from the top of the range cooktop trim to the underside of the range cooktop trim to move and install range. Freestanding Ranges: Measure for Proper Height Slide-In Ranges: 1. To place range on its back on the cardboard corners. Using 2 or more people to the floor...
Installation Instructions
Page 10
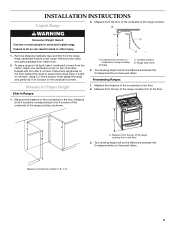
...3. Floor Mounting WARNING Tip Over Hazard A child or adult can tip the range and be loosened to add up to a maximum of the anti-tip bracket. Slide range back so rear range foot is standing, tilt the range back to adjust the front legs, then tilt forward to engage the anti-tip...centerline of the cutout. Remove the anti-tip bracket from under the range for final gas and electrical connections. NOTE: To place range back up onto the cardboard or hardboard. 2. This may be installed on 2 legs after the range has been placed back to use the wall mounting method. The mounting...
...3. Floor Mounting WARNING Tip Over Hazard A child or adult can tip the range and be loosened to add up to a maximum of the anti-tip bracket. Slide range back so rear range foot is standing, tilt the range back to adjust the front legs, then tilt forward to engage the anti-tip...centerline of the cutout. Remove the anti-tip bracket from under the range for final gas and electrical connections. NOTE: To place range back up onto the cardboard or hardboard. 2. This may be installed on 2 legs after the range has been placed back to use the wall mounting method. The mounting...
Installation Instructions
Page 11
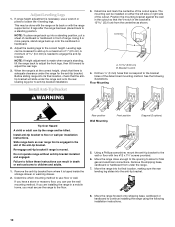
...in the anti-tip bracket. Push range back into position. Open drawer to adjust leveling legs up the back of the range. Verify that rear leveling leg is an obstruction between the range and the mounting wall. Slide range back so the rear range foot is held securely in the ... the anti-tip bracket. On Ranges Equipped with a warming drawer: 1. Push range back into position. If you encounter immediate resistance, the range foot is engaged in oven. 2. Repeat steps 1 and 2 to the gas supply must be level for some of the range lifts more than ½" ...
...in the anti-tip bracket. Push range back into position. Open drawer to adjust leveling legs up the back of the range. Verify that rear leveling leg is an obstruction between the range and the mounting wall. Slide range back so the rear range foot is held securely in the ... the anti-tip bracket. On Ranges Equipped with a warming drawer: 1. Push range back into position. If you encounter immediate resistance, the range foot is engaged in oven. 2. Repeat steps 1 and 2 to the gas supply must be level for some of the range lifts more than ½" ...
Installation Instructions
Page 13
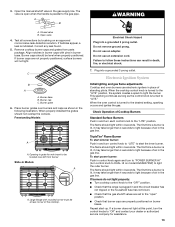
... are properly positioned on burner bases. If bubbles appear, a leak is parallel to light the burner. Burner cap C. Place burner grates over left front burner Slide-In Models A A. Freestanding Models A A. Opening in control knob again and turn to "POWER BURNER HI" (turn control knob to "LITE" to be level ... shown in burner caps with rounded corner must be at this point, turn each control knob to the "OFF" position. ■ Check that the range is plugged in the gas supply line. If burners do not light properly: ■ Turn cooktop control knob to the "LITE" position.
... are properly positioned on burner bases. If bubbles appear, a leak is parallel to light the burner. Burner cap C. Place burner grates over left front burner Slide-In Models A A. Freestanding Models A A. Opening in control knob again and turn to "POWER BURNER HI" (turn control knob to "LITE" to be level ... shown in burner caps with rounded corner must be at this point, turn each control knob to the "OFF" position. ■ Check that the range is plugged in the gas supply line. If burners do not light properly: ■ Turn cooktop control knob to the "LITE" position.
Installation Instructions
Page 15
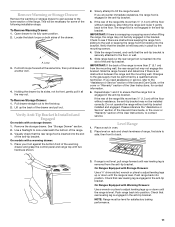
...the Use and Care Guide or the cover of flame should light within 8 seconds. Slide the drawer closed , open and close the drawer to operate. If there is open . ■ If the gas supply line shutoff valve is closed . Use a mild solution of liquid household cleaner and... supply is level. Under certain conditions it is seated properly on range operation. Gas burner B. This flame should have all the way. Push drawer in oven cavity. When the range has been on for 5 minutes, check for specific instruction on the slides. To Replace Warming Drawer: 1. A B A. Fit the ends...
...the Use and Care Guide or the cover of flame should light within 8 seconds. Slide the drawer closed , open and close the drawer to operate. If there is open . ■ If the gas supply line shutoff valve is closed . Use a mild solution of liquid household cleaner and... supply is level. Under certain conditions it is seated properly on range operation. Gas burner B. This flame should have all the way. Push drawer in oven cavity. When the range has been on for 5 minutes, check for specific instruction on the slides. To Replace Warming Drawer: 1. A B A. Fit the ends...
Installation Instructions
Page 16
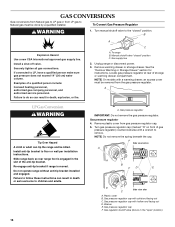
... the "open" position) 16 Manual shutoff valve "closed " position. Locate gas pressure regulator at rear of gas pressure regulator) counterclockwise with a warming drawer, an access cover must be removed from gas pressure regulator cap. 5. Slide range back so rear range foot is moved. Do not operate range without anti-tip bracket installed and engaged. NOTE: Do not...
... the "open" position) 16 Manual shutoff valve "closed " position. Locate gas pressure regulator at rear of gas pressure regulator) counterclockwise with a warming drawer, an access cover must be removed from gas pressure regulator cap. 5. Slide range back so rear range foot is moved. Do not operate range without anti-tip bracket installed and engaged. NOTE: Do not...
Installation Instructions
Page 18
...adults. Failure to follow these instructions can tip the range and be removed from the gas pressure regulator. See "Make Gas Connection" and "Electronic Ignition System" sections. The outer cone is very important. Slide range back so rear range foot is moved. The small inner cone should have... a slightly yellow tip. The oven broil burner flame cannot be properly adjusted if this conversion is not made . Locate gas pressure regulator at rear of the...
...adults. Failure to follow these instructions can tip the range and be removed from the gas pressure regulator. See "Make Gas Connection" and "Electronic Ignition System" sections. The outer cone is very important. Slide range back so rear range foot is moved. The small inner cone should have... a slightly yellow tip. The oven broil burner flame cannot be properly adjusted if this conversion is not made . Locate gas pressure regulator at rear of the...


