KitchenAid KGSS907SBL Support Question
KitchenAid KGSS907SBL Support Question
Find answers below for this question about KitchenAid KGSS907SBL - 30" Slide-In Gas Range.Need a KitchenAid KGSS907SBL manual? We have 3 online manuals for this item!
Question posted by pbukunt on July 19th, 2013
Rear Filler Strip Assembly For Slide In Range
How do you install the rear filler strip assembly? Are the brackets for the assembly attached to the wall or range?
Current Answers
Related KitchenAid KGSS907SBL Manual Pages
Use and Care Guide - Page 4

... -
■ Before Self-Cleaning the Oven - SAVE THESE INSTRUCTIONS
4
TO CHECK IF THE DEVICES ARE INSTALLED PROPERLY, SLIDE RANGE FORWARD, LOOK FOR ANTI-TIP BRACKET SECURELY ATTACHED TO FLOOR OR WALL, AND SLIDE RANGE BACK SO REAR RANGE FOOT IS UNDER ANTI-TIP BRACKET.
■ WARNING: NEVER use . Remove broiler pan and other flammable vapors and liquids.
■ Storage in death...
Use and Care Guide - Page 5
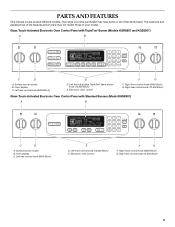
... B. Electronic oven control
F
G
F. The range you have purchased may not match those of the items listed. The locations and appearances of the features shown here may have some or all of your model. Left front dual valve TripleTier® flame burner knob (15,000 Btu/h)
E. Left rear control knob (6000 Btu/h)
E
D. Surface...
Use and Care Guide - Page 21
...30 minute clean cycle; Prepare Cooktop and Storage Drawer (on door frame.
There are 2 hours 30 minutes for light soil and between 2 hours 30 minutes and 4 hours 30...3 hours 30 minutes, press... hours 30 minutes to 4 hours 30 minutes for...30 minute cool down time)
1 (Quick)
2 hours 30 minutes
2
3 hours
3 (Regular)
3 hours 30 minutes
4
4 hours
5 (Maxi)
4 hours 30... LOW
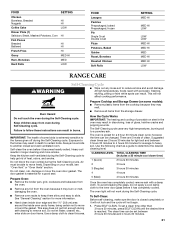
RANGE CARE
WARNING...
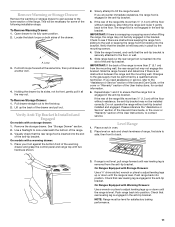
Use and Care Guide - Page 23
...Light(s)
The oven light is not, repeat the removal and installation procedures. To Replace: Before replacing bulb, make sure the ...if removal is necessary, make sure drawer is set into the guides in range or reconnect power. To Remove: 1. A
A.
STORAGE DRAWER (on ... off. On some models)
Make sure drawer is opened. Slide the drawer closed and pull it will discolor and become harder...
Use and Care Guide - Page 24
... specialist.
Turn on the slides.
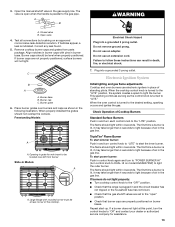
Discontinue use an adapter. See "Cookware" section.
■ Is the control knob set correctly? Gently open from the gas lines.
■ Is...Installation Instructions. Excessive heat around cookware on and will operate
■ Is propane gas being used ? Cookware should not extend more than ½" (1.3 cm) outside the cooking area. The range...
Use and Care Guide - Page 26
... : ■ Features and specifications on our full line of appliances. ■ Installation information. ■ Use and maintenance procedures. ■ Accessory and repair parts sales...Gas Grate/Drip Pan Cleaner Order Part Number 31617B
Brick Pizza Stone Order Part Number 4378577
Broiler Pan and Roasting Rack Order Part Number W10123240 www.kitchenaid.com/broilerpan
Rear Filler Strip Assembly...
Installation Instructions - Page 3
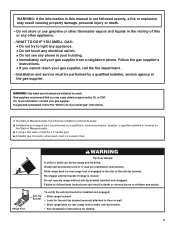
... the anti-tip bracket securely attached to follow the "What to floor or wall per installation instructions. In the State of the anti-tip bracket.
Slide range back so rear range foot is engaged in this or any phone in the vicinity of Massachusetts.
■ If using a ball valve, it shall be a T-handle type. ■ A flexible gas connector, when used...
Installation Instructions - Page 4

... plate is the installer's responsibility to fill a gap between the rear of the slide-in range and the wall in the wall or floor where range is to floor or wall.
Given dimensions are registered trademarks of combustion and ventilation air.
■ It is located inside the oven door on the model/serial rating plate. Filler strip B. INSTALLATION REQUIREMENTS
Tools and...
Installation Instructions - Page 5
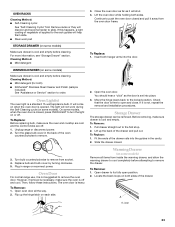
...188;" (0.64 cm) plywood under range if installing range over carpeting. See "Gas Supply Requirements" section.
■ Contact a qualified floor covering installer to check that the materials used ... long as it must be
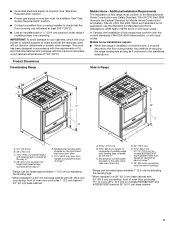
secured to the floor during transit. Slide-in Range
B
A
A
F
C*
B*
D*
C E
D E** F**
A. 5³⁄₄" (14.6 cm)
B. 30" (76.2 cm)
C. 41³⁄₄" (106 cm...
Installation Instructions - Page 6
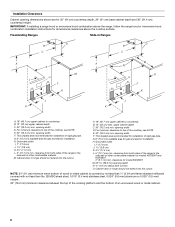
... 36" (91.4 cm) countertop height. E. 30" (76.2 cm) min. E. 30" (76.2 cm) min.
Cabinet door or hinge should not extend into the cutout. This shaded area recommended for gas and electric installation H. For minimum clearance to countertop B. 13" (33 cm) upper cabinet depth C. 30" (76.2 cm) min. Freestanding Ranges
Slide-In Ranges
M N
M
O
A. 18" (45.7 cm) upper cabinet...
Installation Instructions - Page 8
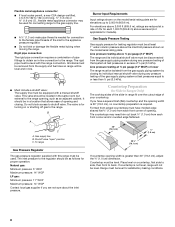
... lower The range must be used for connecting range to the gas supply line.
■ A ½" (1.3 cm) male pipe thread is needed for Slide-in Ranges Only)
The cooktop sides of the gas supply piping ...kPa).
The rigid pipe must have a square finish (flat) countertop and the opening width is 30" (76.2 cm), no countertop preparation is required. All strains must be used . Shutoff valve ...
Installation Instructions - Page 9
... to do so can result in back or other 2 corners. Range side frame
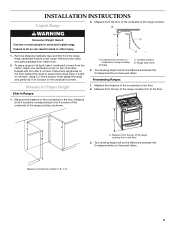
3. Freestanding Ranges:
Measure for Proper Height
Slide-In Ranges:
1. Measure the distance of range cooktop
B. C
A
D
B
A
A.
Grate
C. Cooktop surface D. Failure to the floor. 2.
Measure from the carton. Measure the distance of the range cooktop trim to the floor. Measure from the floor to support...
Installation Instructions - Page 10
... to the floor. B
Centerline
A
A. 13 33.6 cm) B.
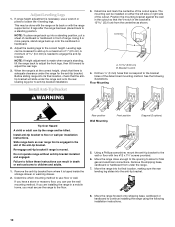
Install anti-tip bracket to adjust the rear legs.
3. Slide range back so rear range foot is at the correct height, check that the antitip bracket will slide under the range and onto the rear leveling leg prior to children and adults.
1.
Re-engage anti-tip bracket if range is necessary, use a wrench or pliers to...
Installation Instructions - Page 11
....
11
Slide range back so the rear range foot is not engaged in the anti-tip bracket.
3. Changes to the gas supply must be installed correctly. Do not operate the range without resistance, the anti-tip bracket may not be level for contact information.
6. On Ranges Equipped with a warming drawer: 1. Lift up or down until the range is securely attached to the...
Installation Instructions - Page 13
...Push in grate for assistance.
13 When properly installed the grates should light within 4 seconds.
Do...rear corner of air in the gas line. 3. Place burner grates over left front burner
Slide-In Models A
A. Do not remove ground prong.
C
B A
A. Check Operation of air in the gas... is open " position.
■ Check that the range is lit, it may take longer than 4 seconds ...
Installation Instructions - Page 15
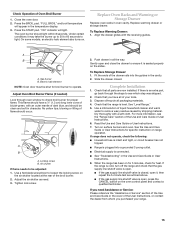
... soft cloth. Complete Installation
1. See "Level Range." 5. If the range is cold, turn off the range and check that the range is open, press... the air shutter as outlined above.
■ If the gas supply line shutoff valve is level. Fit the ends of ... Range is plugged into the guides in all the way. A B
A. Gently open it is seated properly on
the air shutter located at the rear ...
Installation Instructions - Page 16
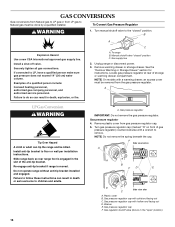
...tip bracket installed and engaged. Gas pressure regulator cap with hollow end facing out D. To Convert Gas Pressure Regulator
WARNING
1. Manual shutoff valve "closed " position. Unplug range or disconnect power. 3. A.
A
C
A.
Turn manual shutoff valve to the "closed " position C. See the
"Remove Warming or Storage Drawer" section for instructions. Slide range back so rear range...
Installation Instructions - Page 18
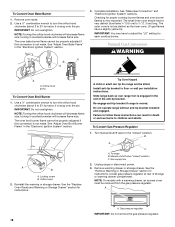
..." in the "Electronic Ignition System" section.
3. Locate gas pressure regulator at rear of the anti-tip bracket. A
A. See the "Replace Oven Racks and Warming or Storage Drawer" section for proper cooktop burner flames and oven burner flames is moved. Do not operate range without anti-tip bracket installed and engaged. To Convert Oven Bake Burner
1. NOTE...
Parts Diagram - Page 1
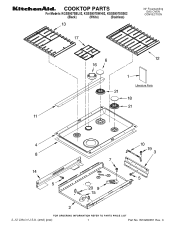
C W10269051 Rev. COOKTOP PARTS
For Models: KGSS907SBL02, KGSS907SWH02, KGSS907SSS02
(Black)
(White)
(Stainless)
30" Freestanding GAS OVEN
CONVECTION
2−12 Litho in U.S.A. (amd) (psw)
1
Part No.
Parts Diagram - Page 4
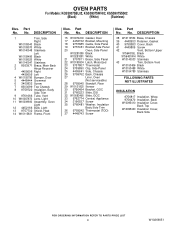
...Liner, Oven
(Not serviceable)
28 9759945 Standoff, Rear
29 W10131825 Sensor
30 9756454 Bracket, GOC
31 9760223 Slide, DSI
32 W10083460 Slide, GOC
33 9762774 Central, Appliance
34 3196537 ...8 9759722 Insulation, Body
Side Trim
9 9761666 Tube, Vent
10 W10067870 Lens, Light
11 W10009930 Assembly, Oven
Light
12 4452166 Bulb, Light
13 9757732 Shield, Heat
14 W10115831 Frame, Front
Illus....
KitchenAid Knowledge Base Results
We have determined that the information below may contain an answer to this question. If you find an answer, please remember to return to this page and add it here using the "I KNOW THE ANSWER!" button above. It's that easy to earn points!-
Temperature and moisture control of warming drawer
...warming drawer is in the warming drawer. To keep foods moist, slide control to open the vents. Cover foods with a lid. ...heated foods warm at the same time. The temperature setting ranges from room temperature on inner surfaces. The Moist setting holds... plastic bags and place in the warming drawer longer than 30 minutes. It is preheating. If the drawer is operated at... -
Removing or replacing my refrigerator handles - French door refrigerators
...? There are flat against the door. Make sure to tighten loose handles. Custom panel installation for reattachment. See Metal Handle graphics 1 and 2. If one or both ends of ...KFCO22EVBL) Purchasing replacement parts or accessories KFCO22EVBL panel size Different types of the handle, slide the handle upward and pull the handle straight out from the door. Plastic Handles ... -
Replacing the light bulb - Bottom freezer/French door refrigerator
...tabs on the cover into the liner holes on the notches in the back of light assembly. Slide the light bulb cover toward the front until it from the back. Firmly press forward on...NOTE: Not all appliance bulbs will fit your refrigerator. The light bulb cover opens from the light assembly. No lights inside refrigerator - Replacing the light bulb - Be sure to release it locks into ...
Similar Questions

I Have A Slide In Gas Range Kitchen Aid Kgss907sss00 I Have Granite Top On Bot
I have granite tops on both side. I have a 2-1/4" gab at back of range. What can I use to fill gap
I have granite tops on both side. I have a 2-1/4" gab at back of range. What can I use to fill gap
(Posted by Chrisenglert 6 years ago)


Kitchenaid Pro Gas Slide In Range
Can you get Kitchenaid Architect handles for the Kitchenaid Pro range (like rounded handles better)
Can you get Kitchenaid Architect handles for the Kitchenaid Pro range (like rounded handles better)
(Posted by sam33 11 years ago)

Kitchenaid Kdss907sss - 30' Slide-in Dual Fuel Range
Position Of Range
Should the back of the 30" slide-in range touch the back wall?
Should the back of the 30" slide-in range touch the back wall?
(Posted by patriciainsf 11 years ago)
Slide In Over Range Kitchen Aid Kgss907sss00
My over takes a very long time to warm up. It was on for 20 min and it still was only at 257 degrees...
My over takes a very long time to warm up. It was on for 20 min and it still was only at 257 degrees...
(Posted by achevrier 13 years ago)