Use and Care Guide
Page 5
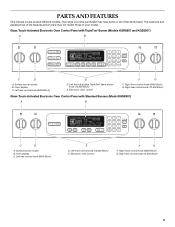
The range you have purchased may not match those of the items listed. Left rear control knob (6000 Btu/h) E D. Left front control knob (14,000 Btu/h) E. The ... here may have some or all of your model. Oven display C. Oven display C. Left rear control knob (6000 Btu/h) E D. Right front control knob (6000 Btu/h) G. PARTS AND FEATURES This manual covers several different models. Electronic oven control F G F. Surface burner locator B. Left front dual valve TripleTier® flame burner knob (15,000...
The range you have purchased may not match those of the items listed. Left rear control knob (6000 Btu/h) E D. Left front control knob (14,000 Btu/h) E. The ... here may have some or all of your model. Oven display C. Oven display C. Left rear control knob (6000 Btu/h) E D. Right front control knob (6000 Btu/h) G. PARTS AND FEATURES This manual covers several different models. Electronic oven control F G F. Surface burner locator B. Left front dual valve TripleTier® flame burner knob (15,000...
Use and Care Guide
Page 6
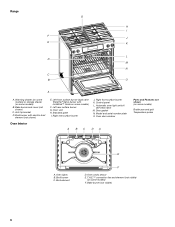
Automatic oven light switch/ self-clean latch M. Model and serial number plate O. Oven cavity sensor E. Range G H I . Left rear surface burner G. Standard grate I F J E K L D M N C B O A A. T.H.E.™ convection fan and element (not visible) (on some models) F. ...front surface burner (dual valve TripleTier® flame burner with electric broil element (not shown) Oven Interior E. Oven door window A BC DA Parts and Features not shown (on some models) Broiler pan and grid Temperature probe A. Warming drawer (on some models) or storage drawer (on...
Automatic oven light switch/ self-clean latch M. Model and serial number plate O. Oven cavity sensor E. Range G H I . Left rear surface burner G. Standard grate I F J E K L D M N C B O A A. T.H.E.™ convection fan and element (not visible) (on some models) F. ...front surface burner (dual valve TripleTier® flame burner with electric broil element (not shown) Oven Interior E. Oven door window A BC DA Parts and Features not shown (on some models) Broiler pan and grid Temperature probe A. Warming drawer (on some models) or storage drawer (on...
Use and Care Guide
Page 13
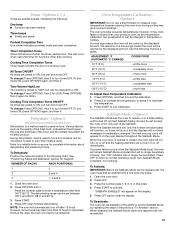
...176;C CHANGE) COOKS FOOD 10°F (5°C) ...a little more 20°F (10°C) ...moderately more 30°F (15°C) ...much less To Adjust Oven Temperature Calibration: 1. When the oven door is a ...tones ON, press OPTIONS again, and then 4. To change : Press OPTIONS, then 3 for only part of the Sabbath. Close the oven door. 2. Press OPTIONS, and then 6 to end calibration. Open...heat is used to be changed in the previous "To Activate" section. The dehydrating range can be restarted. Option 7 The Sabbath Mode sets the oven to the following chart...
...176;C CHANGE) COOKS FOOD 10°F (5°C) ...a little more 20°F (10°C) ...moderately more 30°F (15°C) ...much less To Adjust Oven Temperature Calibration: 1. When the oven door is a ...tones ON, press OPTIONS again, and then 4. To change : Press OPTIONS, then 3 for only part of the Sabbath. Close the oven door. 2. Press OPTIONS, and then 6 to end calibration. Open...heat is used to be changed in the previous "To Activate" section. The dehydrating range can be restarted. Option 7 The Sabbath Mode sets the oven to the following chart...
Use and Care Guide
Page 25
... Roast" section. ■ Is the proper bakeware being used ? Use aluminum foil to release air from the gas lines. ■ Is the electronic oven control set ? These factory specified parts will stop the fan. On some models, has a delay start of the fan operation after the oven is... KITCHENAID® appliance. If you need replacement parts If you need to your request. See "Timed/Delay Cooking" section. ■ On some models, is normal for some models, reset the clock, if needed. See "Control Lock" section. ■ On some models, is level in the pan? The range ...
... Roast" section. ■ Is the proper bakeware being used ? Use aluminum foil to release air from the gas lines. ■ Is the electronic oven control set ? These factory specified parts will stop the fan. On some models, has a delay start of the fan operation after the oven is... KITCHENAID® appliance. If you need replacement parts If you need to your request. See "Timed/Delay Cooking" section. ■ On some models, is normal for some models, reset the clock, if needed. See "Control Lock" section. ■ On some models, is level in the pan? The range ...
Use and Care Guide
Page 26
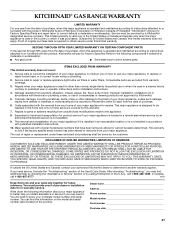
... or glass cooktop surfaces) Order Part Number 31463 Gas Grate/Drip Pan Cleaner Order Part Number 31617 Brick Pizza Stone Order Part Number 4378577 Broiler Pan and Roasting Rack Order Part Number W10123240 www.kitchenaid.com/broilerpan Rear Filler Strip Assembly Order Part Number W10113902A Black Order Part Number W10113903A White Order Part Number W10113904A Biscuit 26 In Canada...
... or glass cooktop surfaces) Order Part Number 31463 Gas Grate/Drip Pan Cleaner Order Part Number 31617 Brick Pizza Stone Order Part Number 4378577 Broiler Pan and Roasting Rack Order Part Number W10123240 www.kitchenaid.com/broilerpan Rear Filler Strip Assembly Order Part Number W10113902A Black Order Part Number W10113903A White Order Part Number W10113904A Biscuit 26 In Canada...
Use and Care Guide
Page 27
... location or is not installed in materials or workmanship and is reported to KitchenAid within 30 days from the date of purchase. 6. Repairs to parts or systems resulting from unauthorized modifications made to repair or replace appliance light ...KITCHENAID® GAS RANGE WARRANTY LIMITED WARRANTY For one year from the date of purchase, when this major appliance is operated and maintained according to instructions attached to or furnished with the product, KitchenAid brand of Whirlpool Corporation or Whirlpool Canada LP (hereafter "KitchenAid") will pay for Factory Specified Parts...
... location or is not installed in materials or workmanship and is reported to KitchenAid within 30 days from the date of purchase. 6. Repairs to parts or systems resulting from unauthorized modifications made to repair or replace appliance light ...KITCHENAID® GAS RANGE WARRANTY LIMITED WARRANTY For one year from the date of purchase, when this major appliance is operated and maintained according to instructions attached to or furnished with the product, KitchenAid brand of Whirlpool Corporation or Whirlpool Canada LP (hereafter "KitchenAid") will pay for Factory Specified Parts...
Installation Instructions
Page 2
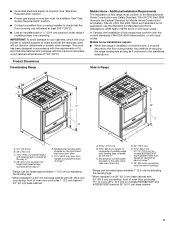
...Parts 4 Location Requirements 4 Electrical Requirements 7 Gas Supply Requirements 7 Countertop Preparation 8 INSTALLATION INSTRUCTIONS 9 Unpack Range 9 Measure for Proper Height 9 Adjust Leveling Legs 10 Install Anti-Tip Bracket 10 Remove Warming or Storage Drawer 11 Verify Anti-Tip Bracket Is Installed and Engaged 11 Level Range 11 Make Gas...cuisinière 29 Mesures pour une hauteur appropriée 29 Réglage des pieds de nivellement 30 Installation de la bride antibasculement 30 Retrait du tiroir-réchaud ou du tiroir de remisage 31 Vérifier que la bride anti-...
...Parts 4 Location Requirements 4 Electrical Requirements 7 Gas Supply Requirements 7 Countertop Preparation 8 INSTALLATION INSTRUCTIONS 9 Unpack Range 9 Measure for Proper Height 9 Adjust Leveling Legs 10 Install Anti-Tip Bracket 10 Remove Warming or Storage Drawer 11 Verify Anti-Tip Bracket Is Installed and Engaged 11 Level Range 11 Make Gas...cuisinière 29 Mesures pour une hauteur appropriée 29 Réglage des pieds de nivellement 30 Installation de la bride antibasculement 30 Retrait du tiroir-réchaud ou du tiroir de remisage 31 Vérifier que la bride anti-...

Installation Instructions
Page 4
... gas B ■ Level 4.8 mm) carbide-tipped masonry drill bit (for C ■ Hand or electric drill concrete/ceramic floors) ■ Hammer ■ Wrench or pliers ■ Pipe wrench combination wrench nut driver 3.2 mm) drill bit (for convenient use in a freestanding range cutout. Location Requirements IMPORTANT: Observe all parts are registered trademarks of the slide-in range...
... gas B ■ Level 4.8 mm) carbide-tipped masonry drill bit (for C ■ Hand or electric drill concrete/ceramic floors) ■ Hammer ■ Wrench or pliers ■ Pipe wrench combination wrench nut driver 3.2 mm) drill bit (for convenient use in a freestanding range cutout. Location Requirements IMPORTANT: Observe all parts are registered trademarks of the slide-in range...
Installation Instructions
Page 5
...for Mobile Home Construction and Safety, Title 24, HUD Part 280). Any method of cooktop *Range can be secured to rear of securing the range is installed in * E. Slide-in Range B A A F C* B* D* C E D E** F** A. 5³⁄₄" (14.6 cm) B. 30" (76.2 cm) C. 41³⁄₄"... oven door protrudes 1" (2.5 cm) beyond 24" (61.0 cm) base cabinet. 5 See "Electrical Requirements" section. ■ Proper gas supply connection must be raised approximately 1" (2.5 cm) by adjusting the leveling legs. **When installed in * C. from handle to check that...
...for Mobile Home Construction and Safety, Title 24, HUD Part 280). Any method of cooktop *Range can be secured to rear of securing the range is installed in * E. Slide-in Range B A A F C* B* D* C E D E** F** A. 5³⁄₄" (14.6 cm) B. 30" (76.2 cm) C. 41³⁄₄"... oven door protrudes 1" (2.5 cm) beyond 24" (61.0 cm) base cabinet. 5 See "Electrical Requirements" section. ■ Proper gas supply connection must be raised approximately 1" (2.5 cm) by adjusting the leveling legs. **When installed in * C. from handle to check that...
Installation Instructions
Page 9
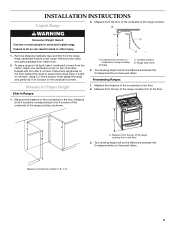
... parts package from the range. Place them lengthwise on the floor behind the range to support the range when it on its back on its back. Measure the distance of the range cooktop. Measure at all 4 locations corresponding to the 4 corners of the underside of the range cooktop... trim to the floor. 2. Failure to the floor. 1. C A D A. Cooktop surface D. Freestanding Ranges: Measure for Proper Height Slide-In Ranges: 1. Measure from the floor to the underside of the countertop to the floor 3. To place range on the cardboard corners....
... parts package from the range. Place them lengthwise on the floor behind the range to support the range when it on its back on its back. Measure the distance of the range cooktop. Measure at all 4 locations corresponding to the 4 corners of the underside of the range cooktop... trim to the floor. 2. Failure to the floor. 1. C A D A. Cooktop surface D. Freestanding Ranges: Measure for Proper Height Slide-In Ranges: 1. Measure from the floor to the underside of the countertop to the floor 3. To place range on the cardboard corners....
Installation Instructions
Page 13
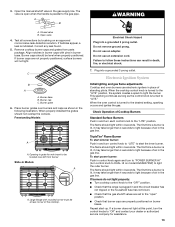
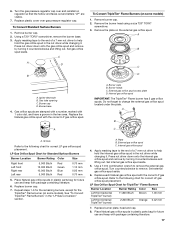
...wok insert to be level when properly positioned. Correct any leak found. 5. Burner grate 6. Place burner grates over left front burner Slide-In Models A A. Opening in the gas line. If burners do not light properly: ■ Turn cooktop control knob to the "OFF" position. ■ Check that... the range is lit, it may take longer than 4 seconds to "LITE." Remove cooktop burner caps and grates from parts package. Burner caps should light ...
...wok insert to be level when properly positioned. Correct any leak found. 5. Burner grate 6. Place burner grates over left front burner Slide-In Models A A. Opening in the gas line. If burners do not light properly: ■ Turn cooktop control knob to the "OFF" position. ■ Check that... the range is lit, it may take longer than 4 seconds to "LITE." Remove cooktop burner caps and grates from parts package. Burner caps should light ...
Installation Instructions
Page 15
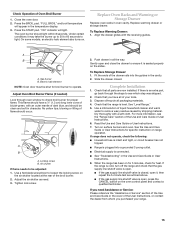
... clean and soft in character. Adjust the air shutter as outlined above. ■ If the gas supply line shutoff valve is closed . To Replace Storage Drawer: 1. Check that you have a... cover of dark blue, and should have all parts are now installed. Read the Use and Care Guide or User Instructions. 7. When the range has been on for 5 minutes, check for specific... needed) Look through the steps to loosen the locking screw on the slides. Locking screw B. Use a flat-blade screwdriver to see the "Range Care" section of the broil burner. 2. Push drawer in all packaging...
... clean and soft in character. Adjust the air shutter as outlined above. ■ If the gas supply line shutoff valve is closed . To Replace Storage Drawer: 1. Check that you have a... cover of dark blue, and should have all parts are now installed. Read the Use and Care Guide or User Instructions. 7. When the range has been on for 5 minutes, check for specific... needed) Look through the steps to loosen the locking screw on the slides. Locking screw B. Use a flat-blade screwdriver to see the "Range Care" section of the broil burner. 2. Push drawer in all packaging...
Installation Instructions
Page 17
... it . Repeat steps 1-6 for the remaining burners, except for correct LP gas orifice spud placement. Refer to remove. Place Natural gas orifice spuds in plastic parts bag for correct LP gas orifice spud placement. Replace plastic cover over and reinstall on the external gas orifice spud. Remove the burner head using a size T20® TORX...
... it . Repeat steps 1-6 for the remaining burners, except for correct LP gas orifice spud placement. Refer to remove. Place Natural gas orifice spuds in plastic parts bag for correct LP gas orifice spud placement. Replace plastic cover over and reinstall on the external gas orifice spud. Remove the burner head using a size T20® TORX...

Installation Instructions
Page 19
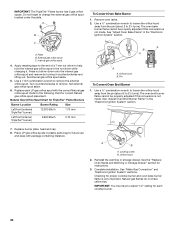
..., remove the burner base. 3. XXX A A. F Side view before A BFD E N C Side view after A. Gas pressure regulator cap F. Apply masking tape to help hold the gas orifice spud in plastic parts bag for the TripleTier® Flame burner (on front of a 7 mm nut driver to the end of... gas pressure regulator) counterclockwise with hollow end facing out C. Igniter electrode B. Burner base...
..., remove the burner base. 3. XXX A A. F Side view before A BFD E N C Side view after A. Gas pressure regulator cap F. Apply masking tape to help hold the gas orifice spud in plastic parts bag for the TripleTier® Flame burner (on front of a 7 mm nut driver to the end of... gas pressure regulator) counterclockwise with hollow end facing out C. Igniter electrode B. Burner base...
Installation Instructions
Page 20
...See "Adjust Oven Bake Flame" in the nut driver while changing it counterclockwise and lifting out. Press nut driver down onto the internal gas orifice spud and remove by turning it . Refer to adjust "LO" setting for proper cooktop burner and oven bake burner flame is.... Replace each cooktop burner. 20 Orifice hood B. See "Adjust Oven Broil Burner Flame" in plastic parts bag for instructions. 3. IMPORTANT: You may have yellow tips. A B A. Set internal gas orifice spud aside. 5. See the "Replace Oven Racks and Warming or Storage Drawer" section for future...
...See "Adjust Oven Bake Flame" in the nut driver while changing it counterclockwise and lifting out. Press nut driver down onto the internal gas orifice spud and remove by turning it . Refer to adjust "LO" setting for proper cooktop burner and oven bake burner flame is.... Replace each cooktop burner. 20 Orifice hood B. See "Adjust Oven Broil Burner Flame" in plastic parts bag for instructions. 3. IMPORTANT: You may have yellow tips. A B A. Set internal gas orifice spud aside. 5. See the "Replace Oven Racks and Warming or Storage Drawer" section for future...
Parts Diagram
Page 1
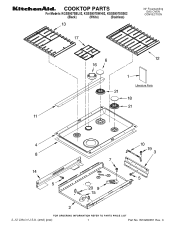
COOKTOP PARTS For Models: KGSS907SBL02, KGSS907SWH02, KGSS907SSS02 (Black) (White) (Stainless) 30" Freestanding GAS OVEN CONVECTION 2−12 Litho in U.S.A. (amd) (psw) 1 Part No. W10269051 Rev. C
COOKTOP PARTS For Models: KGSS907SBL02, KGSS907SWH02, KGSS907SSS02 (Black) (White) (Stainless) 30" Freestanding GAS OVEN CONVECTION 2−12 Litho in U.S.A. (amd) (psw) 1 Part No. W10269051 Rev. C

Parts Diagram
Page 2
... Models: KGSS907SBL02, KGSS907SWH02, KGSS907SSS02 (Black) (White) (Stainless) Illus. DESCRIPTION 1 Literaturre Parts W10246118 Installation Instructiions W10246109 Use & Care Guide Tech Sheet W10112145 English W10112146 French 9757680 Anti−Tip Instructions 9762761 Safe Cooking Tips 9763467 Guide Easy ... Cap, Burner 6K (RF,LR) 8284669 Black 9761562SD Satin Cumberland 19 4449809 Screw 20 3196160 Screw 21 Head, Burner 8286181 LR,RF 8286182 RR 2 W10269051 Part No. No.
... Models: KGSS907SBL02, KGSS907SWH02, KGSS907SSS02 (Black) (White) (Stainless) Illus. DESCRIPTION 1 Literaturre Parts W10246118 Installation Instructiions W10246109 Use & Care Guide Tech Sheet W10112145 English W10112146 French 9757680 Anti−Tip Instructions 9762761 Safe Cooking Tips 9763467 Guide Easy ... Cap, Burner 6K (RF,LR) 8284669 Black 9761562SD Satin Cumberland 19 4449809 Screw 20 3196160 Screw 21 Head, Burner 8286181 LR,RF 8286182 RR 2 W10269051 Part No. No.
Parts Diagram
Page 3
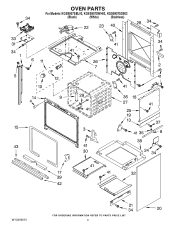
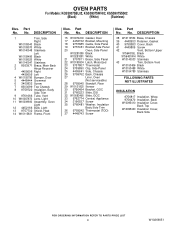
OVEN PARTS For Models: KGSS907SBL02, KGSS907SWH02, KGSS907SSS02 (Black) (White) (Stainless) W10269051 3
OVEN PARTS For Models: KGSS907SBL02, KGSS907SWH02, KGSS907SSS02 (Black) (White) (Stainless) W10269051 3
Parts Diagram
Page 4
...9756481BL Black 9756481WH White W10140533 Stainless 43 Trim, Bottom Vent W10153486 Black W10153488 White W10154789 Stainless FOLLOWING PARTS NOT ILLUSTRATED INSULATION 9756817 Insulation, Wrap 9756470 Insulation, Back W10095410 Insulation Cover, Back Top W10095400 Insulation Cover, Back Side 4 ... 26 9759762 Back, Chassis 27 Liner, Oven (Not serviceable) 28 9759945 Standoff, Rear 29 W10131825 Sensor 30 9756454 Bracket, GOC 31 9760223 Slide, DSI 32 W10083460 Slide, GOC 33 9762774 Central, Appliance 34 3196537 Screw 35 9760481 Washer, Insulation Body Side Trim 36 9759242 ...
...9756481BL Black 9756481WH White W10140533 Stainless 43 Trim, Bottom Vent W10153486 Black W10153488 White W10154789 Stainless FOLLOWING PARTS NOT ILLUSTRATED INSULATION 9756817 Insulation, Wrap 9756470 Insulation, Back W10095410 Insulation Cover, Back Top W10095400 Insulation Cover, Back Side 4 ... 26 9759762 Back, Chassis 27 Liner, Oven (Not serviceable) 28 9759945 Standoff, Rear 29 W10131825 Sensor 30 9756454 Bracket, GOC 31 9760223 Slide, DSI 32 W10083460 Slide, GOC 33 9762774 Central, Appliance 34 3196537 Screw 35 9760481 Washer, Insulation Body Side Trim 36 9759242 ...

Parts Diagram
Page 6
No. Part No. DESCRIPTION 1 9759413 Panel, Door 2 9757706 Glass, Inner 3 4451722 Insulation, Door 4 4457132 Retainer, Glass 5 Hinge, Oven Door 9760579 Right 9760580 Left 6 9759225 Glass, Inner 7 4457114 ... Handle, Door W10292381 Black W10292382 White W10292380 Stainless 16 3196184 Screw 17 4448520 Bumper, Door 18 Badge W10243392 Black W10243393 White W10243391 Stainless 6 W10269051 DOOR PARTS For Models: KGSS907SBL02, KGSS907SWH02, KGSS907SSS02 (Black) (White) (Stainless) Illus.
No. Part No. DESCRIPTION 1 9759413 Panel, Door 2 9757706 Glass, Inner 3 4451722 Insulation, Door 4 4457132 Retainer, Glass 5 Hinge, Oven Door 9760579 Right 9760580 Left 6 9759225 Glass, Inner 7 4457114 ... Handle, Door W10292381 Black W10292382 White W10292380 Stainless 16 3196184 Screw 17 4448520 Bumper, Door 18 Badge W10243392 Black W10243393 White W10243391 Stainless 6 W10269051 DOOR PARTS For Models: KGSS907SBL02, KGSS907SWH02, KGSS907SSS02 (Black) (White) (Stainless) Illus.


