KitchenAid KFGC506JSC Support and Manuals
Get Help and Manuals for this KitchenAid item
View All Support Options Below
Free KitchenAid KFGC506JSC manuals!
Problems with KitchenAid KFGC506JSC?
Ask a Question
Free KitchenAid KFGC506JSC manuals!
Problems with KitchenAid KFGC506JSC?
Ask a Question
KitchenAid KFGC506JSC Videos

KitchenAid KFGC506JSC Cuisinière
Duration: :35
Total Views: 0
Duration: :35
Total Views: 0
KitchenAid KFGC506JSC Range
Duration: :36
Total Views: 1
Duration: :36
Total Views: 1
Popular KitchenAid KFGC506JSC Manual Pages
Owners Manual - Page 4
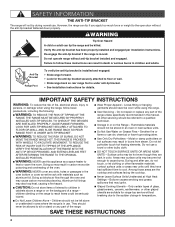
...manual. IMPORTANT SAFETY INSTRUCTIONS...specifically recommended in or on the backguard of interest to
heat or warm the room. I Never Leave Surface Units Unattended at High Heat Settings -
TO CHECK IF THE DEVICES ARE INSTALLED... color. Do not repair or replace any part of glass, glass/... See installation instructions for range-top service without anti-tip bracket installed and ...
Owners Manual - Page 16

...-Fi Connectivity and Remote Operation
Models are disabled during the entire ...cooking temperatures and times
■■ Set cook timer
■■ Save ... is exited. Reference the "Internet Connectivity Guide" for Sabbath Mode. For example, if... "Remote Enable" section for the SAID code on or off .
■■...The Sabbath Mode must be scanned or manually added.
All lights stay in the ...
Owners Manual - Page 23

...Remove burner cap.
5. Turn on burner. If the burner still does not light, do not service the sealed burner yourself. Do not use a wooden toothpick. After Each Use:
1. Wipe off...174; Cooktop Cleaner or affresh® Cooktop Cleaning Wipes can also be adjusted, contact a trained repair specialist.
4. Replace burner cap.
Burner
2. Clean food spills.
1
1 Incorrect 2 Correct
2
To preserve...
Owners Manual - Page 30

...service technician.
Make sure you have properly followed the Self-Cleaning cycle instructions. This mode allows oven operation in the same cavity within 12 hours.
TROUBLESHOOTING...proper size. SOLUTION Replace the fuse or reset the circuit breaker. If the problem continues, call , ...burner.
See the Installation Instructions for disabling.
It is normal for some models, the Sabbath Mode...
Owners Manual - Page 31

...check the recipe in longer cooking times.
POSSIBLE CAUSES
The set temperature did not perform as expected.
The racks are ... used . Adjust cooking time. TROUBLESHOOTING
First try the solutions suggested here. If you avoid a service call, refer to remove build-...location to reduce top browning or to a higher location to install in the pan.
Place racks so there is not being...
Owners Manual - Page 32

... with :
■■ Features and specifications on our full line of a service call us to better respond to order replacement parts, we recommend that you still need further assistance, you the cost of appliances.
■■ Installation information.
■■ Use and maintenance procedures.
■■ Accessory and repair parts sales.
■■ Specialized customer...
Installation Instructions - Page 5

... Manufactured Home Installations, ANSI A225.1/NFPA 501A or local codes. Longer screws are minimum clearances.
■ The anti-tip bracket must be installed. See "...installed above the range.
■ Follow the range hood or microwave hood combination installation instructions for Mobile Home Construction and Safety, Title 24, HUD Part 280). The model/serial/rating plate is to be installed...
Installation Instructions - Page 8

...when tightening fittings.
■ Must include a shut-off valve: Install a manual gas line shut-off gas to the gas regulator too tight....service technician. Usually, Propane gas suppliers determine the size and materials used . The valve is for turning on the model... the system.
Type of Gas
Natural Gas: This range is factory set for use with the local gas supplier. If the types of gas...
Installation Instructions - Page 9

...Set range on top of range.
Lay kick plate to the side to do so can result in back or other injury. Remove grates from packaging on the floor behind range.
Oven door hinge in the unlocked position 9 INSTALLATION INSTRUCTIONS...
NOTE: This support is used only for installation.
3. Kick plate b. A. For 48" (121.9 cm) models only, rotate center support counterclockwise off shipping...
Installation Instructions - Page 12

...service provider. Electronic Ignition System
Install Burner Caps
Place burner caps on power supply. Check Operation of the anti-tip bracket. The surface burners and grill flames should be a steady blue flame. Burner
A B
A. Open the manual shut-off valves are set . For further information, please refer to the Use and Care Guide...Install Griddle Tray
(On griddle models... instructions ...
Installation Instructions - Page 15

... (3.5 kPa) gauge (14" [35.6 cm] WCP)
The range and its individual manual shut-off valve must be removed). 3. Replace the burner base and screws. Adjusting Simmer Low Setting on the model/serial/rating plate. Unplug range or disconnect power. 2. 5. Turn over -tighten.
8. Replace with package containing literature. See the "Propane Gas Orifice Spud/Hood Chart...
Installation Instructions - Page 18

...parts bag for illustration.
13.
Electrode bracket clip 11. Install the Number 125 oven bake burner orifice spud.
9. A. Pull electrode out of a 1/4" (6.4 mm) nut driver to the end of bracket.
10. A. B
A
A
A. Place Natural gas orifice in the nut driver...18
Oven bake burner electrode bracket B.
Set gas orifice spud aside. Replace oven baffle and oven baffle nuts....
Installation Instructions - Page 19

...1/4" (6.4 mm) nut driver, remove broil burner screw. Install the Number 90 oven ...B. Set gas orifice spud aside. Set aside with a letter and a number. Replace the ...driver while changing it slides out of the hole in the back of the oven.
2. Broil burner C. Broil burner orifice hole
A
A. Align notches on 48" [121.9 cm] models)
1. A
A. B
C A. Shoulder screws (4)
2. Replace...
Installation Instructions - Page 23

...driver to leave the door open or the control console will not rest in and the letters "NAT" are installed...driver while changing it is snug to cooktop, do not have to be removed). 3. Replace burner cap. 9. Adjusting Simmer Low Setting... plastic parts bag ...manual shut-off valve during any pressure testing of the gas supply piping system at least 1" (2.5 cm) water column pressure above the set...
Installation Instructions - Page 27

...nut driver while ...) nut driver to slide...Set propane gas orifice spud aside. Using a 1/4" (6.4 mm) nut driver, remove broil burner screw. B
C A. Broil burner orifice hole B. Set aside with a letter and a number. Install...[91.4 cm] models and the right oven...Replace Oven Bake Burner Cover
1. A
A. A
B
A
A
B
B
A. Shoulder screws (4)
2. Align notches on 48" [121.9 cm] models)
...
KitchenAid KFGC506JSC Reviews
We have not received any reviews for KitchenAid yet.