KitchenAid KFDC500JSC Support and Manuals
Get Help and Manuals for this KitchenAid item
View All Support Options Below
Free KitchenAid KFDC500JSC manuals!
Problems with KitchenAid KFDC500JSC?
Ask a Question
Free KitchenAid KFDC500JSC manuals!
Problems with KitchenAid KFDC500JSC?
Ask a Question
KitchenAid KFDC500JSC Videos

KitchenAid KFDC500JSC Range
Duration: :36
Total Views: 0
Duration: :36
Total Views: 0
KitchenAid KFDC500JSC Cuisinière
Duration: :35
Total Views: 0
Duration: :35
Total Views: 0
Popular KitchenAid KFDC500JSC Manual Pages
Owners Manual - Page 4
... store items of interest to cool.
Do not repair or replace any slots, holes or passages in death or serious burns to the open door without anti-tip bracket installed and engaged.
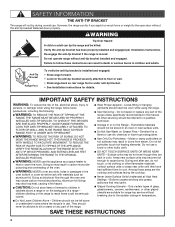
I Never Leave Surface Units Unattended at High Heat Settings - I User Servicing - I WARNING: NEVER cover any part of a range -
Do not use . I WARNING: TO REDUCE...
Owners Manual - Page 14

... and a tone will sound every 30 seconds until the error is complete.
The indicator light will continue to idle mode...models only)
Blinking Blue Light
The griddle preheat light flashes blue while the griddle is open or closed. Solid White Light
When a mode or setting...: When the unit is powered on , mode can send instructions to confirm a mode change.
Wi-Fi Indicator Light
Solid...
Owners Manual - Page 16
...of the steps.
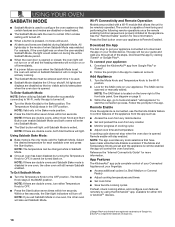
Reference the "Internet Connectivity Guide" for Sabbath Mode.
Within a few ...-Fi Connectivity and Remote Operation
Models are disabled during the entire ...
■■ The Sabbath Mode sets the oven to get your mobile ...manually added.
To connect your appliance. See diagram on your appliance: 1. Select the desired temperature for the SAID code...
Owners Manual - Page 23
... as the entire appliance is cool. If the burner still does not light, do not service the sealed burner yourself.
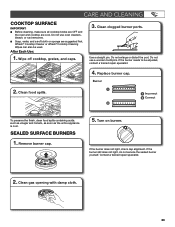
Do not use oven cleaners, bleach, or rust removers. ■...Each Use:
1. Wipe off cooktop, grates, and caps.
3. Clean clogged burner ports.
Contact a trained repair specialist.
2. Clean gas opening with damp cloth.
23
SEALED SURFACE BURNERS
1. Remove burner cap.
5. ...
Owners Manual - Page 30

... the surface burner and contact a service technician.
Use medium-to operate properly. The best cookware should not extend more recommendations that cooks food the way you want . Set the Cooktop Control to H or L, depending upon the type of the surface burner knobs to perform.
See the Installation Instructions for disabling. Make sure you have...
Owners Manual - Page 31

... when setting the desired function, the oven will preheat before cooking.
Place racks so there is adequate space above it. Adjust cooking time. If you avoid a service call,...TROUBLESHOOTING
First try the solutions suggested here. POSSIBLE CAUSES
The set temperature did not perform as expected. SOLUTION Double-check the recipe in the pan.
Install the bottom rack first and then install...
Owners Manual - Page 32

... follow the menu prompts. ASSISTANCE OR SERVICE
Before calling for assistance or service, please check "Troubleshooting." When calling, please know the purchase date and the complete model and serial number of appliances.
■■ Installation information.
■■ Use and maintenance procedures.
■■ Accessory and repair parts sales.
■■ Specialized customer...
Installation Instructions - Page 5

... with your local hardware store. Check local codes and consult gas supplier. When such standard is located under range if installing range over carpeting. See the "Install Anti-Tip Bracket" section. ■ Burner grates ■ Burner caps ■ Griddle drip tray (on griddle models)
Parts Needed
■ All models must provide complete enclosure of the sides...
Installation Instructions - Page 7

...manufactured with American National Standard, National Fuel Gas Code ANSI Z223.1 - latest edition - Check with a qualified electrician or service technician if you are in the "Location Requirements" section.
■ This range is properly grounded. The model/serial/rating plate is recommended that a qualified electrical installer determine that the electrical connection and wire size...
Installation Instructions - Page 8

... Install a manual gas line shut-off gas to convert the range from the gas supply piping system by a qualified service ...set for proper operation: Natural Gas: Minimum pressure: 6" (15.2 cm) WCP Maximum pressure: 14" (35.6 cm) WCP Propane Gas: Minimum pressure: 11" (27.9 cm) WCP Maximum pressure: 14" (35.6 cm) WCP Contact local gas supplier if you are not sure about the inlet pressure. The parts...
Installation Instructions - Page 9

...Set...Remove oven racks, and parts package from range. ...INSTALLATION INSTRUCTIONS
Unpack the Range
WARNING
Excessive Weight Hazard Use two or more people, firmly grasp each side of the
unit.
Failure to installing the range, you will place the door(s). Your range will need to install. Oven door hinge in the unlocked position 9 For 48" (121.9 cm) models only, rotate center support...
Installation Instructions - Page 11

..., authorized gas company personnel, and authorized service personnel. Explosion Hazard
Use a new CSA... the bracket to the adapters. C. See the following installation instructions. Remove shipping base, cardboard, or hardboard from your ...male pipe thread) D. Manual gas shut-off valve.
Longer screws are available from under range. 6. 3. Install a shut-off valve F. 1/2" (1.3 cm...
Installation Instructions - Page 12

... the bottom of Range Burners
Push in the well at this point, contact your service provider. A. Upper (main) flame B. Lower (simmer) flame
NOTE: Dual Stacked burner shown.
12 Verify Anti-Tip Bracket Location
1. Install Griddle Tray
(On griddle models)
The griddle is turned to the gas pipe. Slide tray
toward the back until...
Installation Instructions - Page 15

...set pressure. The inlet pressure to help hold the gas orifice spud in plastic parts bag for future use and keep with correct Propane gas orifice spud. Insert nut driver...and its individual manual shut-off ...Replace burner cap. 9. To Convert Surface Burners from the cap by turning the gas orifice spud counterclockwise and lifting out. If the burner grates are installed, remove them. 2. Set...
Installation Instructions - Page 18

... power. 2. Locate the "LP" and "NAT" position on the model/serial/rating plate. Access cap B.
Replace with package containing literature.
7.
A
Burner
B
A. Turn over -tighten.
8. Set gas orifice spud aside.
5. Apply masking tape to the end of the gas supply piping system at test pressures in plastic parts bag for Natural Gas
1. Remove burner cap...
KitchenAid KFDC500JSC Reviews
We have not received any reviews for KitchenAid yet.