KitchenAid KFGC500JSC Support and Manuals
Get Help and Manuals for this KitchenAid item
View All Support Options Below
Free KitchenAid KFGC500JSC manuals!
Problems with KitchenAid KFGC500JSC?
Ask a Question
Free KitchenAid KFGC500JSC manuals!
Problems with KitchenAid KFGC500JSC?
Ask a Question
KitchenAid KFGC500JSC Videos

KitchenAid KFGC500JSC Cuisinière
Duration: :35
Total Views: 0
Duration: :35
Total Views: 0
KitchenAid KFGC500JSC Range
Duration: :36
Total Views: 0
Duration: :36
Total Views: 0
Popular KitchenAid KFGC500JSC Manual Pages
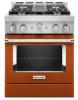
Owners Manual - Page 4
...BE SECURED BY PROPERLY INSTALLED ANTI-TIP DEVICES. Do not repair or replace any part of a range ...specifically recommended in burns from steam. Anti-Tip Bracket
Range Foot
To verify the anti-tip bracket is under anti-tip bracket. • See installation instructions for range-top service without anti-tip bracket installed...Settings - Children should be left alone or unattended in area where...
Owners Manual - Page 16

...sets the oven to remain ON in a bake setting until Sabbath Mode is exited.
Wi-Fi Connectivity and Remote Operation
Models...guide and walk you exit Sabbath Mode in Sabbath Mode but will no visible activity takes place when the oven door is opened .
Follow the prompts in the OFF position. If the Mode and Temperature Knobs are set... the SAID code on during Sabbath...scanned or manually added....
Owners Manual - Page 23

... use a wooden toothpick.
Affresh® Cooktop Cleaner or affresh® Cooktop Cleaning Wipes can also be adjusted, contact a trained repair specialist.
4. Replace burner cap. If the burner still does not light, do not service the sealed burner yourself. After Each Use:
1. Wipe off cooktop, grates, and caps.
3. Clean clogged burner ports. Contact a trained...
Owners Manual - Page 30

...use of cooking you have followed the instructions for the griddle to release air from the gas lines.
Contact a trained repair specialist. The function has not been ... improperly. See the Installation Instructions for disabling. Set the Cooktop Control to H or L, depending upon the type of the surface burner and contact a service technician. TROUBLESHOOTING
First try the solutions...
Owners Manual - Page 31

... rack first and then install the rack above each food item.
The racks are too brown on baking dishes. Baked items are not positioned properly.
Place racks so there is not proper air circulation around bakeware and oven walls.
TROUBLESHOOTING
First try the solutions suggested here. If you avoid a service call, refer to...
Owners Manual - Page 32

.... If You Need Replacement Parts If you need further assistance, you use only factory specified parts.
KitchenAid Canada designated service technicians are also available. ASSISTANCE OR SERVICE
Before calling for assistance or service, please check "Troubleshooting." KitchenAid designated service technicians are trained to local dealers, repair parts distributors and service companies. In...
Installation Instructions - Page 5

... or with local codes. Check local codes and consult gas supplier.
The model/serial/rating plate is recommended that a 585 CFM (993.9 m3/hr) or larger range hood be installed above the range.
■ Follow the range hood or microwave hood combination installation instructions for Mobile Home Construction and Safety, Title 24, HUD Part 280).
See the...
Installation Instructions - Page 8

...model/serial/rating plate are in the system. To range
†®TEFLON is factory set...manual shut-off valve must be used . The parts...-off valve: Install a manual gas line shut...model/serial/rating plate for Canada). No attempt shall be isolated from the gas supply piping system by a qualified service...metal appliance connector:
■ If local codes permit, a new CSA design-certified,...
Installation Instructions - Page 9

... locked position
B
B. Remove oven racks, and parts package from range. Lay a piece of cardboard from the packaging material. Set range on cardboard to avoid scratching. A
A... cm) models only, rotate center support counterclockwise off shipping pallet.
Excessive Weight Hazard Use two or more people, firmly grasp each side of the
unit. INSTALLATION INSTRUCTIONS
WARNING
Unpack...
Installation Instructions - Page 12

...Install Griddle Tray
(On griddle models)
The griddle is indicated.
This allows the gas to reach the burners during the first use electronic igniters in and turn the Control Knobs to the user instructions...the Use and Care Guide. Clean griddle before using... this point, contact your service provider. Griddle drip tray... 1. Open the manual shut-off valves are factory set to the
open...
Installation Instructions - Page 15

...Replace the burner base and screws. Adjusting Simmer Low Setting on Surface Burners for the remaining burners. Apply masking tape to the end of a 7 mm nut driver...cm] WCP)
The range and its individual manual shut-off valve must be isolated from the ...be checked at test pressures in plastic parts bag for more information on the regulator ... the model/serial/rating plate. Replace with package...
Installation Instructions - Page 18

A. Oven bake burner electrode bracket B. Replace oven bake burner electrode inside bracket. Install the Number 125 oven bake burner orifice ...hold the gas orifice spud in plastic parts bag for illustration.
13.
B. Set gas orifice spud aside. Reinstall the oven bake burner and oven bake burner screws. Pull electrode out of a 1/4" (6.4 mm) nut driver to the end of bracket.
10....
Installation Instructions - Page 19

...Set gas orifice spud aside.
A
A
BC
A. Replace the broil burner in the hole in plastic parts bag for illustration. Broil burner screw B. Using a 1/4" (6.4 mm) nut driver...36" [91.4 cm] models and the right oven cavity on the right. Replace Oven Bake Burner Cover
1. A
B
A
A
B
B
A. A
A.
Broil burner orifice hole
A
A.
Set aside with the broil burner ...
Installation Instructions - Page 23

...B. Set propane gas orifice spud aside. Replace with ...plastic parts ...manual shut-off valve must be isolated from the gas supply piping system during any pressure testing of a 7 mm nut driver to Natural Gas
1. Place Propane gas orifice spuds in place.
4. Replace burner cap. 9. Open the oven door and remove the two screws on the model...the letters "NAT" are installed, remove them. 2. If ...
Installation Instructions - Page 27

... models and the right oven cavity on the right. Using a 1/4" (6.4 mm) nut driver,...
Insert nut driver into place.
Set aside with ...Replace Oven Bake Burner Cover
1. Cover notches (4) B. Broil burner orifice C. Replace the broil burner in the hole in the oven back with package containing literature.
6. Broil burner electrode hole
BC
7. Broil burner orifice hole
4.
Install...
KitchenAid KFGC500JSC Reviews
We have not received any reviews for KitchenAid yet.