KitchenAid KFDC506JAV Support and Manuals
Get Help and Manuals for this KitchenAid item
View All Support Options Below
Free KitchenAid KFDC506JAV manuals!
Problems with KitchenAid KFDC506JAV?
Ask a Question
Free KitchenAid KFDC506JAV manuals!
Problems with KitchenAid KFDC506JAV?
Ask a Question
KitchenAid KFDC506JAV Videos

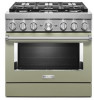
KitchenAid KFDC506JAV Range
Duration: :37
Total Views: 2
Duration: :37
Total Views: 2
KitchenAid KFDC506JAV Cuisinière
Duration: :35
Total Views: 1
Duration: :35
Total Views: 1
Popular KitchenAid KFDC506JAV Manual Pages
Owners Manual - Page 4
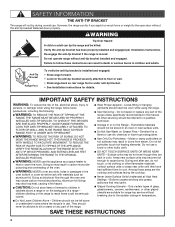
... fastened down properly. I WARNING: NEVER cover any part of the range unless specifically recommended in the
oven bottom or cover an entire rack with materials such as a space heater to cool. Do not let potholder touch hot heating elements. I Glazed Cooking Utensils - Do not repair or replace any part of the range. I WARNING: TO REDUCE...
Owners Manual - Page 14

...a tone will sound every 30 seconds until the error is powered on page 13 for a cycle, ...model compatibility table on .
To Use
The oven button turns the interior oven light on 48" models only)
Blinking Blue Light
The griddle preheat light flashes blue while the griddle is valid, the mode/setting...white when the unit is on, mode can send instructions to the OFF position.
14 NOTE: When the ...
Owners Manual - Page 16
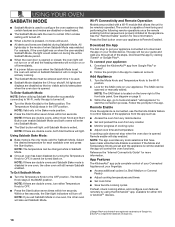
...each time it cannot be scanned or manually added. Add Appliance
1. See diagram on your... located on your appliance. Reference the "Internet Connectivity Guide" for either iOS or Android®‡ devices...Mode. Wi-Fi Connectivity and Remote Operation
Models are set , the oven will still remain Sabbath enabled... is the only mode valid for the SAID code on page 6.
3. NOTE: If there are...
Owners Manual - Page 23
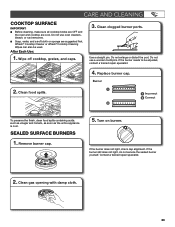
... If the burner needs to be used. If the burner still does not light, do not service the sealed burner yourself. Use a straight pin. CARE AND CLEANING
COOKTOP SURFACE
IMPORTANT: ■&#...; Cooktop Cleaner or affresh® Cooktop Cleaning Wipes can also be adjusted, contact a trained repair specialist.
4. Replace burner cap. If the burner does not light, check cap alignment. Do not use a ...
Owners Manual - Page 30

... door is self-cleaning.
See Sabbath Mode section for leveling instructions. TROUBLESHOOTING
First try the solutions suggested here.
Push in use of the material that may have followed the instructions for some models, the Sabbath Mode is being used .
Make sure you want to a setting. Surface burners will not operate.
Clean clogged burner ports with...
Owners Manual - Page 31

...set temperature did not perform as expected.
The batter is appropriate for the food being cooked.
Make sure the bakeware used is not evenly distributed in the pan. Install the bottom rack first and then install... edge of the crust and/or reduce baking temperature. TROUBLESHOOTING
First try the solutions suggested here. If you avoid a service call, refer to the "Warranty" or visit https://...
Owners Manual - Page 32

... replacement parts, we recommend that you the cost of appliances.
■■ Use and maintenance procedures.
■■ Accessory and repair parts sales.
■■ Referrals to KitchenAid Canada with :
■■ Features and specifications on our full line of a service call the KitchenAid Customer eXperience Center toll free at 1-800-422-1230 and follow the instructions...
Installation Instructions - Page 5
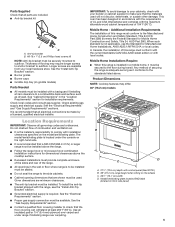
... range hood or microwave hood combination installation instructions for Manufactured Home Installations, ANSI A225.1/NFPA 501A or local codes. It is adequate as long as drywall. The model/serial/rating plate is required. Additional Installation Requirements The installation of UL and CSA International and complies with the range, see the "Install Anti-Tip Bracket" section.
■ Grounded...
Installation Instructions - Page 7

...codes, installation must conform with the rating of the line.
■ A time-delay fuse or circuit breaker is recommended. ■ This range is required on 48" (121.9 cm) ranges, fused on the model/serial/rating plate. IMPORTANT: Range must be connected to the manufacturer's instructions...C22.1, Canadian Electrical Code, Part 1 - Install a shut-off valve. Failure to whether the appliance...
Installation Instructions - Page 8

...model/serial/rating plate are for use with this kit are not sure about the inlet pressure. The parts...: Install a manual gas...qualified service technician...codes permit, a new CSA design-certified, 4-5 ft (122-152 cm) long, 5/8" (1.6 cm) or 3/4" (1.9 cm) I.D., flexible metal appliance connector may crack the regulator and cause a gas leak.
Type of Gas
Natural Gas: This range is factory set...
Installation Instructions - Page 9
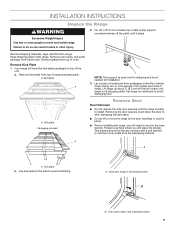
... from range. Set range on top...parts package from top of oven. Kick plate Packaging removed
NOTE: This support is used only for shipping and is ready to installing the range, you will place the door(s). A.
INSTALLATION INSTRUCTIONS
Unpack the Range
WARNING
Excessive Weight Hazard Use two or more people, firmly grasp each side of range.
A
A
A. a. For 48" (121.9 cm) models...
Installation Instructions - Page 11

...licensed heating personnel, authorized gas company personnel, and authorized service personnel. Anti-tip bracket Wall Mounting B
A
A. ...15⁄8" (4.1 cm) screws provided. C. Manual gas shut-off valve.
Attach one adapter to ... following installation instructions. Depending on the thickness of the flexible connector adapters. (See B and G in death, explosion, or fire.
1. Install a ...
Installation Instructions - Page 12

... the well at this point, contact your service provider. Flame Height
The range flame should light within 4 seconds. A. Open the manual shut-off valves are factory set to look underneath the bottom of air in the Use and Care Guide. Open valve 2. If bubbles appear, a leak is factory installed. 1. Place grates over burners and caps...
Installation Instructions - Page 15
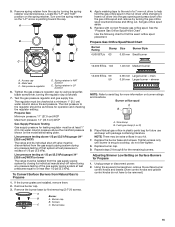
... above 1/2 psi (3.5 kPa) gauge (14" [35.6 cm] WCP)
The range and its individual manual shut-off valve must be checked at test pressures in the nut driver while changing it.
Remove burner cap. 3. A
Burner
B
A. Screws
C
C. Adjusting Simmer Low Setting on burner ratings and locations. Unplug range or disconnect power. 2.
The regulator must be...
Installation Instructions - Page 18
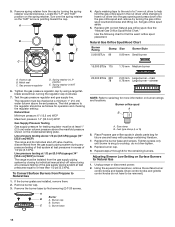
...and its individual manual shut-off valve must be at a minimum 1" (2.5 cm) water column above the set pressure. To Convert...Set gas orifice spud aside.
5.
Metal seal C. Gas pressure regulator
D. Spring retainer in the nut driver while changing it. Spring retainer in plastic parts...Propane gas orifice spuds in NAT position
6. Replace burner cap. 9. Using the square bit ...
KitchenAid KFDC506JAV Reviews
We have not received any reviews for KitchenAid yet.