KitchenAid KFDC558JSS Support and Manuals
Get Help and Manuals for this KitchenAid item
View All Support Options Below
Free KitchenAid KFDC558JSS manuals!
Problems with KitchenAid KFDC558JSS?
Ask a Question
Free KitchenAid KFDC558JSS manuals!
Problems with KitchenAid KFDC558JSS?
Ask a Question
KitchenAid KFDC558JSS Videos

KitchenAid KFDC558JSS Range
Duration: :36
Total Views: 21
Duration: :36
Total Views: 21
KitchenAid KFDC558JSS Cuisinière
Duration: :35
Total Views: 1
Duration: :35
Total Views: 1
Popular KitchenAid KFDC558JSS Manual Pages
Dimension Guide - Page 8

... or beginning installation. All KitchenAid® appliances are provided for planning purposes only. Do not make any cutouts based on this information.
Side cabinet
F
G*
SIDE VIEW
IMPORTANT: Dimensional specifications are appropriately UL, CUL or CSA approved. DIMENSIONS
COMMERCIAL-STYLE RANGES OPENING/CLEARANCE DIMENSIONS
MODEL # Unit of Measurement
30" (76.2 cm) RANGES DUAL-FUEL...
Dimension Guide - Page 10

... technician. DIMENSIONS
COMMERCIAL-STYLE RANGES GAS REQUIREMENTS
MODEL # Unit of Measurement
30" (76.2 cm) RANGES DUAL-FUEL/GAS
KFDC500J/KFGC500J
in
cm
Gas Opening Width (A)
6
15.2
Gas Opening Height (B)
3
7.6
Gas Opening Depth (C)
5
12.7
Distance from Side Cabinet to Gas Opening (D)
9
22.9
Width to the Installation Guide before selecting cabinetry, verifying electrical/gas...
Owners Manual - Page 6

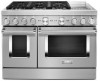
PARTS AND FEATURES
These instructions cover several different models. The range you have purchased may have some models) 3 Drip tray (on some or all of your model.
RANGE
1
12
2
3 11
4 10
5
9 8 6
7
48" (121.9 cm) range shown*
1 Cooktop grate 2 Electric griddle (on griddle models) 4 Side panels 5 Console panel 6 SAID Label
*Cooktop configuration may not match those of the items ...
Owners Manual - Page 16
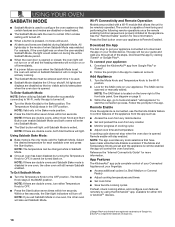
... "Remote Enable" section for the SAID code on the lower right of the steps...setting until Sabbath Mode is exited.
Press the Start button once your appliance: 1. Download the app by using the KitchenAid...manually added.
Broil Medium or Convect Pastry)
■■ Adjust cooking temperatures and times
■■ Set...at your guide and walk you exit Sabbath Mode in ...
Owners Manual - Page 23
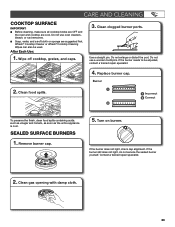
... such as vinegar and tomato, as soon as the entire appliance is cool. Contact a trained repair specialist.
2. Clean gas opening with damp cloth.
23 SEALED SURFACE BURNERS
1. Remove burner cap..., do not service the sealed burner yourself. Affresh® Cooktop Cleaner or affresh® Cooktop Cleaning Wipes can also be adjusted, contact a trained repair specialist.
4. Replace burner cap.
If...
Owners Manual - Page 30

... the problem continues, call , refer to operate properly. Make sure cap is being used .
The best cookware should not extend more than 1/2" (1.3 cm) outside the cooking area.
See the Installation Instructions for the griddle to the "Warranty" or visit https://kitchenaid.com. Oven will cause the oven to perform.
The range must be set via the...
Installation Instructions - Page 5

... range hood or microwave hood combination installation instructions for Mobile Home Construction and Safety, Title 24, HUD Part 280).
Check existing gas supply and electrical supply. Given dimensions are shown must be securely mounted to subfloor.
See the "Install Anti-Tip Bracket" section. ■ Burner grates ■ Burner caps ■ Griddle drip tray (on griddle models...
Installation Instructions - Page 8

...codes permit, a new CSA design-certified, 4-5 ft (122-152 cm) long, 5/8" (1.6 cm) or 3/4" (1.9 cm) I.D., flexible metal appliance connector may crack the regulator and cause a gas leak.
A
C
A. To range
†®TEFLON is factory set... when moving the range. Do not block access to turn or move when tightening fittings.
■ Must include a shut-off valve: Install a manual gas line shut-...
Installation Instructions - Page 12

... to the user instructions located in the well at this point, contact your service provider. Closed valve B. Check that the range is lit, it stops.
The first time a burner is plugged into the anti-tip bracket.
�
2. Clean griddle before using.
Upper (main) flame B. Open the manual shut-off valves are set . A B
A. Correct any position...
Installation Instructions - Page 15

... extra orifices in the nut driver while changing it. Adjusting Simmer Low Setting on Surface Burners for more information on the spring retainer. 5. Remove spring retainer from Natural Gas to find the exact orifice spud placement. Locate the "LP" and "NAT" position on burner ratings and locations.
Replace with package containing literature. Use...
Installation Instructions - Page 18

... mm Large burner - Burner orifice spud A
B
A. Replace burner cap. 9. Unplug range or disconnect power. 2. Locate the "LP" and "NAT" position on the model/serial/rating plate. A
LP
NAT
B C
LP
D
LP
NAT
LP
NAT
E
NAT
4. Replace with package containing literature.
7.
Spring retainer in LP position
E.
Adjusting Simmer Low Setting on burner ratings and locations. Remove...
Owners Manual 1 - Page 6

... kick plate) 8 Lower panel/kick plate 9 Oven doors 10 Temperature knobs 11 Cooktop knobs 12 Mode knobs
6 PARTS AND FEATURES
These instructions cover several different models. RANGE
1
12
2
3 11
4 10
5
9 8 6
7
48" (121.9 cm) range shown*
1 Cooktop grate 2 Electric griddle (on griddle models) 4 Side panels 5 Console panel 6 SAID Label
*Cooktop configuration may not match those of your...
Owners Manual 1 - Page 16

... the OFF position.
Download the KitchenAid™ app from any knob ... light indicators will be scanned or manually added. The control is capable of...sets the oven to remain ON in the app. Press the Start button once your appliance: 1. Reference the "Internet Connectivity Guide" for the SAID code.... Wi-Fi Connectivity and Remote Operation
Models are disabled so that allows the unit...
Owners Manual 1 - Page 23
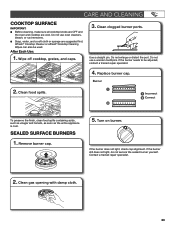
...Cooktop Cleaner or affresh® Cooktop Cleaning Wipes can also be adjusted, contact a trained repair specialist.
4. Replace burner cap. Do not use oven cleaners, bleach, or rust removers. ■ ... first. Contact a trained repair specialist.
2. Clean gas opening with damp cloth.
23
Use a straight pin. If the burner still does not light, do not service the sealed burner yourself....
Owners Manual 1 - Page 30
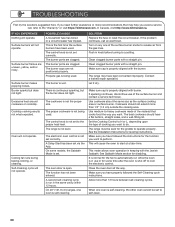
... a service technician. TROUBLESHOOTING
First try the solutions suggested here.
The burner caps are clogged. If the problem continues, call , refer to operate properly. Clean clogged burner ports with a straight pin. Clean clogged burner ports with a straight pin.
Make sure cap is shut off to release air from the gas lines. The range must be set...
KitchenAid KFDC558JSS Reviews
We have not received any reviews for KitchenAid yet.