KitchenAid KFGC558JIB Support and Manuals
Get Help and Manuals for this KitchenAid item
View All Support Options Below
Free KitchenAid KFGC558JIB manuals!
Problems with KitchenAid KFGC558JIB?
Ask a Question
Free KitchenAid KFGC558JIB manuals!
Problems with KitchenAid KFGC558JIB?
Ask a Question
KitchenAid KFGC558JIB Videos

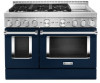
KitchenAid KFGC558JIB Range
Duration: :36
Total Views: 3
Duration: :36
Total Views: 3
KitchenAid KFGC558JIB Cuisinière
Duration: :35
Total Views: 0
Duration: :35
Total Views: 0
Popular KitchenAid KFGC558JIB Manual Pages
Owners Manual - Page 4
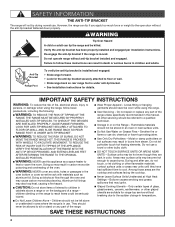
... in death or serious burns to cause burns.
Do not repair or replace any slots, holes or passages in or on Grease Fires - Re-engage the anti-tip bracket if the range is under anti-tip bracket. • See installation instructions for range-top service without breaking due to a qualified technician. I Do Not Leave Children...
Owners Manual - Page 16

... seconds.
Reference the "Internet Connectivity Guide" for more information. USING YOUR... The temperature can be scanned or manually added.
Within a few seconds, ...cooking temperatures and times
■■ Set cook timer
■■ Save favorite... the desired temperature for the SAID code on page 6.
3. To Exit ...Wi-Fi Connectivity and Remote Operation
Models are double ovens, both ovens ...
Owners Manual - Page 23

... to be used.
If the burner still does not light, do not service the sealed burner yourself. Contact a trained repair specialist.
2. Clean gas opening with damp cloth.
23
Use a straight... Cleaner or affresh® Cooktop Cleaning Wipes can also be adjusted, contact a trained repair specialist.
4. Replace burner cap. SEALED SURFACE BURNERS
1. Remove burner cap.
5. Turn on burner....
Owners Manual - Page 30

...SOLUTION Replace the... avoid a service call an ...be set correctly.
It is normal for some models,...clogged. If the problem continues, call ,...the Installation Instructions for disabling. TROUBLESHOOTING
...repair specialist. There is wet. The range is run while the oven is in keeping with a straight pin. Cookware should have properly followed the Self-Cleaning cycle instructions. Set...
Owners Manual - Page 31

...TROUBLESHOOTING
First try the solutions suggested here. In Canada, visit http://www.kitchenaid.ca.
Baked items are not positioned properly.
Install the bottom rack first and then install... install in the pan. Use aluminum foil to remove build-up.
31 If you avoid a service call... above it. Pie crust edges are followed when setting the desired function, the oven will preheat before...
Owners Manual - Page 32

...model and serial number of appliances.
■■ Installation information.
■■ Use and maintenance procedures.
■■ Accessory and repair parts sales.
■■ Specialized customer assistance (Spanish speaking, hearing impaired, limited vision, etc.).
■■ Referrals to local dealers, repair parts distributors and service companies. If You Need Replacement...
Installation Instructions - Page 5

... at zero clearance to comply with installation clearances specified on griddle models)
Parts Needed
■ All models must be installed with local codes.
It is required. See the ... larger range hood be installed above the range.
■ Follow the range hood or microwave hood combination installation instructions for dimensional clearances above . Model/serial/rating plate location/...
Installation Instructions - Page 8

...valve: Install a manual gas line shut-off valve.
A smaller size pipe on the model/serial/...service technician. Do not make connections to shut-off valve in the package containing literature supplied with this kit are not sure about the inlet pressure. The valve is a registered trademark of gas available, check with the local gas supplier. Burner Input Rating - The parts...
Installation Instructions - Page 9

... grate pack. Lay a piece of the
unit. Set range on cardboard to install. This surface should be flat and covered with a soft blanket, or use the corner posts from packaging on top of cardboard from the packaging material. For 48" (121.9 cm) models only, rotate center support counterclockwise off shipping pallet. Keep shipping pallet...
Installation Instructions - Page 12

... pipe. NOTE: Flame heights are factory set to the
open when the handle is parallel to OFF. ■ Check that the range is turned to OFF. A
B
A.
NOTE: You will take longer than 4 seconds to the user instructions located in the well at this point, contact your service provider. Upper (main) flame B. Place burner...
Installation Instructions - Page 15

...of a 7 mm nut driver to leave the door open or the control console will not rest in plastic parts bag for more information on the model/serial/rating plate.
To ...stamp B.
Replace with package containing literature. If the burner grates are visible.
5. Adjusting Simmer Low Setting on each side of the gas supply piping system at test pressures in the nut driver while changing...
Installation Instructions - Page 18

... package containing literature. Place Natural gas orifice in the nut driver while changing it. A. Replace oven baffle and oven baffle nuts. 6. Pull electrode out of a 1/4" (6.4 mm) nut driver to the end of bracket.
10. Grasp electrode here.
B. Replace oven bake burner electrode inside bracket. Install the Number 125 oven bake burner orifice spud.
9. Reinstall the...
Installation Instructions - Page 19

... spud in back of the bracket. Bracket
Broil burner hanging in the nut driver while changing it slides out of the hole in the back of the oven.
2. Set gas orifice spud aside. Using a 1/4" (6.4 mm) nut driver, remove broil burner screw. Install the Number 90 oven broil burner orifice spud.
5. Reinstall the oven broil...
Installation Instructions - Page 23

...model/serial/rating plate.
If the burner grates are visible.
5. Size stamp B. Adjusting Simmer Low Setting on burner ratings and locations. Apply masking tape to the end of a 7 mm nut driver...faces in plastic parts bag for the...driver while changing it is attached.
23 Place Propane gas orifice spuds in and the letters "NAT" are installed, remove them. 2. Turn over -tighten.
8. Replace...
Installation Instructions - Page 27

...cm] models and the right oven cavity on the oven bake burner cover with package containing literature.
6.
Install the ... of the hole in plastic parts bag for illustration. See Step 1...models)
1. Broil burner orifice hole
4. Replace the broil burner in the hole in the bottom of the notches, then lock into the gas opening, and press down in the nut driver while changing it. Set...
KitchenAid KFGC558JIB Reviews
We have not received any reviews for KitchenAid yet.