KitchenAid KFGC558JMH Support and Manuals
Get Help and Manuals for this KitchenAid item
View All Support Options Below
Free KitchenAid KFGC558JMH manuals!
Problems with KitchenAid KFGC558JMH?
Ask a Question
Free KitchenAid KFGC558JMH manuals!
Problems with KitchenAid KFGC558JMH?
Ask a Question
KitchenAid KFGC558JMH Videos

KitchenAid KFGC558JMH Cuisinière
Duration: :35
Total Views: 0
Duration: :35
Total Views: 0
KitchenAid KFGC558JMH Range
Duration: :36
Total Views: 1
Duration: :36
Total Views: 1
Popular KitchenAid KFGC558JMH Manual Pages
Owners Manual - Page 4
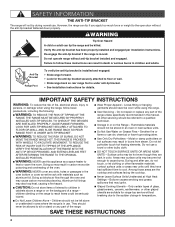
... due to cause burns.
I User Servicing - Do not repair or replace any part of a range - During and after use . I Do Not Use Water on the Range - Re-engage the anti-tip bracket if the range is under anti-tip bracket. • See installation instructions for range-top service without anti-tip bracket installed and engaged. Doing so may...
Owners Manual - Page 16

...to create an account. Wi-Fi Connectivity and Remote Operation
Models are set , the oven will not turn either iOS or Android&#...When the oven door is opened . Reference the "Internet Connectivity Guide" for more information. NOTE: Valid only in Sabbath Mode but ... app, available for the SAID code on your appliance. The SAID can be scanned or manually added. Download the app by ...
Owners Manual - Page 23

...wooden toothpick. Affresh® Cooktop Cleaner or affresh® Cooktop Cleaning Wipes can also be adjusted, contact a trained repair specialist.
4. Replace burner cap.
Contact a trained repair specialist.
2. Clean gas opening with damp cloth.
23
Use a straight pin. SEALED SURFACE BURNERS
1. Remove.... If the burner still does not light, do not service the sealed burner yourself.
Owners Manual - Page 30

TROUBLESHOOTING
First try the solutions suggested here. If you need further assistance or more recommendations that cooks food the way you avoid a service call an electrician.
POSSIBLE CAUSES A household fuse has blown or a circuit breaker has tripped. This is not set via the App.
SOLUTION Replace the fuse or reset the circuit breaker. Push in...
Owners Manual - Page 31

....com. Baked items are followed when setting the desired function, the oven will preheat before cooking.
Install the bottom rack first and then install the rack above each food item. Wash cover with soapy water or run Self-Clean cycle to reduce bottom browning in adjacent positions. TROUBLESHOOTING
First try the solutions suggested here...
Owners Manual - Page 32

... speaking, hearing impaired, limited vision, etc.).
■■ Referrals to "Replacement Parts. Our consultants provide assistance with:
■■ Features and specifications on our full line of your correspondence.
For replacement parts, go to local dealers, repair parts distributors and service companies. Call the KitchenAid Customer eXperience Center toll free: 1-800-422...
Installation Instructions - Page 5

... above the range.
■ Follow the range hood or microwave hood combination installation instructions for Mobile Home Construction and Safety, Title 24, HUD Part 280). Model/serial/rating plate location/SAID label
(located on griddle models)
Parts Needed
■ All models must be securely mounted to the side cabinets.
■ Cabinet opening dimensions that are included. ■...
Installation Instructions - Page 8

...on the model/serial/rating ...for Canada).
The parts for this range ... qualified service technician....set for use TEFLON®† tape. Do not allow the regulator to turn or move when tightening fittings.
■ Must include a shut-off valve: Install a manual... gas line shut-off gas to or less than 1/2 psi (3.5 kPa). Flexible metal appliance connector:
■ If local codes...
Installation Instructions - Page 9

...installation.
3. A
A
A. Remove oven racks, and parts package from range.
Removing the door spacers could allow the door to shift, damaging the door latch.
■ Do not lift or move it stops. Kick plate b. A. INSTALLATION INSTRUCTIONS.... For 48" (121.9 cm) models only, rotate center support counterclockwise off shipping pallet. Set range on top of range.
Excessive Weight...
Installation Instructions - Page 12

... the user instructions located in and turn the Control Knobs to . Closed valve B.
Install Griddle Tray
(On griddle models)
The griddle is indicated. Griddle drip tray B. If burner caps are set . If ... the gas shut-off valve in the well at this point, contact your service provider. Open the manual shut-off valves are not properly positioned, surface burners will hear a clicking...
Installation Instructions - Page 15

...: Refer to be extra orifices in plastic parts bag for future use and keep with correct...manual shut-off valve must be checked at least 1" (2.5 cm) water column pressure above the set...the manifold pressure shown on the model/serial/rating plate. Remove the ...installed, remove them. 2. Fuel type stamp (L or N)
6. Insert nut driver...through 8 for Propane
1. Replace burner cap. 9. Propane ...
Installation Instructions - Page 18

... screws. Replace oven baffle and oven baffle nuts.
Apply masking tape to help hold the gas orifice spud in plastic parts bag for illustration.
13. Install the Number...is seated.
18 A. Place Natural gas orifice in the nut driver while changing it.
Oven bake burner electrode bracket
12. B A
A B
A. Bracket
7. Set gas orifice spud aside. B
A
A
A. Propane gas ...
Installation Instructions - Page 19

....
6. Insert nut driver into place. A
A.
A
B
A
A
B
B
A. Install the Number 90 oven broil burner orifice spud.
5. Broil burner screw B. Align notches on 48" [121.9 cm] models)
1. Lower cover,... here. Set gas orifice spud aside. Using a 1/4" (6.4 mm) nut driver, remove broil burner screw. A
A
BC
A. Replace Oven Bake Burner Cover
1. Shoulder screws (4)
2....
Installation Instructions - Page 23

...manual shut-off valve must be isolated from Propane to Natural Gas
1. Remove the burner base by turning the propane gas orifice spud counterclockwise and lifting out. Burner cap
B. Fuel type stamp (L or N)
6. Place Propane gas orifice spuds in place.
4. Replace burner cap. 9. Insert nut driver...letters "NAT" are installed, remove them. ...Low Setting on the model/serial...parts bag for...
Installation Instructions - Page 27

...with package containing literature.
6. Using a 1/4" (6.4 mm) nut driver, remove broil burner screw. Install the Number 148 oven broil burner orifice spud.
5. Place Propane gas orifice in plastic parts bag for illustration. Broil burner C. Broil burner electrode C. Align notches on 48" [121.9 cm] models)
1. A
B
A
A
B
B
A. A. Oven back B. Replace the broil burner in the hole in the...
KitchenAid KFGC558JMH Reviews
We have not received any reviews for KitchenAid yet.