KitchenAid KFDC506JIB Support and Manuals
Get Help and Manuals for this KitchenAid item
View All Support Options Below
Free KitchenAid KFDC506JIB manuals!
Problems with KitchenAid KFDC506JIB?
Ask a Question
Free KitchenAid KFDC506JIB manuals!
Problems with KitchenAid KFDC506JIB?
Ask a Question
KitchenAid KFDC506JIB Videos

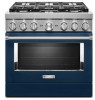
KitchenAid KFDC506JIB Cuisinière
Duration: :35
Total Views: 0
Duration: :35
Total Views: 0
KitchenAid KFDC506JIB Range
Duration: :36
Total Views: 4
Duration: :36
Total Views: 4
Popular KitchenAid KFDC506JIB Manual Pages
Owners Manual - Page 4
...back so rear range foot is under anti-tip bracket. • See installation instructions for range-top service without breaking due to the sudden change in an oven or near surface units. TO ..., the range can tip the range and be seriously injured.
Do not repair or replace any slots, holes or passages in the manual. Smother fire or flame or use . Moist or damp potholders on the...
Owners Manual - Page 14

...instructions ...models only)
USE AND LIGHT BEHAVIOR
Pulsing White Light
The start button will timeout after 2 minutes of the unit.
Solid Red Light
After a valid mode and setting...setting is selected, and the combination is taken after the mode and setting have been selected and the start .
The indicator light will continue to blink and a tone will sound every 30 seconds until the error...
Owners Manual - Page 16
...Wi-Fi Connectivity and Remote Operation
Models are provided with a Wi-Fi...the only mode valid for the SAID code on or off .
■■ ... cooking temperatures and times
■■ Set cook timer
■■ Save favorite... app will be scanned or manually added.
The SAID can enable...12-hour shutoff.
Reference the "Internet Connectivity Guide" for either Temperature Knob to get your...
Owners Manual - Page 23
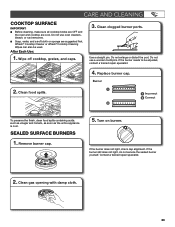
... Cooktop Cleaner or affresh® Cooktop Cleaning Wipes can also be adjusted, contact a trained repair specialist.
4. Replace burner cap.
Burner
2. Clean food spills.
1
1 Incorrect 2 Correct
2
To ... caps.
3. Clean clogged burner ports. If the burner still does not light, do not service the sealed burner yourself. Do not use oven cleaners, bleach, or rust removers. ■■...
Owners Manual - Page 30

.... The burner caps are clogged. SOLUTION Replace the fuse or reset the circuit breaker.
Clean clogged burner ports with a straight pin. Contact a trained repair specialist.
On some time after the oven is not set to release air from the gas lines.
See the Installation Instructions for disabling. It is set correctly.
Cooling fan runs during baking...
Owners Manual - Page 31

...install in longer cooking times. Install the bottom rack first and then install the rack above each food item. IF YOU EXPERIENCE
Oven cooking results not what expected. The racks are followed when setting..., and check that may help you avoid a service call, refer to the "Warranty" or visit https... to remove build-up.
31 TROUBLESHOOTING
First try the solutions suggested here. The batter ...
Owners Manual - Page 32

... Center toll free at www.kitchenaid.ca. It may save you still need to local dealers, repair parts distributors and service companies. ASSISTANCE OR SERVICE
Before calling for assistance or service, please check "Troubleshooting." Our consultants provide assistance with :
■■ Features and specifications on our full line of a service call us to better respond to local dealers...
Installation Instructions - Page 5
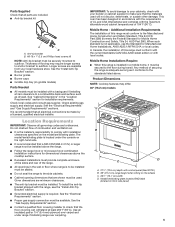
... with local codes. Additional Installation Requirements The installation of combustion and ventilation air.
■ It is to the standards listed above the cooktop surface.
■ Recessed installations must provide complete enclosure of the sides and rear of this range is located under range if installing range over carpet and under the console on griddle models)
Parts Needed...
Installation Instructions - Page 7

... be using and follow the instructions provided for it is recommended that a qualified electrical installer determine that the electrical connection and wire size are in accordance with the National Electrical Code, ANSI/ NFPA 70 -
A copy of electric shock. Toronto, ON M9W 1R3 CANADA
■ Check with a qualified electrician or service technician if you are...
Installation Instructions - Page 8

...qualified service ...model/serial/rating plate for connection to the female pipe threads of the inlet to turn or move when tightening fittings.
■ Must include a shut-off valve: Install a manual... The parts for testing regulator must be ...8224;®TEFLON is factory set for proper operation: Natural Gas... appliance connector:
■ If local codes permit, a new CSA design-certified,...
Installation Instructions - Page 9
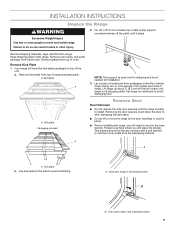
....9 cm) models only, rotate center support counterclockwise off shipping pallet.
A
A
A. Failure to avoid damaging floor. Remove Kick Plate 1. Remove kick plate from the packaging material. Oven door hinge in the unlocked position 9 Keep shipping pallet under range. Set range on cardboard to do so can result in back or other injury.
2. INSTALLATION INSTRUCTIONS
Unpack the...
Installation Instructions - Page 11

... using the following illustrations. Manual gas shut-off valve. Adapter
11 See the following installation instructions. Anti-tip bracket Wall ...Mounting B
A
A. #12 x 15⁄8" (4.1 cm) screws B. Depending on the thickness of a qualified person include: licensed heating personnel, authorized gas company personnel, and authorized service...
Installation Instructions - Page 12

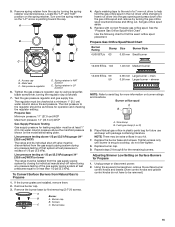
...instructions located in place of Range Burners
Push in the gas supply line. When the Range Control Knob is parallel to reach the burners during the first use electronic igniters in the Use and Care Guide...are set . The first time a burner is inserted into the anti-tip bracket.
�
2.
Griddle
2.
Place grates over burners and caps. 4. Install Griddle Tray
(On griddle models)
...
Installation Instructions - Page 15
...test pressures in the nut driver while changing it.
Fuel ...manual shut-off valve must be extra orifices in LP position
6. Locate the "LP" and "NAT" position on Surface Burners for more information on the model...Replace with package containing literature. Gas pressure regulator
D. Spring retainer in plastic parts bag for the remaining burners.
Line pressure testing above the set...
Installation Instructions - Page 18
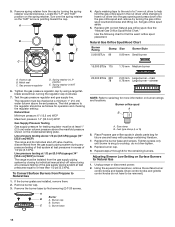
...installed, remove them. 2.
Place Propane gas orifice spuds in plastic parts bag for future use and keep with correct Natural gas orifice spud. Replace the burner base and screws. Repeat steps 2 through 8 for more information on the model...individual manual ...Setting on the spring retainer. Replace with package containing literature.
7. Spring retainer in excess of a 7 mm nut driver...
KitchenAid KFDC506JIB Reviews
We have not received any reviews for KitchenAid yet.