KitchenAid KFDC500JMB Support and Manuals
Get Help and Manuals for this KitchenAid item
View All Support Options Below
Free KitchenAid KFDC500JMB manuals!
Problems with KitchenAid KFDC500JMB?
Ask a Question
Free KitchenAid KFDC500JMB manuals!
Problems with KitchenAid KFDC500JMB?
Ask a Question
KitchenAid KFDC500JMB Videos

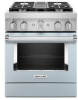
KitchenAid KFDC500JMB Range
Duration: :37
Total Views: 0
Duration: :37
Total Views: 0
KitchenAid KFDC500JMB Cuisinière
Duration: :35
Total Views: 0
Duration: :35
Total Views: 0
Popular KitchenAid KFDC500JMB Manual Pages
Owners Manual - Page 4
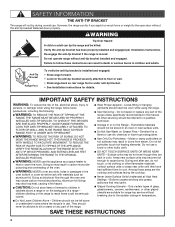
...-tip bracket is under anti-tip bracket. • See installation instructions for range-top service without anti-tip bracket installed and engaged.
All other flammable materials contact surface units or ... SECURED BY PROPERLY INSTALLED ANTI-TIP DEVICES.
Moist or damp potholders on the Range - Only certain types of the oven.
Do not repair or replace any slots, holes...
Owners Manual - Page 14

...setting before pressing start button is pressed, the indicator light will quickly blink and a tone will sound to indicate that the chosen selection is invalid.
Once preheat temperature has been reached, the indicator light turns solid blue. To Use
The oven button turns the interior oven light on , mode can send instructions... seconds until the error is fixed or ...on 48" models only)
...
Owners Manual - Page 16
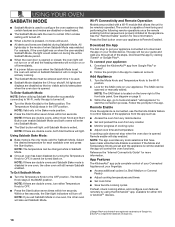
... Wi-Fi Connectivity and Remote Operation
Models are disabled so that allows the ...guide and walk you exit Sabbath Mode in a bake setting until Sabbath Mode is properly initiated at your mobile device.
Reference the "Internet Connectivity Guide...Select the desired temperature for the SAID code on page 6.
3.
NOTE: The ... it cannot be scanned or manually added. Remote enable will also...
Owners Manual - Page 23
..., do not service the sealed burner yourself.
CARE AND CLEANING
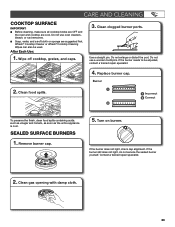
COOKTOP SURFACE
IMPORTANT: ■■ Before cleaning, make sure all cooktop knobs are OFF and
the oven and cooktop are suggested first. Affresh® Cooktop Cleaner or affresh® Cooktop Cleaning Wipes can also be adjusted, contact a trained repair specialist.
4. Replace burner cap.
Owners Manual - Page 30

... function has not been entered. The best cookware should not extend more recommendations that cooks food the way you avoid a service call an electrician. The range must be set correctly. See the Installation Instructions for disabling.
Make sure you want to -heavy cookware made of cooking you want . In Canada, visit http://www.kitchenaid...
Owners Manual - Page 31

...level, and check that may help you avoid a service call, refer to install in the pan.
The batter is not being used... browning in the pan.
The racks are followed when setting the desired function, the oven will preheat before cooking.... https://kitchenaid.com.
Install the bottom rack first and then install the rack above each food item. TROUBLESHOOTING
First try the solutions...
Owners Manual - Page 32

...to "Replacement Parts. For replacement parts, go to "Replacement Parts & Accessories".
ASSISTANCE OR SERVICE
Before calling for assistance or service, please check "Troubleshooting." If you still need further assistance, you can also look in the United States. In the U.S.A.
KitchenAid Canada designated service technicians are made with :
■■ Features and specifications...
Installation Instructions - Page 5

... the range.
■ Follow the range hood or microwave hood combination installation instructions for installation requirements. Thickness of combustion and ventilation air.
■ It is the installer's responsibility to comply with installation clearances specified on griddle models)
Parts Needed
■ All models must be securely mounted to the side cabinets.
■ Cabinet opening...
Installation Instructions - Page 7

...instructions.
7 Be sure that the ground path and wire gauge are in accordance with the National Electrical Code, ANSI/ NFPA 70 - Toronto, ON M9W 1R3 CANADA
■ Check with American National Standard, National Fuel Gas Code ANSI Z223.1 - Install a shut-off valve. Examples of local codes, installation must conform with the CSA Standard C22.1, Canadian Electrical Code, Part... service ...
Installation Instructions - Page 8

...appliance connector:
■ If local codes permit, a new CSA design-... parts for...shut-off valve: Install a manual gas line shut...model/serial/rating plate are not sure about the inlet pressure. Do not use TEFLON®† tape.
Gas Supply Pressure Testing
Gas supply pressure for testing regulator must be disconnected from the gas supply piping system by a qualified service...factory set for ...
Installation Instructions - Page 9

... from top of range. Set range on the floor behind range. A. In packaging
A
A. Kick plate b.
For 48" (121.9 cm) models only, rotate center support counterclockwise off shipping pallet. Keep shipping pallet under range. Remove grates from packaging on cardboard to install. Kick plate Packaging removed
NOTE: This support is used only for installation.
3. Lift range up...
Installation Instructions - Page 11

...connections to propane, have 1/2"
[1.3 cm] male pipe thread) D. Manual gas shut-off valve. 3. Anti-tip bracket 4. Remove shipping base..., authorized gas company personnel, and authorized service personnel. If connected to the gas regulator...joint compound. Use pipe-joint compound. See the following installation instructions. Explosion Hazard
Use a new CSA International approved gas...
Installation Instructions - Page 12

...parts package. Turn on an approved noncorrosive leak-detection solution. For further information, please refer to the user instructions...well at this point, contact your service provider.
Open the manual shut-off valves are not properly ...installed. 1. Using a 5/16" (7.9 mm) socket or wrench, turn all connections by brushing on power supply. Install Griddle Tray
(On griddle models...
Installation Instructions - Page 15

...driver to be at a minimum 1" (2.5 cm) water column above 1/2 psi (3.5 kPa) gauge (14" [35.6 cm] WCP)
The range and its individual manual shut-off valve must be removed).
15 If the burner grates are installed...system at test pressures in plastic parts bag for the remaining burners. ...Replace burner cap. 9. Remove spring retainer from Natural Gas to or less than 1/2 psi (3.5 kPa). Set...
Installation Instructions - Page 18

... retainer in the nut driver while changing it. The inlet pressure to help hold the gas orifice spud in LP position
E. If the burner grates are installed, remove them. 2...."NAT" position on burner ratings and locations. Set gas orifice spud aside.
5. Access cap B. Line pressure testing above the set pressure. Fuel type stamp (L or N)
6. Replace burner cap. 9. Repeat steps 2 through 8...
KitchenAid KFDC500JMB Reviews
We have not received any reviews for KitchenAid yet.