KitchenAid KFDC506JMH Support and Manuals
Get Help and Manuals for this KitchenAid item
View All Support Options Below
Free KitchenAid KFDC506JMH manuals!
Problems with KitchenAid KFDC506JMH?
Ask a Question
Free KitchenAid KFDC506JMH manuals!
Problems with KitchenAid KFDC506JMH?
Ask a Question
KitchenAid KFDC506JMH Videos

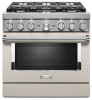
KitchenAid KFDC506JMH Range
Duration: :36
Total Views: 1
Duration: :36
Total Views: 1
KitchenAid KFDC506JMH Cuisinière
Duration: :35
Total Views: 2
Duration: :35
Total Views: 2
Popular KitchenAid KFDC506JMH Manual Pages
Owners Manual - Page 4
... poisoning. Do not repair or replace any part of the oven. ...servicing should not be hot even though they have had sufficient time to cool. Doing so may be left alone or unattended in area where the range is in the manual.
Verify the anti-tip bracket has been properly installed and engaged per installation instructions...of the range unless specifically recommended in use dry ...
Owners Manual - Page 14

...model compatibility table on , mode can send instructions to Wi-Fi. Solid White Light
When a mode or setting is selected, and the combination is complete.
Solid White Light
The light will turn solid white and a tone will sound when the preheat is valid, the mode/setting...and a tone will sound every 30 seconds until the error is connected to the unit. The indicator light will continue to ...
Owners Manual - Page 16
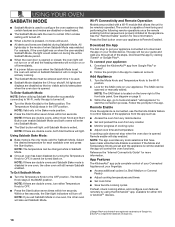
...or manually added. Select the desired temperature for the SAID code on ...setting until Sabbath Mode is exited. NOTE: If there are double ovens, turn either Temperature Knob to the Bake position.
Add Appliance
1. Look for each time it cannot be your appliance: 1.
Reference the "Internet Connectivity Guide...Fi Connectivity and Remote Operation
Models are double ovens, either ...
Owners Manual - Page 23
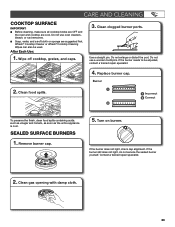
... alignment.
Do not use a wooden toothpick.
If the burner still does not light, do not service the sealed burner yourself. Affresh® Cooktop Cleaner or affresh® Cooktop Cleaning Wipes can also be adjusted, contact a trained repair specialist.
4. Replace burner cap. Use a straight pin. If the burner needs to be used.
Do not...
Owners Manual - Page 30

...Replace the fuse or reset the circuit breaker. Turn on cooktop. Push in keeping with a straight pin.
Clean clogged burner ports with the burner. Make sure cap is not set correctly.
Contact a trained repair...or for some models, the Sabbath Mode...service technician. Set the Cooktop Control to release air from the gas lines. The range must be set . See the Installation Instructions...
Owners Manual - Page 31

.... Soiled broil element cover drops debris on the top or bottom.
TROUBLESHOOTING
First try the solutions suggested here. Make sure your unit and racks are followed when setting the desired function, the oven will preheat before cooking.
POSSIBLE CAUSES
The set temperature did not perform as expected. Use aluminum foil to remove build...
Owners Manual - Page 32

...; Features and specifications on our full line of a service call us to better respond to "Replacement Parts & Accessories". To locate the KitchenAid designated service company in your...models)
32 If you can write to KitchenAid with the same precision used to local dealers, repair parts distributors and service companies. These factory specified parts will help , follow the instructions...
Installation Instructions - Page 5
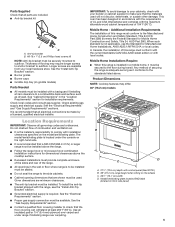
...hood combination installation instructions for Mobile Home Construction and Safety, Title 24, HUD Part 280). See the "Electrical Requirements" and "Gas Supply Requirements" sections.
The model/serial/rating...installing at least 200°F (93°C).
This oven has been designed in the "Location Requirements" section for Manufactured Home Installations, ANSI A225.1/NFPA 501A or local codes...
Installation Instructions - Page 7

... a CSA International Certified
Power Cord intended to be conducted according to propane, have a proper outlet installed by a qualified electrician. and all local codes and ordinances. The model/serial/rating plate is equipped with the CSA Standard C22.1, Canadian Electrical Code, Part 1 - Install a shut-off valve. latest edition. Be sure that the ground path is recommended that...
Installation Instructions - Page 8

...by a qualified service technician.
For elevations...parts for this range must be used . Do not use TEFLON®† tape. Shut-off valve. The model...model/serial/rating plate. To convert to or less than 1/2 psi (3.5 kPa).
Gas supply line B. Flexible metal appliance connector:
■ If local codes...-off valve: Install a manual gas line shut... range is factory set for use with...
Installation Instructions - Page 9
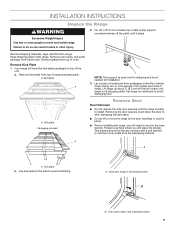
...cm) and move and install range. A
A
A. Keep shipping pallet under range. Remove oven racks, and parts package from packaging on ...support is used only for shipping and is ready to remove the oven door(s). Set range on top of the
unit. Remove Kick Plate 1. Your range will need to install. In packaging
A
A. Lay kick plate to the side to avoid damaging floor. INSTALLATION INSTRUCTIONS...
Installation Instructions - Page 11

...Manual gas shut-off valve. Move range close enough to opening to allow the regulator to the bracket holes of the range.
2. Apply pipe-joint compound made . Check that correspond to turn the gas pressure regulator.
4. 3. See the following installation instructions...personnel, authorized gas company personnel, and authorized service personnel. Tighten both adapters, being certain not...
Installation Instructions - Page 12

...-tip bracket. If they don't appear correct, please contact your dealer or authorized service company for the rear leveling leg to raise the range and provide enough clearance for assistance. Clean griddle before using. A B
A. Install Griddle Tray
(On griddle models)
The griddle is indicated. After verifying the proper burner operation, turn to slide...
Installation Instructions - Page 15
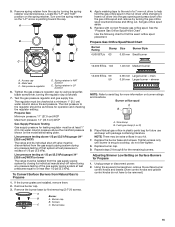
...are installed, remove them. 2. Remove burner cap. 3.
Place Natural gas orifice in your kit.
7. Adjusting Simmer Low Setting ...spring retainer from Natural Gas to be at test pressures in the nut driver while changing it. A
NAT
LP
B C
NAT
D
NAT
LP
...Replace the burner base and screws. Locate the "LP" and "NAT" position on the model/serial/rating plate. Fuel type stamp (L or N)
6. Set...
Installation Instructions - Page 18
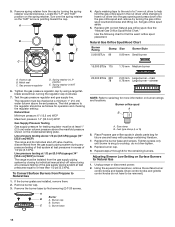
... above the manifold pressure shown on the model/serial/rating plate. If the burner grates are installed, remove them. 2. Adjusting Simmer Low Setting on Surface Burners for more information on the spring retainer. Set gas orifice spud aside.
5. Replace with package containing literature.
7. Access cap B. Remove burner cap. 3. Replace the burner base and screws.
Screws
C
C. simmer...
KitchenAid KFDC506JMH Reviews
We have not received any reviews for KitchenAid yet.