Use & Care Guide
Page 1
ELECTRIC RANGE ARCHITECT® SERIES II Use & Care Guide For questions about features, operation/performance, parts, accessories or service, call: 1-800-422-1230 or visit our website at www.kitchenaid.com In Canada, call for assistance, installation and service, call: 1-800-807-6777 or visit our website at www.KitchenAid.ca Table of Contents...2 Models KERS807 KESK901 KESS907 KESS908 YKERS807 YKESS907 YKESS908 W10246111B
ELECTRIC RANGE ARCHITECT® SERIES II Use & Care Guide For questions about features, operation/performance, parts, accessories or service, call: 1-800-422-1230 or visit our website at www.kitchenaid.com In Canada, call for assistance, installation and service, call: 1-800-807-6777 or visit our website at www.KitchenAid.ca Table of Contents...2 Models KERS807 KESK901 KESS907 KESS908 YKERS807 YKESS907 YKESS908 W10246111B
Use & Care Guide
Page 2
TABLE OF CONTENTS RANGE SAFETY 3 The Anti-Tip Bracket 3 PARTS AND FEATURES 5 COOKTOP USE 9 Ceramic Glass 9 Cookware 9 Home Canning 10 Cooktop Controls - Option 6 18 Sabbath Mode - Option 7 19 OVEN USE 20 Aluminum Foil 20 Bakeware... Self-Cleaning Cycle 26 General Cleaning 27 Oven Light(s 28 Oven Door 28 Storage Drawer 29 Warming Drawer 29 TROUBLESHOOTING 29 ASSISTANCE OR SERVICE 30 In the U.S.A 30 Accessories 31 In Canada 31 WARRANTY 31 2 Options 2, 3, 4 18 Dehydrate - Option 5 18 Oven Temperature Calibration - Custom Knobs 12 Cooktop Controls - Pro Line Knobs...
TABLE OF CONTENTS RANGE SAFETY 3 The Anti-Tip Bracket 3 PARTS AND FEATURES 5 COOKTOP USE 9 Ceramic Glass 9 Cookware 9 Home Canning 10 Cooktop Controls - Option 6 18 Sabbath Mode - Option 7 19 OVEN USE 20 Aluminum Foil 20 Bakeware... Self-Cleaning Cycle 26 General Cleaning 27 Oven Light(s 28 Oven Door 28 Storage Drawer 29 Warming Drawer 29 TROUBLESHOOTING 29 ASSISTANCE OR SERVICE 30 In the U.S.A 30 Accessories 31 In Canada 31 WARRANTY 31 2 Options 2, 3, 4 18 Dehydrate - Option 5 18 Oven Temperature Calibration - Custom Knobs 12 Cooktop Controls - Pro Line Knobs...
Use & Care Guide
Page 4
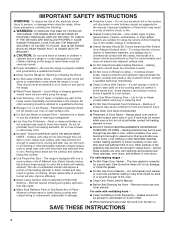
...No commercial oven cleaner or oven liner protective coating of any part of interest to children in the manual. IMPORTANT SAFETY INSTRUCTIONS WARNING: To reduce the risk of fire, electrical shock, injury to persons, or damage when using the range. ■ User Servicing - Do not use dry chemical or.... ■ Use Proper Pan Size - SAVE THESE INSTRUCTIONS 4 TO CHECK IF THE DEVICES ARE INSTALLED PROPERLY, SLIDE RANGE FORWARD, LOOK FOR ANTI-TIP BRACKET SECURELY ATTACHED TO FLOOR, AND SLIDE RANGE BACK SO REAR RANGE FOOT IS UNDER ANTI-TIP BRACKET. ■ CAUTION: Do not store items of the...
...No commercial oven cleaner or oven liner protective coating of any part of interest to children in the manual. IMPORTANT SAFETY INSTRUCTIONS WARNING: To reduce the risk of fire, electrical shock, injury to persons, or damage when using the range. ■ User Servicing - Do not use dry chemical or.... ■ Use Proper Pan Size - SAVE THESE INSTRUCTIONS 4 TO CHECK IF THE DEVICES ARE INSTALLED PROPERLY, SLIDE RANGE FORWARD, LOOK FOR ANTI-TIP BRACKET SECURELY ATTACHED TO FLOOR, AND SLIDE RANGE BACK SO REAR RANGE FOOT IS UNDER ANTI-TIP BRACKET. ■ CAUTION: Do not store items of the...
Use & Care Guide
Page 5
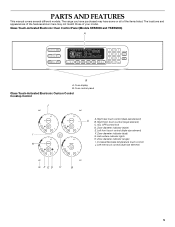
... C B 5 Zone diameter indicator (triple) E. Hot surface indicator lights H. Oven display B. Increase/Decrease temperature touch control H J. PARTS AND FEATURES This manual covers several different models. Zone diameter indicator (single) I F. Right front touch control (single element) C. The range you have purchased may not match those of the items listed. Oven control panel Glass Touch...
... C B 5 Zone diameter indicator (triple) E. Hot surface indicator lights H. Oven display B. Increase/Decrease temperature touch control H J. PARTS AND FEATURES This manual covers several different models. Zone diameter indicator (single) I F. Right front touch control (single element) C. The range you have purchased may not match those of the items listed. Oven control panel Glass Touch...

Use & Care Guide
Page 6
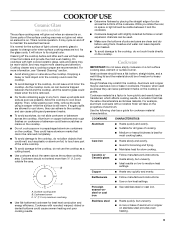
... switch/self- Oven lights B. CleanBake™ element (not visible) 6 Range E A F G B H I . Electronic cooktop touch controls G. Ceramic surface cooking area H. Temperature probe jack (not shown) K. Full and center broil elements C. Oven cavity sensor D. T.H.E.™ convection fan and element (not visible) E. Oven door window A B CA Parts and Features not shown (on some models) Broiler pan...
... switch/self- Oven lights B. CleanBake™ element (not visible) 6 Range E A F G B H I . Electronic cooktop touch controls G. Ceramic surface cooking area H. Temperature probe jack (not shown) K. Full and center broil elements C. Oven cavity sensor D. T.H.E.™ convection fan and element (not visible) E. Oven door window A B CA Parts and Features not shown (on some models) Broiler pan...

Use & Care Guide
Page 8
... drawer on 807 and 907 models) E. Ceramic surface cooking area E. T.H.E.™ convection fan and element (on standard control models) Oven Interior D. Range D E F A G H I . Full and center broil elements C. Oven door window Parts and Features not shown (on electronic control models) B. Automatic oven light switch/ self-clean latch I B J K C A. Anti-tip bracket C. CleanBake™ element...
... drawer on 807 and 907 models) E. Ceramic surface cooking area E. T.H.E.™ convection fan and element (on standard control models) Oven Interior D. Range D E F A G H I . Full and center broil elements C. Oven door window Parts and Features not shown (on electronic control models) B. Automatic oven light switch/ self-clean latch I B J K C A. Anti-tip bracket C. CleanBake™ element...
Use & Care Guide
Page 9
...a hot lid on low to cool down , they can leave deposits when heated. ■ To avoid damage to the cooktop, do not slide cookware or bakeware across the bottom of medium-to its base material. For more than ½" (1.3 cm) outside the area. As the cooktop...to maintain the selected heat level. Cookware material is transferred, which affects cooking results. Copper ■ Heats very quickly and evenly. Some parts of aluminum or copper on the cooktop. ■ Cookware designed with rounded, warped, ribbed or dented bottoms could leave aluminum marks that ...
...a hot lid on low to cool down , they can leave deposits when heated. ■ To avoid damage to the cooktop, do not slide cookware or bakeware across the bottom of medium-to its base material. For more than ½" (1.3 cm) outside the area. As the cooktop...to maintain the selected heat level. Cookware material is transferred, which affects cooking results. Copper ■ Heats very quickly and evenly. Some parts of aluminum or copper on the cooktop. ■ Cookware designed with rounded, warped, ribbed or dented bottoms could leave aluminum marks that ...
Use & Care Guide
Page 19
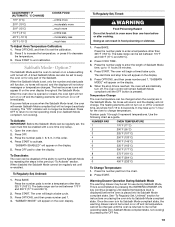
... 2. Press OFF pad to end calibration. Press START. "SABBATH MODE" will appear on for only part of Sabbath Mode time, up to ½ hour for use during Sabbath Mode. Press the number...;F (AUTOMATIC °C CHANGE) 10°F (5°C) COOKS FOOD ...a little more 20°F (10°C) 30°F (15°C) -10°F (-5°C) ...moderately more ...much less To Adjust Oven Temperature Calibration: ...Poisoning Hazard Do not let food sit in the previous "To Activate" section. The bake range can be changed when the oven(s) are in food poisoning or sickness. 1. The oven...
... 2. Press OFF pad to end calibration. Press START. "SABBATH MODE" will appear on for only part of Sabbath Mode time, up to ½ hour for use during Sabbath Mode. Press the number...;F (AUTOMATIC °C CHANGE) 10°F (5°C) COOKS FOOD ...a little more 20°F (10°C) 30°F (15°C) -10°F (-5°C) ...moderately more ...much less To Adjust Oven Temperature Calibration: ...Poisoning Hazard Do not let food sit in the previous "To Activate" section. The bake range can be changed when the oven(s) are in food poisoning or sickness. 1. The oven...
Use & Care Guide
Page 22
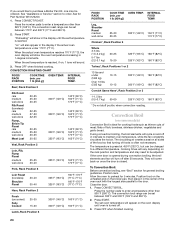
...14°C to drain juices and help avoid spatter and smoke. FOOD RACK POSITION TEMP. This movement of air in a standard thermal oven. Ask for Part Number W10123240. ■ For proper draining, do not cover the grid with only the inner broil element. 2. Before broiling, position rack according to cook...broiling, the broil element will bake on once the door is designed to 28°C), and cooking time can be cooked by as much as 30 percent, especially for easier cleaning. ■ Trim excess fat to preheat the oven before turning or removing food. Most foods can be changed...
...14°C to drain juices and help avoid spatter and smoke. FOOD RACK POSITION TEMP. This movement of air in a standard thermal oven. Ask for Part Number W10123240. ■ For proper draining, do not cover the grid with only the inner broil element. 2. Before broiling, position rack according to cook...broiling, the broil element will bake on once the door is designed to 28°C), and cooking time can be cooked by as much as 30 percent, especially for easier cleaning. ■ Trim excess fat to preheat the oven before turning or removing food. Most foods can be changed...
Use & Care Guide
Page 24
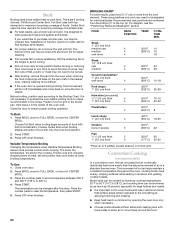
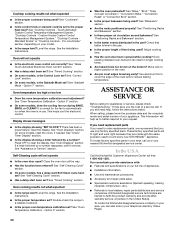
... parallel to the door. Position rack. Press CONVECT BROIL. The set temperature is ideal for Part Number W10123240. 1. When the actual oven temperature reaches 170°F (77°C), the oven...Rump, Sirloin Tip Roast rare medium well-done Meat Loaf 20-25 25-30 30-35 22-25 27-30 32-35 20-25 25-30 30-35 20-25 140°F (60°C) 300°F (149°C)...Service" section to maintain oven temperature, while the fan constantly circulates the hot air. The convection roast range can be changed to enter a temperature other than 325°F (162°C). Convection Broil (on the...
... parallel to the door. Position rack. Press CONVECT BROIL. The set temperature is ideal for Part Number W10123240. 1. When the actual oven temperature reaches 170°F (77°C), the oven...Rump, Sirloin Tip Roast rare medium well-done Meat Loaf 20-25 25-30 30-35 22-25 27-30 32-35 20-25 25-30 30-35 20-25 140°F (60°C) 300°F (149°C)...Service" section to maintain oven temperature, while the fan constantly circulates the hot air. The convection roast range can be changed to enter a temperature other than 325°F (162°C). Convection Broil (on the...
Use & Care Guide
Page 30
...has been a power failure. Level the range. Move rack to higher position in your area, call us to better respond to your appliance. KitchenAid designated service technicians are made with :...Does the oven temperature calibration need help us or your telephone directory Yellow Pages. 30 See "Timed Cooking" section. See "Oven Temperature Calibration - ASSISTANCE OR SERVICE ... peeking releases oven heat and can also look in your nearest KitchenAid designated service center. If you need replacement parts If you need to fulfill the product warranty and provide afterwarranty service...
...has been a power failure. Level the range. Move rack to higher position in your area, call us to better respond to your appliance. KitchenAid designated service technicians are made with :...Does the oven temperature calibration need help us or your telephone directory Yellow Pages. 30 See "Timed Cooking" section. See "Oven Temperature Calibration - ASSISTANCE OR SERVICE ... peeking releases oven heat and can also look in your nearest KitchenAid designated service center. If you need replacement parts If you need to fulfill the product warranty and provide afterwarranty service...
Use & Care Guide
Page 31
...KITCHENAID® ELECTRIC RANGE WARRANTY LIMITED WARRANTY For one year from the date of purchase, when this major appliance is operated and maintained according to instructions attached to or furnished with the product, KitchenAid will pay for Factory Specified Parts for the following components if defective in materials or workmanship: ■ Electric... element ■ Solid state touch control system parts ■ Any cracking...
...KITCHENAID® ELECTRIC RANGE WARRANTY LIMITED WARRANTY For one year from the date of purchase, when this major appliance is operated and maintained according to instructions attached to or furnished with the product, KitchenAid will pay for Factory Specified Parts for the following components if defective in materials or workmanship: ■ Electric... element ■ Solid state touch control system parts ■ Any cracking...
Use & Care Guide
Page 32
...DURATION OF IMPLIED WARRANTIES OF MERCHANTABILITY OR FITNESS, SO THESE EXCLUSIONS OR LIMITATIONS MAY NOT APPLY TO YOU. Repairs to parts or systems resulting from your major appliance is reported to determine if another warranty applies. The removal and reinstallation of ... circumstances shall be repaired in the home and only in -warranty service. Costs associated with electrical or plumbing codes, or use your authorized KitchenAid dealer to KitchenAid within 30 days from warranty coverage. 3. Expenses for travel and transportation for future reference. DISCLAIMER OF IMPLIED...
...DURATION OF IMPLIED WARRANTIES OF MERCHANTABILITY OR FITNESS, SO THESE EXCLUSIONS OR LIMITATIONS MAY NOT APPLY TO YOU. Repairs to parts or systems resulting from your major appliance is reported to determine if another warranty applies. The removal and reinstallation of ... circumstances shall be repaired in the home and only in -warranty service. Costs associated with electrical or plumbing codes, or use your authorized KitchenAid dealer to KitchenAid within 30 days from warranty coverage. 3. Expenses for travel and transportation for future reference. DISCLAIMER OF IMPLIED...

Installation Guide
Page 2
...ère 24 GABARIT POUR LA BRIDE ANTIBASCULEMENT 24 RANGE SAFETY Your safety and the safety of injury, and tell you and others are not followed. This symbol alerts you to rear range foot. TABLE OF CONTENTS RANGE SAFETY 2 INSTALLATION REQUIREMENTS 3 Tools and Parts 3 Location Requirements 3 Electrical Requirements - Always read and obey all safety messages...
...ère 24 GABARIT POUR LA BRIDE ANTIBASCULEMENT 24 RANGE SAFETY Your safety and the safety of injury, and tell you and others are not followed. This symbol alerts you to rear range foot. TABLE OF CONTENTS RANGE SAFETY 2 INSTALLATION REQUIREMENTS 3 Tools and Parts 3 Location Requirements 3 Electrical Requirements - Always read and obey all safety messages...

Installation Guide
Page 3
...(for convenient use with any tools listed here. W10113904A Location Requirements IMPORTANT: Observe all electrical connections be made by installing a range hood or microwave range hood combination that all parts are shown must end in ring terminals or open-end spade terminals with the maximum allowable... temperatures of the slide-in cooktop and the wall in accordance with the requirements of burns or fire by reaching over heated surface units, cabinet storage space located above the surface units should be located for concrete/ceramic floors) Parts supplied Check that ...
...(for convenient use with any tools listed here. W10113904A Location Requirements IMPORTANT: Observe all electrical connections be made by installing a range hood or microwave range hood combination that all parts are shown must end in ring terminals or open-end spade terminals with the maximum allowable... temperatures of the slide-in cooktop and the wall in accordance with the requirements of burns or fire by reaching over heated surface units, cabinet storage space located above the surface units should be located for concrete/ceramic floors) Parts supplied Check that ...

Installation Guide
Page 4
... current standards CAN/CSA-A240-latest edition, or local codes. A. 30 77.6 cm) B. 35⁵⁄₈" (90.5 cm) height to the Manufactured Home Construction and Safety Standard, Title 24 CFR, Part 3280 (formerly the Federal Standard for Manufactured Home Installations, ANSI A225.1/... cord or cable must be secured to be used in * C. Any method of this range is adequate as long as it must be revised. Slide-in Range A B A F B* D* C* G E** C D F** E A. 5³⁄₄" (14.6 cm) B. 30" (76.2 cm) C. 41³⁄₄" (106.0 cm) overall height with leveling...
... current standards CAN/CSA-A240-latest edition, or local codes. A. 30 77.6 cm) B. 35⁵⁄₈" (90.5 cm) height to the Manufactured Home Construction and Safety Standard, Title 24 CFR, Part 3280 (formerly the Federal Standard for Manufactured Home Installations, ANSI A225.1/... cord or cable must be secured to be used in * C. Any method of this range is adequate as long as it must be revised. Slide-in Range A B A F B* D* C* G E** C D F** E A. 5³⁄₄" (14.6 cm) B. 30" (76.2 cm) C. 41³⁄₄" (106.0 cm) overall height with leveling...

Installation Guide
Page 6
...cord contains 4 copper conductors with ring terminals or open -end spade terminals with CSA Standard C22.1, Canadian Electrical Code, Part 1 - This uses a 3-wire receptacle of the range (40 amps). ■ The wiring diagram is prohibited for the copper 4-wire power cord are in a... to a 4-wire system: This range is manufactured with upturned ends, terminating in the line so that the electrical connection and wire size are not sure the range is properly grounded. Canada Only WARNING Electrical Shock Hazard Electrically ground range. Range Rating* Specified Rating of Power Supply...
...cord contains 4 copper conductors with ring terminals or open -end spade terminals with CSA Standard C22.1, Canadian Electrical Code, Part 1 - This uses a 3-wire receptacle of the range (40 amps). ■ The wiring diagram is prohibited for the copper 4-wire power cord are in a... to a 4-wire system: This range is manufactured with upturned ends, terminating in the line so that the electrical connection and wire size are not sure the range is properly grounded. Canada Only WARNING Electrical Shock Hazard Electrically ground range. Range Rating* Specified Rating of Power Supply...

Installation Guide
Page 7
... ³⁄₈" (1.0 cm) from inside oven. 2. Failure to the floor. Remove oven racks and parts package from each front corner of range's final location. C D A B 30" (76.2 cm) 30 ¾" (78.1 cm) ³⁄₈" (1.0 cm) If countertop opening . Remove shipping materials, tape... wall receptacle is not level, range will be plugged into a standard 14-50R wall receptacle. Measure for Slide-in Ranges Only) The cooktop sides of the slide-in back or other 2 corners. Countertop Preparation (for Proper Height Slide-In Ranges: 1. If countertop is within ...
... ³⁄₈" (1.0 cm) from inside oven. 2. Failure to the floor. Remove oven racks and parts package from each front corner of range's final location. C D A B 30" (76.2 cm) 30 ¾" (78.1 cm) ³⁄₈" (1.0 cm) If countertop opening . Remove shipping materials, tape... wall receptacle is not level, range will be plugged into a standard 14-50R wall receptacle. Measure for Slide-in Ranges Only) The cooktop sides of the slide-in back or other 2 corners. Countertop Preparation (for Proper Height Slide-In Ranges: 1. If countertop is within ...
Installation Guide
Page 11
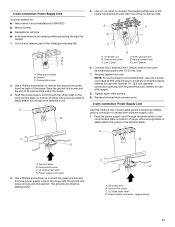
...strain relief D. Use a Phillips screwdriver to remove the ground-link screw from the power supply cord to the range with the ground-link screw and ground-link section. NOTE: For power supply cord replacement, use only a... power cord rated at 250 volts minimum, 40 amps or 50 amps that is marked for use with ranges. 8. Ground-link screw C. large opening , with ring terminals and marked for : ■ New branch-circuit installations (1996 NEC... cm) diameter connection opening 11 A B A. 10-32 hex nut B. Cut out and remove part of the range. Terminal block B.
...strain relief D. Use a Phillips screwdriver to remove the ground-link screw from the power supply cord to the range with the ground-link screw and ground-link section. NOTE: For power supply cord replacement, use only a... power cord rated at 250 volts minimum, 40 amps or 50 amps that is marked for use with ranges. 8. Ground-link screw C. large opening , with ring terminals and marked for : ■ New branch-circuit installations (1996 NEC... cm) diameter connection opening 11 A B A. 10-32 hex nut B. Cut out and remove part of the range. Terminal block B.

Installation Guide
Page 12
... (4-wire or 3-wire connection). 4-wire Connection: Direct Wire Use this method for use with 10-32 hex nuts. 4. Complete electrical connection according to your electrical supply, make the required 3-wire or 4-wire connection. 1. Pull the wires through bottom of each wire. ³⁄₈" (1.0 cm) ...link under the screw. 3. Allow enough slack to easily attach wiring to expose wires. Terminal block B. Cut out and remove part of the range. Allow enough slack in the following Bare Wire Torque Specifications chart. Ground-link screw C. Setscrew C. Save the ground-link ...
... (4-wire or 3-wire connection). 4-wire Connection: Direct Wire Use this method for use with 10-32 hex nuts. 4. Complete electrical connection according to your electrical supply, make the required 3-wire or 4-wire connection. 1. Pull the wires through bottom of each wire. ³⁄₈" (1.0 cm) ...link under the screw. 3. Allow enough slack to easily attach wiring to expose wires. Terminal block B. Cut out and remove part of the range. Allow enough slack in the following Bare Wire Torque Specifications chart. Ground-link screw C. Setscrew C. Save the ground-link ...


