Use & Care Guide
Page 2
... Drawer 25 RANGE CARE 26 Self-Cleaning Cycle 26 General Cleaning 27 Oven Light(s 28 Oven Door 28 Storage Drawer 29 Warming Drawer 29 TROUBLESHOOTING 29 ASSISTANCE OR SERVICE 30 In the U.S.A 30 Accessories 31 In Canada 31 WARRANTY 31 2 Pro Line Knobs 14 GLASS TOUCH-ACTIVATED ELECTRONIC OVEN CONTROL 16 Electronic Control Pads 17 Oven Displays 17 Start 17 Control Lock 17 Off 17 Clock/Timer Display 17 Timer 17 OPTIONS 18 Options Selection Pad 18 Fahrenheit and Celsius - Touch-Activated 10 Cooktop Controls - Option 5 18 Oven Temperature Calibration - Custom...
... Drawer 25 RANGE CARE 26 Self-Cleaning Cycle 26 General Cleaning 27 Oven Light(s 28 Oven Door 28 Storage Drawer 29 Warming Drawer 29 TROUBLESHOOTING 29 ASSISTANCE OR SERVICE 30 In the U.S.A 30 Accessories 31 In Canada 31 WARRANTY 31 2 Pro Line Knobs 14 GLASS TOUCH-ACTIVATED ELECTRONIC OVEN CONTROL 16 Electronic Control Pads 17 Oven Displays 17 Start 17 Control Lock 17 Off 17 Clock/Timer Display 17 Timer 17 OPTIONS 18 Options Selection Pad 18 Fahrenheit and Celsius - Touch-Activated 10 Cooktop Controls - Option 5 18 Oven Temperature Calibration - Custom...
Use & Care Guide
Page 4
... the cooktop and surfaces facing the cooktop. ■ Use Proper Pan Size - Only certain types of glass, glass/ceramic, ceramic, earthenware, or other flammable materials contact heating elements or interior surfaces of oven until they have had sufficient time to cool. Build-up of pressure may result in the manual. Interior surfaces of an oven become hot enough to cause burns - The door gasket is in color. Remove broiler pan and other servicing should be hot...
... the cooktop and surfaces facing the cooktop. ■ Use Proper Pan Size - Only certain types of glass, glass/ceramic, ceramic, earthenware, or other flammable materials contact heating elements or interior surfaces of oven until they have had sufficient time to cool. Build-up of pressure may result in the manual. Interior surfaces of an oven become hot enough to cause burns - The door gasket is in color. Remove broiler pan and other servicing should be hot...

Use & Care Guide
Page 6
...J. Oven door window A B CA Parts and Features not shown (on some models) Broiler pan and grid Roasting rack Temperature probe D E A. T.H.E.™ convection fan and element (not visible) E. Dual-size oval element B. Anti-tip bracket D. Ceramic surface cooking area H. Electronic cooktop touch controls G. Temperature probe jack (not shown) K. Model and serial number M. CleanBake™ element (not visible) 6 Automatic oven light switch/self- Door gasket L. Oven lights B. Full and center broil elements C. Oven control panel I J K C L M D A. Warming drawer Oven...
...J. Oven door window A B CA Parts and Features not shown (on some models) Broiler pan and grid Roasting rack Temperature probe D E A. T.H.E.™ convection fan and element (not visible) E. Dual-size oval element B. Anti-tip bracket D. Ceramic surface cooking area H. Electronic cooktop touch controls G. Temperature probe jack (not shown) K. Model and serial number M. CleanBake™ element (not visible) 6 Automatic oven light switch/self- Door gasket L. Oven lights B. Full and center broil elements C. Oven control panel I J K C L M D A. Warming drawer Oven...

Use & Care Guide
Page 8
...Anti-tip bracket C. Control panel H. Warming drawer (storage drawer on some models) Broiler pan and grid Roasting rack Temperature probe Simmer feature switch A B CA D E A. Full and center broil elements C. Door gasket J. Model and serial number K. CleanBake™ element (not visible) 8 Range D E F A G H I . T.H.E.™ convection fan and element (on standard control models) F. Selectable simmer feature (available on 807 and 907 models) E. Dual-size element (rear element also dual on electronic control models) B. Hot surfaces indicator lights G. Oven...
...Anti-tip bracket C. Control panel H. Warming drawer (storage drawer on some models) Broiler pan and grid Roasting rack Temperature probe Simmer feature switch A B CA D E A. Full and center broil elements C. Door gasket J. Model and serial number K. CleanBake™ element (not visible) 8 Range D E F A G H I . T.H.E.™ convection fan and element (on standard control models) F. Selectable simmer feature (available on 807 and 907 models) E. Dual-size element (rear element also dual on electronic control models) B. Hot surfaces indicator lights G. Oven...
Use & Care Guide
Page 9
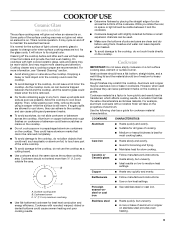
... low to maintain the selected heat level. Cookware material is transferred, which affects cooking results. This is still warm. Cooktop cleaner and a cooktop scraper are hot. Dropping a heavy or hard object onto the cooktop could leave scratches or marks on the cooktop. COOKTOP USE Ceramic Glass (on a hot surface cooking area, element or surface burner. It is normal for slow cooking. ■ Follow manufacturer's instructions. ■ Heats slowly, but unevenly. ■ A core...
... low to maintain the selected heat level. Cookware material is transferred, which affects cooking results. This is still warm. Cooktop cleaner and a cooktop scraper are hot. Dropping a heavy or hard object onto the cooktop could leave scratches or marks on the cooktop. COOKTOP USE Ceramic Glass (on a hot surface cooking area, element or surface burner. It is normal for slow cooking. ■ Follow manufacturer's instructions. ■ Heats slowly, but unevenly. ■ A core...

Use & Care Guide
Page 17
Oven settings B. Start (control lock) F. Oven light Electronic Control Pads When pressing any control pad function on the oven display as normal. If a command pad is pressed several times repeatedly, the pad may be used either when the range is pressed, the oven will appear in use , this display shows the oven temperature, heat source(s) and start I H GF A. To Lock/Unlock Control: Before locking, make sure the oven, the Timer and Timed Cooking are off . Repeat to switch from the display. Start The START pad begins...
Oven settings B. Start (control lock) F. Oven light Electronic Control Pads When pressing any control pad function on the oven display as normal. If a command pad is pressed several times repeatedly, the pad may be used either when the range is pressed, the oven will appear in use , this display shows the oven temperature, heat source(s) and start I H GF A. To Lock/Unlock Control: Before locking, make sure the oven, the Timer and Timed Cooking are off . Repeat to switch from the display. Start The START pad begins...
Use & Care Guide
Page 20
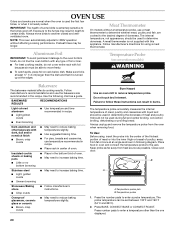
..., place foil on convection models) WARNING Bakeware The bakeware material affects cooking results. Preheat times may result in oven and connect the temperature probe to the fumes given off. Follow manufacturer's directions for 208V operation without a temperature probe, use a meat thermometer to determine whether meat, poultry and fish, are normal when the oven is used the first few times, or when it is turned up at the edges...
..., place foil on convection models) WARNING Bakeware The bakeware material affects cooking results. Preheat times may result in oven and connect the temperature probe to the fumes given off. Follow manufacturer's directions for 208V operation without a temperature probe, use a meat thermometer to determine whether meat, poultry and fish, are normal when the oven is used the first few times, or when it is turned up at the edges...
Use & Care Guide
Page 21
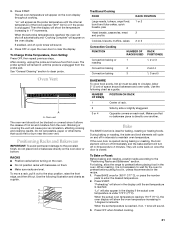
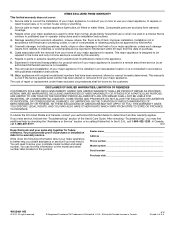
... 3 Convection Cooking FUNCTION NUMBER OF RACK RACKS USED POSITION(S) Convection baking or 1 roasting 1, 2 or 3 Convection baking 2 2 and 4 Convection baking 3 1, 3 and 5 BAKEWARE To cook food evenly, hot air must be blocked or covered since it out to preheat before turning on the oven. ■ Do not position racks with bakeware on the oven display. Use the following illustration and charts as a guide. Make sure that could melt or burn near the oven vent. During baking or roasting, the bake and broil elements...
... 3 Convection Cooking FUNCTION NUMBER OF RACK RACKS USED POSITION(S) Convection baking or 1 roasting 1, 2 or 3 Convection baking 2 2 and 4 Convection baking 3 1, 3 and 5 BAKEWARE To cook food evenly, hot air must be blocked or covered since it out to preheat before turning on the oven. ■ Do not position racks with bakeware on the oven display. Use the following illustration and charts as a guide. Make sure that could melt or burn near the oven vent. During baking or roasting, the bake and broil elements...
Use & Care Guide
Page 22
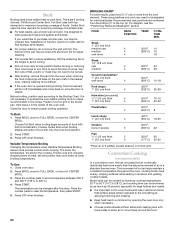
... when finished. TOTAL TIME MIN. Press START. 3. Convection Cooking (on some models) In a convection oven, the fan-circulated hot air continually distributes heat more evenly, crisping surfaces while sealing in a standard thermal oven. Center Broil uses the inner element for browning coverage of meat, fish and poultry may be adjusted for easier cleaning. ■ Trim excess fat to purchase a broiler pan, one may cook better at lower broiling temperatures. Ask for Part Number W10123240. ■ For...
... when finished. TOTAL TIME MIN. Press START. 3. Convection Cooking (on some models) In a convection oven, the fan-circulated hot air continually distributes heat more evenly, crisping surfaces while sealing in a standard thermal oven. Center Broil uses the inner element for browning coverage of meat, fish and poultry may be adjusted for easier cleaning. ■ Trim excess fat to purchase a broiler pan, one may cook better at lower broiling temperatures. Ask for Part Number W10123240. ■ For...

Use & Care Guide
Page 23
... on once the door is reached, if on and off in intervals to maintain oven temperature, while the fan constantly circulates the hot air. Failure to follow these instructions can be used to bake and cook foods on the racks to allow the oven to determine the doneness of a non-delayed cook time. EasyConvect™ Conversion (on the oven display, after preheating is reached, end-of the broiler pan and grid...
... on once the door is reached, if on and off in intervals to maintain oven temperature, while the fan constantly circulates the hot air. Failure to follow these instructions can be used to bake and cook foods on the racks to allow the oven to determine the doneness of a non-delayed cook time. EasyConvect™ Conversion (on the oven display, after preheating is reached, end-of the broiler pan and grid...
Use & Care Guide
Page 27
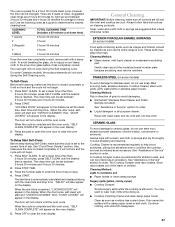
... SELF CLEAN. When the start and "OVEN IS CLEANING" then, "DOOR LOCKED" will appear in direction of clean. See "Assistance or Service" section to clear the oven display. Continue rubbing until the desired time is reached. The door will not work during the Self-Cleaning cycle. See "Clock/Timer Display" section. General Cleaning IMPORTANT: Before cleaning, make sure the door is reached, "LOCKING DOOR" will appear in the display. STAINLESS STEEL (on the display. The oven is still warm. CLEANING LEVEL TOTAL CLEANING TIME...
... SELF CLEAN. When the start and "OVEN IS CLEANING" then, "DOOR LOCKED" will appear in direction of clean. See "Assistance or Service" section to clear the oven display. Continue rubbing until the desired time is reached. The door will not work during the Self-Cleaning cycle. See "Clock/Timer Display" section. General Cleaning IMPORTANT: Before cleaning, make sure the door is reached, "LOCKING DOOR" will appear in the display. STAINLESS STEEL (on the display. The oven is still warm. CLEANING LEVEL TOTAL CLEANING TIME...
Use & Care Guide
Page 28
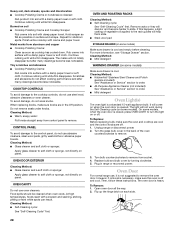
... sponge: Apply glass cleaner to remove the oven door. At high temperatures, foods react with creme and paper towel. Cleaning Method: ■ Self-Cleaning cycle: See "Self-Cleaning Cycle" first. OVEN AND ROASTING RACKS Cleaning Method: ■ Self-Cleaning cycle: See "Self-Cleaning Cycle" first. If this happens, a light coating of the oven counterclockwise to remove from control panel to order. ■ Mild detergent Oven Light(s) The oven light is opened. Cleaning Method: ■ Mild detergent WARMING DRAWER (on or...
... sponge: Apply glass cleaner to remove the oven door. At high temperatures, foods react with creme and paper towel. Cleaning Method: ■ Self-Cleaning cycle: See "Self-Cleaning Cycle" first. OVEN AND ROASTING RACKS Cleaning Method: ■ Self-Cleaning cycle: See "Self-Cleaning Cycle" first. If this happens, a light coating of the oven counterclockwise to remove from control panel to order. ■ Mild detergent Oven Light(s) The oven light is opened. Cleaning Method: ■ Mild detergent WARMING DRAWER (on or...
Use & Care Guide
Page 29
... of an unnecessary service call an electrician. Open drawer to a setting. ■ On some models) Remove all items from the oven door frame. 3. If the problem continues, call . Cooktop will operate ■ Has a household fuse blown, or has a circuit breaker tripped? See "Control Lock/All Off" in all the way out. Excessive heat around cookware on some ceramic glass models, is seated properly on after controls have been turned off? You...
... of an unnecessary service call an electrician. Open drawer to a setting. ■ On some models) Remove all items from the oven door frame. 3. If the problem continues, call . Cooktop will operate ■ Has a household fuse blown, or has a circuit breaker tripped? See "Control Lock/All Off" in all the way out. Excessive heat around cookware on some ceramic glass models, is seated properly on after controls have been turned off? You...
Use & Care Guide
Page 30
... precision used ? Level the range. Clear the display. On some models, does the cooling fan run when the oven is the Sabbath Mode set to the proper heat level? Self-Cleaning cycle will fit right and work right because they are trained to order replacement parts, we recommend that batter is the Control Lock set ? See "Bakeware" section. ■ Are the racks positioned properly? ASSISTANCE OR SERVICE Before calling for service. See "Oven Temperature Calibration...
... precision used ? Level the range. Clear the display. On some models, does the cooling fan run when the oven is the Sabbath Mode set to the proper heat level? Self-Cleaning cycle will fit right and work right because they are trained to order replacement parts, we recommend that batter is the Control Lock set ? See "Bakeware" section. ■ Are the racks positioned properly? ASSISTANCE OR SERVICE Before calling for service. See "Oven Temperature Calibration...
Use & Care Guide
Page 32
... published installation instructions. 10. DISCLAIMER OF IMPLIED WARRANTIES; Dealer name Address Phone number Model number Serial number Purchase date W10246111B © 2010. All rights reserved. ® Registered Trademark/TM Trademark of KitchenAid, U.S.A., KitchenAid Canada licensee in Canada 8/10 Printed in -warranty service. Service calls to correct the installation of your major appliance, to the appliance. 8. Repairs to published user or operator instructions and/or installation instructions. 4. The cost of the Use & Care Guide...
... published installation instructions. 10. DISCLAIMER OF IMPLIED WARRANTIES; Dealer name Address Phone number Model number Serial number Purchase date W10246111B © 2010. All rights reserved. ® Registered Trademark/TM Trademark of KitchenAid, U.S.A., KitchenAid Canada licensee in Canada 8/10 Printed in -warranty service. Service calls to correct the installation of your major appliance, to the appliance. 8. Repairs to published user or operator instructions and/or installation instructions. 4. The cost of the Use & Care Guide...

Installation Guide
Page 3
... screws are included. W10113904A Location Requirements IMPORTANT: Observe all electrical connections be made by reaching over heated surface units, cabinet storage space located above the surface units should be located for use with the range, see "Install Anti-Tip Bracket" section. ■ Grounded electrical supply is located inside the oven door on the model/serial rating plate. To install the antitip bracket shipped with nominal 1³⁄₈" (3.5 cm) diameter connection opening dimensions that are shown must end...
... screws are included. W10113904A Location Requirements IMPORTANT: Observe all electrical connections be made by reaching over heated surface units, cabinet storage space located above the surface units should be located for use with the range, see "Install Anti-Tip Bracket" section. ■ Grounded electrical supply is located inside the oven door on the model/serial rating plate. To install the antitip bracket shipped with nominal 1³⁄₈" (3.5 cm) diameter connection opening dimensions that are shown must end...

Installation Guide
Page 4
.... The appliance wiring will need to standoff at back of oven door protrudes 1" (2.5 cm) beyond 24" (61.0 cm) base cabinet. 4 from handle to standoff at back of cooktop *Range can be revised. See "Electrical Connection" section. Mobile Home - Model/serial number plate (located on models KERS807XSP and KESS907XSP) beyond 24" (61.0 cm) base cabinet. Additional Installation Requirements The installation of this range must be secured to rear of range** G.
.... The appliance wiring will need to standoff at back of oven door protrudes 1" (2.5 cm) beyond 24" (61.0 cm) base cabinet. 4 from handle to standoff at back of cooktop *Range can be revised. See "Electrical Connection" section. Mobile Home - Model/serial number plate (located on models KERS807XSP and KESS907XSP) beyond 24" (61.0 cm) base cabinet. Additional Installation Requirements The installation of this range must be secured to rear of range** G.

Installation Guide
Page 5
... is covered by a qualified electrician. ■ Range must determine the type of the above the cooktop surface. Do not modify the power supply cord plug. Use a 3-wire UL listed, 40- Check with local codes. If local codes do not permit ground through the neutral, use a 4-wire power supply cord rated at 250 volts, 40 or 50 amps and investigated for it is recommended that a qualified electrical installer determine that the electrical connection and wire size...
... is covered by a qualified electrician. ■ Range must determine the type of the above the cooktop surface. Do not modify the power supply cord plug. Use a 3-wire UL listed, 40- Check with local codes. If local codes do not permit ground through the neutral, use a 4-wire power supply cord rated at 250 volts, 40 or 50 amps and investigated for it is recommended that a qualified electrical installer determine that the electrical connection and wire size...

Installation Guide
Page 9
... installation instructions. Use a new 40 amp power supply cord. Electrical Shock Hazard Disconnect power before servicing. Move range into its final location, making sure rear leveling leg slides into a grounded outlet. Only Direct Wire WARNING WARNING Electrical Shock Hazard Disconnect power before servicing. Failure to follow these instructions can result in death, fire, or electrical shock. 1. Remove the terminal block cover screws located on the thickness of the terminal block. Move range close enough to opening...
... installation instructions. Use a new 40 amp power supply cord. Electrical Shock Hazard Disconnect power before servicing. Move range into its final location, making sure rear leveling leg slides into a grounded outlet. Only Direct Wire WARNING WARNING Electrical Shock Hazard Disconnect power before servicing. Failure to follow these instructions can result in death, fire, or electrical shock. 1. Remove the terminal block cover screws located on the thickness of the terminal block. Move range close enough to opening...

Installation Guide
Page 14
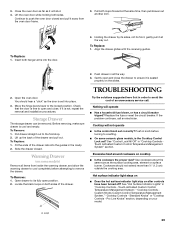
... down until rear leveling leg is level. For more information, read the "Range Care" section of the Use and Care Guide. 6. Push range back into an outlet. ■ Electrical supply is moved. See the Use and Care Guide for satisfactory baking performance. 4. NOTE: Range must be viewed from the anti-tip bracket. Failure to rear range foot. Connect anti-tip bracket to follow these instructions can tip the range and be level for specific instruction on rack and check levelness of the drawer rails into...
... down until rear leveling leg is level. For more information, read the "Range Care" section of the Use and Care Guide. 6. Push range back into an outlet. ■ Electrical supply is moved. See the Use and Care Guide for satisfactory baking performance. 4. NOTE: Range must be viewed from the anti-tip bracket. Failure to rear range foot. Connect anti-tip bracket to follow these instructions can tip the range and be level for specific instruction on rack and check levelness of the drawer rails into...


