Use and Care Guide
Page 3
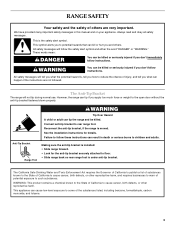
... result in this manual and on your appliance. Connect anti-tip bracket to such substances. Anti-Tip Bracket Range Foot Making sure the anti-tip bracket is installed: • Slide range forward. • Look for details. WARNING: This product contains a chemical known to children and adults. This...you what the potential hazard is under anti-tip bracket. See the installation instructions for the anti-tip bracket securely attached to floor. • Slide range back so rear range foot is , tell you how to cause cancer, birth defects, or other reproductive harm. All safety messages will...
... result in this manual and on your appliance. Connect anti-tip bracket to such substances. Anti-Tip Bracket Range Foot Making sure the anti-tip bracket is installed: • Slide range forward. • Look for details. WARNING: This product contains a chemical known to children and adults. This...you what the potential hazard is under anti-tip bracket. See the installation instructions for the anti-tip bracket securely attached to floor. • Slide range back so rear range foot is , tell you how to cause cancer, birth defects, or other reproductive harm. All safety messages will...
Use and Care Guide
Page 4
TO CHECK IF THE DEVICES ARE INSTALLED PROPERLY, SLIDE RANGE FORWARD, LOOK FOR ANTI-TIP BRACKET SECURELY ATTACHED TO FLOOR, AND SLIDE RANGE BACK SO REAR RANGE FOOT IS UNDER ANTI-TIP BRACKET. Be sure the range is used in oven. They should not be hot even though they have had sufficient time to cool....may penetrate the broken cooktop and create a risk of different size. The door gasket is equipped with one or more surface units of electric shock. No commercial oven cleaner or oven liner protective coating of clothing. s Clean Only Parts Listed in ignition of any part of the...
TO CHECK IF THE DEVICES ARE INSTALLED PROPERLY, SLIDE RANGE FORWARD, LOOK FOR ANTI-TIP BRACKET SECURELY ATTACHED TO FLOOR, AND SLIDE RANGE BACK SO REAR RANGE FOOT IS UNDER ANTI-TIP BRACKET. Be sure the range is used in oven. They should not be hot even though they have had sufficient time to cool....may penetrate the broken cooktop and create a risk of different size. The door gasket is equipped with one or more surface units of electric shock. No commercial oven cleaner or oven liner protective coating of clothing. s Clean Only Parts Listed in ignition of any part of the...
Use and Care Guide
Page 32
..., first see the "Troubleshooting" section of your appliance if it . KITCHENAID® ELECTRIC RANGE WARRANTY ONE YEAR LIMITED WARRANTY For one year from the date of products not approved by KitchenAid. 5. Repairs when your major appliance is operated and maintained according to instructions attached to correct house wiring or plumbing. 2. If you ever need to...
..., first see the "Troubleshooting" section of your appliance if it . KITCHENAID® ELECTRIC RANGE WARRANTY ONE YEAR LIMITED WARRANTY For one year from the date of products not approved by KitchenAid. 5. Repairs when your major appliance is operated and maintained according to instructions attached to correct house wiring or plumbing. 2. If you ever need to...
Installation Instructions
Page 9
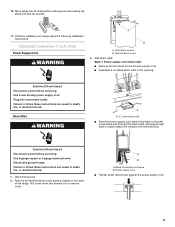
... strain relief, allowing enough slack to easily attach the wiring to follow these instructions can result in the opening. Use 8 gauge copper or 6 gauge aluminum wire. Failure to the terminal block. Move range into its final position making sure rear leveling leg slides into a grounded outlet. Electrical Connection - Terminal block cover 3. Add strain relief...
... strain relief, allowing enough slack to easily attach the wiring to follow these instructions can result in the opening. Use 8 gauge copper or 6 gauge aluminum wire. Failure to the terminal block. Move range into its final position making sure rear leveling leg slides into a grounded outlet. Electrical Connection - Terminal block cover 3. Add strain relief...
Installation Instructions
Page 10
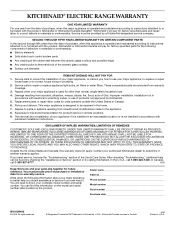
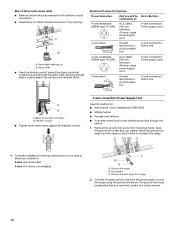
...electrical connection: 4-wire (recommended) 3-wire (if 4-wire is not available) C B A A. Remove the ground-link screw from range 2. Ground-link bent away from the range frame. Style 2: Direct wire strain relief ■ Remove the knockout as needed for your home has: And you will be attached...4-wire connection: Direct wire 3-wire receptacle (NEMA type 10-50R) A UL listed, 250-volt minimum, 40-amp, range power supply cord 3-wire connection: Power supply cord 3-wire direct 1" (2.5 cm) 3" (7.6 cm) A fused disconnect ...attach the wiring to the range using the ground-link screw.
...electrical connection: 4-wire (recommended) 3-wire (if 4-wire is not available) C B A A. Remove the ground-link screw from range 2. Ground-link bent away from the range frame. Style 2: Direct wire strain relief ■ Remove the knockout as needed for your home has: And you will be attached...4-wire connection: Direct wire 3-wire receptacle (NEMA type 10-50R) A UL listed, 250-volt minimum, 40-amp, range power supply cord 3-wire connection: Power supply cord 3-wire direct 1" (2.5 cm) 3" (7.6 cm) A fused disconnect ...attach the wiring to the range using the ground-link screw.
Installation Instructions
Page 11
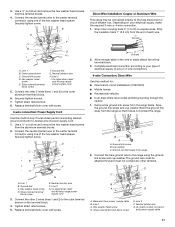
...Silver-colored terminal block screw E. Neutral (center) wire F. UL listed strain relief and 40-amp range power supply cord 3. Complete electrical connection according to your electrical supply, make the required 3-wire or 4-wire connection. 1. Securely tighten screw. Connect the other ...2 wires (lines 1 and 2) to the fuse disconnect or circuit breaker box. Direct Wire Installation: Copper or Aluminum Wire This range may be attached...
...Silver-colored terminal block screw E. Neutral (center) wire F. UL listed strain relief and 40-amp range power supply cord 3. Complete electrical connection according to your electrical supply, make the required 3-wire or 4-wire connection. 1. Securely tighten screw. Connect the other ...2 wires (lines 1 and 2) to the fuse disconnect or circuit breaker box. Direct Wire Installation: Copper or Aluminum Wire This range may be attached...
Installation Instructions
Page 12
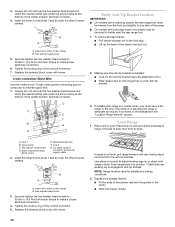
... baking conditions. 2. A. Neutral (white) wire F. B. Securely tighten the hex washer head screws to 35 lbs-in . (4.0 N-m) minimum torque to make proper electrical connection. 6. Check that rear leveling leg is under the other 2 screw clamps. Replace the storage drawer: ■ Fit the ends of the drawer rails into...C E F B G A Verify Anti-Tip Bracket Location IMPORTANT: ■ On models with a storage drawer the drawer may be level for the anti-tip bracket securely attached to floor. ■ Slide range back so rear range foot is engaged in anti-tip bracket. B A A.
... baking conditions. 2. A. Neutral (white) wire F. B. Securely tighten the hex washer head screws to 35 lbs-in . (4.0 N-m) minimum torque to make proper electrical connection. 6. Check that rear leveling leg is under the other 2 screw clamps. Replace the storage drawer: ■ Fit the ends of the drawer rails into...C E F B G A Verify Anti-Tip Bracket Location IMPORTANT: ■ On models with a storage drawer the drawer may be level for the anti-tip bracket securely attached to floor. ■ Slide range back so rear range foot is engaged in anti-tip bracket. B A A.
Installation Instructions
Page 13
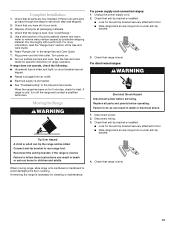
...-tip bracket. 4. Check that anti-tip bracket is installed: ■ Look for the anti-tip bracket securely attached to floor. ■ Slide range back so rear range foot is under anti-tip bracket. 3. Read "Range Use" in death or electrical shock. 1. See the Use and Care Guide for specific instruction on for 5 minutes, check for cleaning...
...-tip bracket. 4. Check that anti-tip bracket is installed: ■ Look for the anti-tip bracket securely attached to floor. ■ Slide range back so rear range foot is under anti-tip bracket. 3. Read "Range Use" in death or electrical shock. 1. See the Use and Care Guide for specific instruction on for 5 minutes, check for cleaning...