Use and Care Guide
Page 2
... Conversion (on some models 22 Convection Bake (on some models 22 Convection Roast (on some models 23 Convection Broil (on some models 24 Proofing Bread (on some models 24 Timed Cooking 24 Warming Drawer (on some models 25 RANGE CARE 26 Self-Cleaning Cycle (on some models 26 General Cleaning 27 Oven Light(s 28 Oven Door 29 Storage Drawer 29 Warming Drawer (on convection models, closed door 17 Oven Temperature Calibration - TABLE OF CONTENTS RANGE SAFETY 3 The Anti-Tip Bracket 3 PARTS AND FEATURES 5 COOKTOP USE 9 Ceramic Glass 9 Cookware 9 Home Canning 10 Cooktop Controls...
... Conversion (on some models 22 Convection Bake (on some models 22 Convection Roast (on some models 23 Convection Broil (on some models 24 Proofing Bread (on some models 24 Timed Cooking 24 Warming Drawer (on some models 25 RANGE CARE 26 Self-Cleaning Cycle (on some models 26 General Cleaning 27 Oven Light(s 28 Oven Door 29 Storage Drawer 29 Warming Drawer (on convection models, closed door 17 Oven Temperature Calibration - TABLE OF CONTENTS RANGE SAFETY 3 The Anti-Tip Bracket 3 PARTS AND FEATURES 5 COOKTOP USE 9 Ceramic Glass 9 Cookware 9 Home Canning 10 Cooktop Controls...
Use and Care Guide
Page 4
... avoid steam burn. Do not repair or replace any part of a range - s Make Sure Reflector Pans or Drip Bowls Are in the manual. among these openings, oven doors, and windows of oven doors. s Do Not Heat Unopened Food Containers - s Clean Ventilating Hoods Frequently - The range is turned inward, and does not extend over adjacent surface units. To reduce the risk of burns, ignition of Oven Racks - s User Servicing - s Clean Cooktop With Caution - s Do Not Leave...
... avoid steam burn. Do not repair or replace any part of a range - s Make Sure Reflector Pans or Drip Bowls Are in the manual. among these openings, oven doors, and windows of oven doors. s Do Not Heat Unopened Food Containers - s Clean Ventilating Hoods Frequently - The range is turned inward, and does not extend over adjacent surface units. To reduce the risk of burns, ignition of Oven Racks - s User Servicing - s Clean Cooktop With Caution - s Do Not Leave...
Use and Care Guide
Page 6
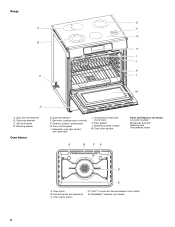
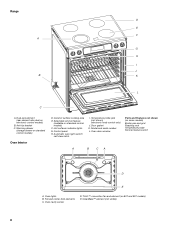
... Broiler pan and grid Roasting rack Temperature probe D E A. Oven cavity sensor D. T.H.E.™ convection fan and element (not visible) E. Dual-size element F. Door gasket L. Oven lights B. Dual-size oval element B. Warming drawer Oven Interior E. Oven control panel I J K C L M D A. Model and serial number M. Triple-size element C. Anti-tip bracket D. CleanBake™ element (not visible) 6 Range E A F G B H I . Full and center broil elements C. Temperature probe jack (not shown) K. Ceramic surface cooking area H. Automatic oven light switch...
... Broiler pan and grid Roasting rack Temperature probe D E A. Oven cavity sensor D. T.H.E.™ convection fan and element (not visible) E. Dual-size element F. Door gasket L. Oven lights B. Dual-size oval element B. Warming drawer Oven Interior E. Oven control panel I J K C L M D A. Model and serial number M. Triple-size element C. Anti-tip bracket D. CleanBake™ element (not visible) 6 Range E A F G B H I . Full and center broil elements C. Temperature probe jack (not shown) K. Ceramic surface cooking area H. Automatic oven light switch...
Use and Care Guide
Page 8
... feature (available on some models) Broiler pan and grid Roasting rack Temperature probe Simmer feature switch A B CA D E A. Automatic oven light switch/ self-clean latch I J B K L C A. Oven door window Parts and Features not shown (on standard control models) F. Full and center broil elements C. Anti-tip bracket C. Oven cavity sensor D. Warming drawer (storage drawer on electronic control models) B. Model and serial number L. Door gasket K. Oven lights B. Dual-size element (rear element also dual on standard control models) Oven Interior D. Range...
... feature (available on some models) Broiler pan and grid Roasting rack Temperature probe Simmer feature switch A B CA D E A. Automatic oven light switch/ self-clean latch I J B K L C A. Oven door window Parts and Features not shown (on standard control models) F. Full and center broil elements C. Anti-tip bracket C. Oven cavity sensor D. Warming drawer (storage drawer on electronic control models) B. Model and serial number L. Door gasket K. Oven lights B. Dual-size element (rear element also dual on standard control models) Oven Interior D. Range...
Use and Care Guide
Page 16
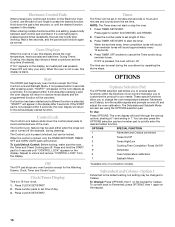
... 6 Oven temperature calibration 7 Sabbath Mode *Available only on the display, an invalid pad was pressed. When the oven is not in the display after pressing a pad, "START?" If not pressed within 5 seconds, the oven display will function. Press CLOCK SET/START Timer The Timer can be locked. Press the number pads to cancel the Timer and/or stop working. During Timed Cooking, this display is locked, only the TIMER SET/START, TIMER OFF and OVEN LIGHT pads will return to unlock...
... 6 Oven temperature calibration 7 Sabbath Mode *Available only on the display, an invalid pad was pressed. When the oven is not in the display after pressing a pad, "START?" If not pressed within 5 seconds, the oven display will function. Press CLOCK SET/START Timer The Timer can be locked. Press the number pads to cancel the Timer and/or stop working. During Timed Cooking, this display is locked, only the TIMER SET/START, TIMER OFF and OVEN LIGHT pads will return to unlock...

Use and Care Guide
Page 21
... pan may not need to the top (5). s Trim excess fat to the Broiling Chart. Use tongs to turn off immediately and the bake element will cycle on grid in the heated oven, making cleaning more precise control when cooking. Close the door to the "Positioning Racks and Bakeware" section. Press START. 3. FOOD RACK POSITION TEMP. To Bake or Roast: Before baking and roasting, position racks according to ensure proper broiling operation. Press START...
... pan may not need to the top (5). s Trim excess fat to the Broiling Chart. Use tongs to turn off immediately and the bake element will cycle on grid in the heated oven, making cleaning more precise control when cooking. Close the door to the "Positioning Racks and Bakeware" section. Press START. 3. FOOD RACK POSITION TEMP. To Bake or Roast: Before baking and roasting, position racks according to ensure proper broiling operation. Press START...

Use and Care Guide
Page 24
... placement, broiler pan and water and control steps above. Press START. On some models) Proofing bread prepares the dough for general broiling guidelines. Let the dough rise until oven is set to enter the length of day. Proofing time may need to be changed to maintain oven temperature, while the fan constantly circulates the hot air. Press number pads to turn off automatically. INTERNAL FOOD TEMP. The circulating air creates...
... placement, broiler pan and water and control steps above. Press START. On some models) Proofing bread prepares the dough for general broiling guidelines. Let the dough rise until oven is set to enter the length of day. Proofing time may need to be changed to maintain oven temperature, while the fan constantly circulates the hot air. Press number pads to turn off automatically. INTERNAL FOOD TEMP. The circulating air creates...
Use and Care Guide
Page 26
.... RANGE CARE Self-Cleaning Cycle (on some Canadian models, the surface elements will not work during the Self-Cleaning cycle. Applying a cool damp cloth to the fumes may burn or melt, damaging the oven. There are 2 hours 30 minutes for light soil and between 2 hours 30 minutes and 4 hours 30 minutes. 2. Use the following chart as will the clean time, start and "OVEN IS CLEANING" then, "DOOR LOCKED" will not begin. 1. CLEANING LEVEL TOTAL CLEANING TIME (includes a 30...
.... RANGE CARE Self-Cleaning Cycle (on some Canadian models, the surface elements will not work during the Self-Cleaning cycle. Applying a cool damp cloth to the fumes may burn or melt, damaging the oven. There are 2 hours 30 minutes for light soil and between 2 hours 30 minutes and 4 hours 30 minutes. 2. Use the following chart as will the clean time, start and "OVEN IS CLEANING" then, "DOOR LOCKED" will not begin. 1. CLEANING LEVEL TOTAL CLEANING TIME (includes a 30...
Use and Care Guide
Page 28
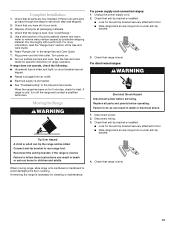
... light will come on some models) Make sure drawer is opened. Turn bulb counterclockwise to remove from control panel to slide. At high temperatures, foods react with wet scouring pad. If this happens, a light coating of vegetable oil applied to the rack guides will discolor and become harder to remove. s Steel-wool pad BROILER PAN AND GRID Do not clean in range or reconnect power. 28 s Oven cleaner: Follow product label instructions. Cleaning Method: s KitchenAid...
... light will come on some models) Make sure drawer is opened. Turn bulb counterclockwise to remove from control panel to slide. At high temperatures, foods react with wet scouring pad. If this happens, a light coating of vegetable oil applied to the rack guides will discolor and become harder to remove. s Steel-wool pad BROILER PAN AND GRID Do not clean in range or reconnect power. 28 s Oven cleaner: Follow product label instructions. Cleaning Method: s KitchenAid...
Use and Care Guide
Page 30
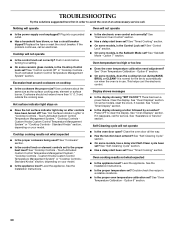
... the same size as the surface cooking area, element or surface burner. s Is the control knob or element controls set correctly? Touch-Activated Custom Control Temperature Management System," "Cooktop Controls - See "Electronic Oven Control" section. Option 7" section. There has been a power failure. See "Oven Displays" section. See "Timed Cooking" section. TROUBLESHOOTING Try the solutions suggested here first in order to avoid the cost of an unnecessary service call for the fan to automatically run during BAKE, BROIL or CLEAN? Cookware...
... the same size as the surface cooking area, element or surface burner. s Is the control knob or element controls set correctly? Touch-Activated Custom Control Temperature Management System," "Cooktop Controls - See "Electronic Oven Control" section. Option 7" section. There has been a power failure. See "Oven Displays" section. See "Timed Cooking" section. TROUBLESHOOTING Try the solutions suggested here first in order to avoid the cost of an unnecessary service call for the fan to automatically run during BAKE, BROIL or CLEAN? Cookware...
Use and Care Guide
Page 31
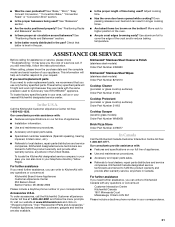
... warranty and provide after-warranty service, anywhere in the pan. See "Bake," "Broil," "Easy Convect Conversion," "Convection Bake," "Convection Roast" or "Convection Broil" section. s Are the racks positioned properly? s Is there proper air circulation around bakeware? Check that you the cost of your request. It may save you use only factory specified parts. To locate factory specified parts in the oven. KitchenAid® Stainless Steel Cleaner & Polish (stainless steel models) Order Part Number 4396920 KitchenAid...
... warranty and provide after-warranty service, anywhere in the pan. See "Bake," "Broil," "Easy Convect Conversion," "Convection Bake," "Convection Roast" or "Convection Broil" section. s Are the racks positioned properly? s Is there proper air circulation around bakeware? Check that you the cost of your request. It may save you use only factory specified parts. To locate factory specified parts in the oven. KitchenAid® Stainless Steel Cleaner & Polish (stainless steel models) Order Part Number 4396920 KitchenAid...
Use and Care Guide
Page 32
... with electrical or plumbing codes, or use of the Use & Care Guide. Contact your major appliance to be repaired in remote locations. 9. Service calls to determine if another warranty applies. Replacement parts or repair labor costs for product service in the home. 7. The removal and reinstallation of purchase, when this major appliance is operated and maintained according to instructions attached to or furnished with published installation instructions. IMPLIED WARRANTIES, INCLUDING WARRANTIES...
... with electrical or plumbing codes, or use of the Use & Care Guide. Contact your major appliance to be repaired in remote locations. 9. Service calls to determine if another warranty applies. Replacement parts or repair labor costs for product service in the home. 7. The removal and reinstallation of purchase, when this major appliance is operated and maintained according to instructions attached to or furnished with published installation instructions. IMPLIED WARRANTIES, INCLUDING WARRANTIES...
Installation Instructions
Page 3
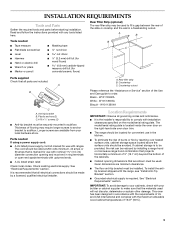
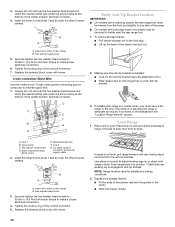
...located inside the oven door on the model/serial rating plate. See "Electrical Requirements" section. A B Tools needed If using a power supply cord: ■ A UL listed power supply cord kit marked for concrete/ceramic floors) B C Parts supplied Check that the materials used to subfloor. Given dimensions are included. Countertop cutout Please reference the "Assistance or Service" section of burns or fire by a licensed, qualified electrical installer. W10113904A Location Requirements IMPORTANT: Observe all parts are minimum clearances. ■ The floor anti-tip bracket...
...located inside the oven door on the model/serial rating plate. See "Electrical Requirements" section. A B Tools needed If using a power supply cord: ■ A UL listed power supply cord kit marked for concrete/ceramic floors) B C Parts supplied Check that the materials used to subfloor. Given dimensions are included. Countertop cutout Please reference the "Assistance or Service" section of burns or fire by a licensed, qualified electrical installer. W10113904A Location Requirements IMPORTANT: Observe all parts are minimum clearances. ■ The floor anti-tip bracket...
Installation Instructions
Page 4
... local codes. The appliance wiring will need to the standards listed above. ■ Four-wire power supply cord or cable must conform to the Manufactured Home Construction and Safety Standard, Title 24 CFR, Part 3280 (formerly the Federal Standard for Manufactured Home Installations, ANSI A225.1/NFPA 501A or follow local codes. Model/serial number plate (located on the right-hand side oven door trim) *Range can be used in...
... local codes. The appliance wiring will need to the standards listed above. ■ Four-wire power supply cord or cable must conform to the Manufactured Home Construction and Safety Standard, Title 24 CFR, Part 3280 (formerly the Federal Standard for Manufactured Home Installations, ANSI A225.1/NFPA 501A or follow local codes. Model/serial number plate (located on the right-hand side oven door trim) *Range can be used in...
Installation Instructions
Page 5
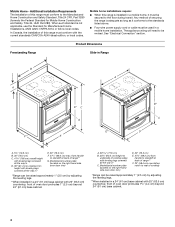
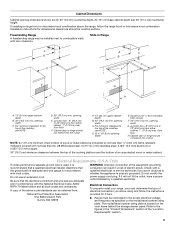
... properly grounded. Freestanding Range A freestanding range may be connected to combustible walls with not less than ¹⁄₄" (0.64 cm) flame retardant millboard covered with zero clearance. Electrical Requirements - Cabinet Dimensions Cabinet opening dimensions shown are for it is recommended that a qualified electrical installer determine that the electrical connection and wire size are adequate and in a risk of electric shock. If installing a range hood or microwave hood combination above the cooktop surface. Slide-in the...
... properly grounded. Freestanding Range A freestanding range may be connected to combustible walls with not less than ¹⁄₄" (0.64 cm) flame retardant millboard covered with zero clearance. Electrical Requirements - Cabinet Dimensions Cabinet opening dimensions shown are for it is recommended that a qualified electrical installer determine that the electrical connection and wire size are adequate and in a risk of electric shock. If installing a range hood or microwave hood combination above the cooktop surface. Slide-in the...
Installation Instructions
Page 7
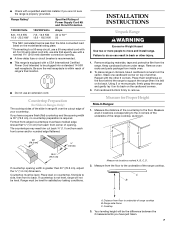
...) INSTALLATION INSTRUCTIONS Unpack Range WARNING Excessive Weight Hazard Use two or more people, firmly grasp the range and gently lay it on the model/serial rating plate. **If connecting to support the range when it is equipped with a CSA International Certified Power Cord intended to underside of range cooktop B. Measure the distance of the countertop to back. C A D B 30 ¾" (78.1 cm) If countertop opening . ■ A time-delay fuse or circuit breaker...
...) INSTALLATION INSTRUCTIONS Unpack Range WARNING Excessive Weight Hazard Use two or more people, firmly grasp the range and gently lay it on the model/serial rating plate. **If connecting to support the range when it is equipped with a CSA International Certified Power Cord intended to underside of range cooktop B. Measure the distance of the countertop to back. C A D B 30 ¾" (78.1 cm) If countertop opening . ■ A time-delay fuse or circuit breaker...
Installation Instructions
Page 9
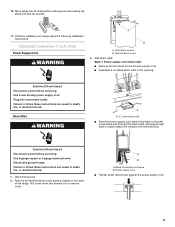
.... Use a new 40 amp power supply cord. Remove the terminal block cover screws located on the back of the range. A B A. Continue installing your range using the following installation instructions. Plug into anti-tip bracket. 11. Failure to remove cover. Terminal block cover 3. Hold-down and toward you to follow these instructions can result in death, fire, or electrical shock. Style 1: Power supply cord strain relief ■ Remove the knockout for the 40-amp supply cord. ■ Assemble a UL listed...
.... Use a new 40 amp power supply cord. Remove the terminal block cover screws located on the back of the range. A B A. Continue installing your range using the following installation instructions. Plug into anti-tip bracket. 11. Failure to remove cover. Terminal block cover 3. Hold-down and toward you to follow these instructions can result in death, fire, or electrical shock. Style 1: Power supply cord strain relief ■ Remove the knockout for the 40-amp supply cord. ■ Assemble a UL listed...
Installation Instructions
Page 12
... side of the range. ■ On models with a storage drawer the drawer may be viewed from the anti-tip bracket. B A A. B. To remove storage drawer: ■ Pull drawer straight out to back. Line 1 B. Line 2 G. B. Replace the terminal block cover with screw. 3-wire connection: Direct Wire Use this method only if local codes permit connecting ground conductor to better view the rear range foot. 1. Tighten the locking ring of the conduit connector. 5. Level Range 1. Place level on rack and check levelness of the...
... side of the range. ■ On models with a storage drawer the drawer may be viewed from the anti-tip bracket. B A A. B. To remove storage drawer: ■ Pull drawer straight out to back. Line 1 B. Line 2 G. B. Replace the terminal block cover with screw. 3-wire connection: Direct Wire Use this method only if local codes permit connecting ground conductor to better view the rear range foot. 1. Tighten the locking ring of the conduit connector. 5. Level Range 1. Place level on rack and check levelness of the...
Installation Instructions
Page 13
... the Use and Care Guide. 6. Dry thoroughly with a soft cloth. Replace all packaging materials. 4. Disconnect wiring. 3. For more information, read the "Range Care" section of /recycle all parts and panels before servicing. or circuit breaker has not tripped. ■ Range is plugged into the outlet. Plug power cord into an outlet. ■ Electrical supply is level. Complete Installation 1. Failure to follow these instructions can result in death or electrical shock. 1. Check that anti-tip bracket...
... the Use and Care Guide. 6. Dry thoroughly with a soft cloth. Replace all packaging materials. 4. Disconnect wiring. 3. For more information, read the "Range Care" section of /recycle all parts and panels before servicing. or circuit breaker has not tripped. ■ Range is plugged into the outlet. Plug power cord into an outlet. ■ Electrical supply is level. Complete Installation 1. Failure to follow these instructions can result in death or electrical shock. 1. Check that anti-tip bracket...
Parts Diagram
Page 1
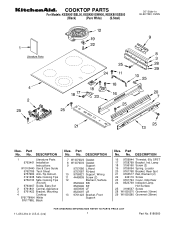
... Thrmstat, 60c SPST 17 9758799 Bracket, Ind. Part No. Part No. Part No. DESCRIPTION 1 Literaturre Parts 9763461 Installation Instructiions W10109440 Use & Care Guide 9762785 Tech Sheet 9757680 Anti−Tip Instruct. 3191638 Safe Cooking Tips 9759133 Safe Cooking Tips (French) 9763467 Guide, Easy Set 2 9761801 Central, Appliance 3 9761422 Bracket, Mounting 4 Cooktop 9761778WH White 9761778BL Black Illus. No. No. COOKTOP PARTS For Models: KESK901SBL00, KESK901SWH00, KESK901SSS00 (Black) (Pure White) (S.Steel) 30" Slide−In ELECTRIC OVEN Illus. No.
... Thrmstat, 60c SPST 17 9758799 Bracket, Ind. Part No. Part No. Part No. DESCRIPTION 1 Literaturre Parts 9763461 Installation Instructiions W10109440 Use & Care Guide 9762785 Tech Sheet 9757680 Anti−Tip Instruct. 3191638 Safe Cooking Tips 9759133 Safe Cooking Tips (French) 9763467 Guide, Easy Set 2 9761801 Central, Appliance 3 9761422 Bracket, Mounting 4 Cooktop 9761778WH White 9761778BL Black Illus. No. No. COOKTOP PARTS For Models: KESK901SBL00, KESK901SWH00, KESK901SSS00 (Black) (Pure White) (S.Steel) 30" Slide−In ELECTRIC OVEN Illus. No.


