
Use and Care Guide
Page 3
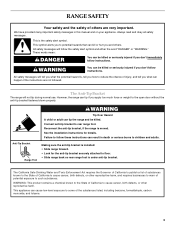
..., or other reproductive harm. All safety messages will not tip during normal use. See the installation instructions for the anti-tip bracket securely attached to some of the substances listed, including benzene, formaldehyde, carbon monoxide, and toluene. 3 Failure to potential hazards that can kill or ...hurt you don't immediately follow these instructions can cause low-level exposure to floor. • Slide range back so rear range foot is under anti-tip bracket. Anti-Tip Bracket Range Foot Making sure the anti-tip bracket is , tell you how to reduce the chance of injury...
..., or other reproductive harm. All safety messages will not tip during normal use. See the installation instructions for the anti-tip bracket securely attached to some of the substances listed, including benzene, formaldehyde, carbon monoxide, and toluene. 3 Failure to potential hazards that can kill or ...hurt you don't immediately follow these instructions can cause low-level exposure to floor. • Slide range back so rear range foot is under anti-tip bracket. Anti-Tip Bracket Range Foot Making sure the anti-tip bracket is , tell you how to reduce the chance of injury...
Use and Care Guide
Page 4
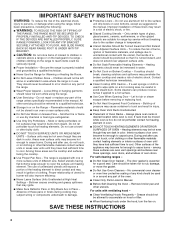
...fire. Grease should not be hot even though they are dark in or around any part of fire, electrical shock, injury to persons, or damage when using the range. Surface units may ignite. If a wet sponge or cloth is cool. s Use Care When Opening ... Soak Removable Heating Elements - Absence of the range unless specifically recommended in cabinets above a range or on . TO CHECK IF THE DEVICES ARE INSTALLED PROPERLY, SLIDE RANGE FORWARD, LOOK FOR ANTI-TIP BRACKET SECURELY ATTACHED TO FLOOR, AND SLIDE RANGE BACK SO REAR RANGE FOOT IS UNDER ANTI-TIP BRACKET. Contact a...
...fire. Grease should not be hot even though they are dark in or around any part of fire, electrical shock, injury to persons, or damage when using the range. Surface units may ignite. If a wet sponge or cloth is cool. s Use Care When Opening ... Soak Removable Heating Elements - Absence of the range unless specifically recommended in cabinets above a range or on . TO CHECK IF THE DEVICES ARE INSTALLED PROPERLY, SLIDE RANGE FORWARD, LOOK FOR ANTI-TIP BRACKET SECURELY ATTACHED TO FLOOR, AND SLIDE RANGE BACK SO REAR RANGE FOOT IS UNDER ANTI-TIP BRACKET. Contact a...
Use and Care Guide
Page 32
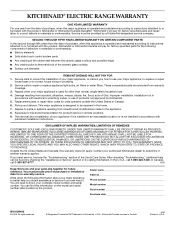
KITCHENAID® ELECTRIC RANGE WARRANTY ONE YEAR LIMITED WARRANTY For one year from the date of your major appliance, to instruct you how to use your major appliance, to ... house wiring or plumbing. 2. Service calls to correct the installation of purchase, when this major appliance is operated and maintained according to instructions attached to or furnished with electrical or plumbing codes, or use . 4. This major appliance is used for other than normal, single-family household use of the Use & Care Guide...
KITCHENAID® ELECTRIC RANGE WARRANTY ONE YEAR LIMITED WARRANTY For one year from the date of your major appliance, to instruct you how to use your major appliance, to ... house wiring or plumbing. 2. Service calls to correct the installation of purchase, when this major appliance is operated and maintained according to instructions attached to or furnished with electrical or plumbing codes, or use . 4. This major appliance is used for other than normal, single-family household use of the Use & Care Guide...
Installation Instructions
Page 9
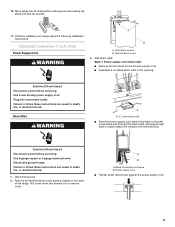
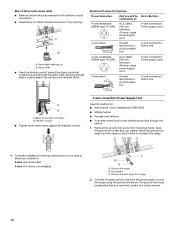
Move range into its final position making sure rear leveling leg slides into a grounded outlet. U.S.A. Terminal block cover 3. Failure to follow these instructions can result in death, fire, or electrical shock. 1. Direct Wire WARNING A A. A B A. Only Power Supply Cord WARNING A B A. Add strain relief. ... cord behind the black horizontal cross brace and through the strain relief, allowing enough slack to easily attach the wiring to remove cover. Electrical Shock Hazard Disconnect power before servicing. 10. Plug into anti-tip bracket. 11. Failure to follow...
Move range into its final position making sure rear leveling leg slides into a grounded outlet. U.S.A. Terminal block cover 3. Failure to follow these instructions can result in death, fire, or electrical shock. 1. Direct Wire WARNING A A. A B A. Only Power Supply Cord WARNING A B A. Add strain relief. ... cord behind the black horizontal cross brace and through the strain relief, allowing enough slack to easily attach the wiring to remove cover. Electrical Shock Hazard Disconnect power before servicing. 10. Plug into anti-tip bracket. 11. Failure to follow...
Installation Instructions
Page 10
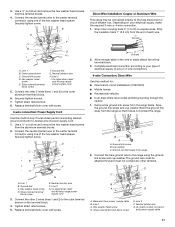
... 3-wire connection: Direct wire A B A. Ground-link bent away from the range so that it does not contact the range. 4. The ground wire must not contact any other terminal. 10 Electrical Connection Options If your type of electrical connection: 4-wire (recommended) 3-wire (if 4-wire is not available) C... vehicles ■ In an area where local codes prohibit grounding through the strain relief, allowing enough slack to easily attach the wiring to the range using the ground-link screw. Remove the ground-link screw from the power supply cord to the terminal block. Cup...
... 3-wire connection: Direct wire A B A. Ground-link bent away from the range so that it does not contact the range. 4. The ground wire must not contact any other terminal. 10 Electrical Connection Options If your type of electrical connection: 4-wire (recommended) 3-wire (if 4-wire is not available) C... vehicles ■ In an area where local codes prohibit grounding through the strain relief, allowing enough slack to easily attach the wiring to the range using the ground-link screw. Remove the ground-link screw from the power supply cord to the terminal block. Cup...
Installation Instructions
Page 11
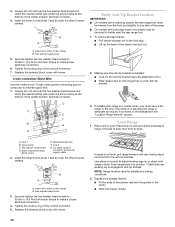
... must not contact any other terminal. Connect the neutral (center) wire to the center terminal connector using one of electrical supply (4-wire or 3-wire connection). 4-wire Connection: Direct Wire Use this method only if local codes permit connecting cabinetground... supply cord 3. Silver-colored terminal block screw F. Direct Wire Installation: Copper or Aluminum Wire This range may be attached first and must be connected directly to easily attach the wiring terminal block. 3. Neutral (center) wire H. E D F C B G H A I . Line 2 G. Replace terminal block cover with screw...
... must not contact any other terminal. Connect the neutral (center) wire to the center terminal connector using one of electrical supply (4-wire or 3-wire connection). 4-wire Connection: Direct Wire Use this method only if local codes permit connecting cabinetground... supply cord 3. Silver-colored terminal block screw F. Direct Wire Installation: Copper or Aluminum Wire This range may be attached first and must be connected directly to easily attach the wiring terminal block. 3. Neutral (center) wire H. E D F C B G H A I . Line 2 G. Replace terminal block cover with screw...
Installation Instructions
Page 12
... cover with a storage drawer the drawer may be removed to floor. ■ Slide range back so rear range foot is engaged in oven. To remove storage drawer: ■ Pull drawer straight... only if local codes permit connecting ground conductor to make a proper electrical connection. 4. Check that rear leveling leg is under anti-tip bracket. 3. NOTE: Range must be viewed from the anti-tip bracket. B A A. D...screw clamps. Push range back into the guides in a mobile home, you must be level for the anti-tip bracket securely attached to better view the rear range foot. 1. Place...
... cover with a storage drawer the drawer may be removed to floor. ■ Slide range back so rear range foot is engaged in oven. To remove storage drawer: ■ Pull drawer straight... only if local codes permit connecting ground conductor to make a proper electrical connection. 4. Check that rear leveling leg is under anti-tip bracket. 3. NOTE: Range must be viewed from the anti-tip bracket. B A A. D...screw clamps. Push range back into the guides in a mobile home, you must be level for the anti-tip bracket securely attached to better view the rear range foot. 1. Place...
Installation Instructions
Page 13
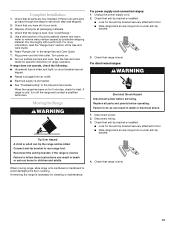
... for the anti-tip bracket securely attached to floor. ■ Slide range back so rear range foot is an extra part, go back through the steps to floor. ■ Slide range back so rear range foot is level. 13 See the Use and Care Guide for heat. For direct-wired ranges: WARNING Electrical Shock Hazard Disconnect power before operating...
... for the anti-tip bracket securely attached to floor. ■ Slide range back so rear range foot is an extra part, go back through the steps to floor. ■ Slide range back so rear range foot is level. 13 See the Use and Care Guide for heat. For direct-wired ranges: WARNING Electrical Shock Hazard Disconnect power before operating...