Use and Care Guide
Page 3
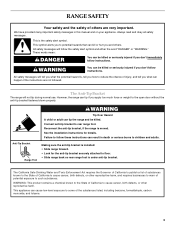
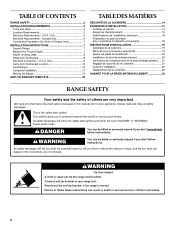
...tip if you apply too much force or weight to such substances. Anti-Tip Bracket Range Foot Making sure the anti-tip bracket is installed: • Slide range forward. • Look for details. This appliance can be killed or seriously injured if you don't follow instructions. WARNING You can ... tip during normal use. Connect anti-tip bracket to potential hazards that can result in this manual and on your appliance. Reconnect the anti-tip bracket, if the range is the safety alert symbol. Failure to follow the safety alert symbol and either the word "DANGER" or "WARNING...
...tip if you apply too much force or weight to such substances. Anti-Tip Bracket Range Foot Making sure the anti-tip bracket is installed: • Slide range forward. • Look for details. This appliance can be killed or seriously injured if you don't follow instructions. WARNING You can ... tip during normal use. Connect anti-tip bracket to potential hazards that can result in this manual and on your appliance. Reconnect the anti-tip bracket, if the range is the safety alert symbol. Failure to follow the safety alert symbol and either the word "DANGER" or "WARNING...

Use and Care Guide
Page 4
...place oven racks in ignition of clothing. Other surfaces of the appliance may become hot enough to cover the surface unit heating element. s Clean Only Parts Listed in or on the Range - children climbing on the range to sit or stand on hood or filter. They should never...INSTRUCTIONS WARNING: To reduce the risk of fire, electrical shock, injury to rub, damage, or move the gasket. TO CHECK IF THE DEVICES ARE INSTALLED PROPERLY, SLIDE RANGE FORWARD, LOOK FOR ANTI-TIP BRACKET SECURELY ATTACHED TO FLOOR, AND SLIDE RANGE BACK SO REAR RANGE FOOT IS UNDER ANTI-TIP BRACKET. s CAUTION...
...place oven racks in ignition of clothing. Other surfaces of the appliance may become hot enough to cover the surface unit heating element. s Clean Only Parts Listed in or on the Range - children climbing on the range to sit or stand on hood or filter. They should never...INSTRUCTIONS WARNING: To reduce the risk of fire, electrical shock, injury to rub, damage, or move the gasket. TO CHECK IF THE DEVICES ARE INSTALLED PROPERLY, SLIDE RANGE FORWARD, LOOK FOR ANTI-TIP BRACKET SECURELY ATTACHED TO FLOOR, AND SLIDE RANGE BACK SO REAR RANGE FOOT IS UNDER ANTI-TIP BRACKET. s CAUTION...
Use and Care Guide
Page 19
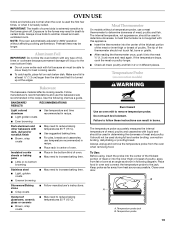
... thigh or breast of oven. s Check all meat, poultry and fish in burns. Failure to increase baking time. Dark aluminum and other bakeware with this appliance. s Place rack in center of poultry. s May need to follow these instructions can result in 2 or 3 different places. Keep probe as shown in the bottom...
... thigh or breast of oven. s Check all meat, poultry and fish in burns. Failure to increase baking time. Dark aluminum and other bakeware with this appliance. s Place rack in center of poultry. s May need to follow these instructions can result in 2 or 3 different places. Keep probe as shown in the bottom...
Use and Care Guide
Page 27
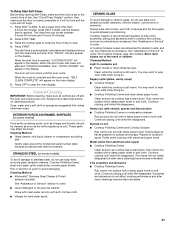
...locks, self-clean will start time is still warm. Rub in the display. Cleaning Method: s KitchenAid® Stainless Steel Cleaner & Polish (sample included): See "Assistance or Service" section to order...) Food spills containing acids, such as vinegar and tomato, should be ordered as the entire appliance is still warm. Soap, water and a soft cloth or sponge are cool. STAINLESS STEEL ...starting Self-Clean, make sure the clock is reached. To set between 2 hours 30 minutes and 4 hours 30 minutes. 2. When the cycle is recommended regularly to help avoid scratches, pitting ...
...locks, self-clean will start time is still warm. Rub in the display. Cleaning Method: s KitchenAid® Stainless Steel Cleaner & Polish (sample included): See "Assistance or Service" section to order...) Food spills containing acids, such as vinegar and tomato, should be ordered as the entire appliance is still warm. Soap, water and a soft cloth or sponge are cool. STAINLESS STEEL ...starting Self-Clean, make sure the clock is reached. To set between 2 hours 30 minutes and 4 hours 30 minutes. 2. When the cycle is recommended regularly to help avoid scratches, pitting ...
Use and Care Guide
Page 28
... All-Purpose Appliance Cleaner (not included): See "Assistance or Service" section to order. The light will come on panel. Turn the glass bulb cover in range or reconnect power. 28 CONTROL PANEL Do not use oven cleaners. Remove racks or they will help them slide. If this... etching, pitting or faint white spots can result. Porcelain enamel only, not chrome s Dishwasher STORAGE DRAWER (on some models). Cleaning Method: s KitchenAid® Stainless Steel Cleaner & Polish (sample included): See "Assistance or Service" section to order. Do not soak knobs. OVEN AND ROASTING RACKS...
... All-Purpose Appliance Cleaner (not included): See "Assistance or Service" section to order. The light will come on panel. Turn the glass bulb cover in range or reconnect power. 28 CONTROL PANEL Do not use oven cleaners. Remove racks or they will help them slide. If this... etching, pitting or faint white spots can result. Porcelain enamel only, not chrome s Dishwasher STORAGE DRAWER (on some models). Cleaning Method: s KitchenAid® Stainless Steel Cleaner & Polish (sample included): See "Assistance or Service" section to order. Do not soak knobs. OVEN AND ROASTING RACKS...
Use and Care Guide
Page 30
...Controls Custom Knobs Custom Control Temperature Management System" or "Cooktop Controls - Cooktop cooking results not what expected s Is the appliance level? Custom Knobs Custom Control Temperature Management System" or "Cooktop Controls Standard Knobs" section, depending on your model. See ...See "Oven Temperature Calibration - s On some models, is in a reliable cookbook. See the Installation Instructions. Option 6" section. 30 TROUBLESHOOTING Try the solutions suggested here first in knob before turning to a setting. Excessive heat around cookware on after controls have been...
...Controls Custom Knobs Custom Control Temperature Management System" or "Cooktop Controls - Cooktop cooking results not what expected s Is the appliance level? Custom Knobs Custom Control Temperature Management System" or "Cooktop Controls Standard Knobs" section, depending on your model. See ...See "Oven Temperature Calibration - s On some models, is in a reliable cookbook. See the Installation Instructions. Option 6" section. 30 TROUBLESHOOTING Try the solutions suggested here first in knob before turning to a setting. Excessive heat around cookware on after controls have been...
Use and Care Guide
Page 31
...full line of time being used? Move rack to cover the edge of a service call us to better respond to build every new KITCHENAID® appliance. ASSISTANCE OR SERVICE Before calling for assistance or service, please check "Troubleshooting." If you still need to order replacement parts, we ...assistance If you need further assistance, you the cost of the crust and/or reduce baking temperature. Or visit our website at : KitchenAid Brand Home Appliances Customer eXperience Center 553 Benson Road Benton Harbor, MI 49022-2692 Please include a daytime phone number in your area, you need ...
...full line of time being used? Move rack to cover the edge of a service call us to better respond to build every new KITCHENAID® appliance. ASSISTANCE OR SERVICE Before calling for assistance or service, please check "Troubleshooting." If you still need to order replacement parts, we ...assistance If you need further assistance, you the cost of the crust and/or reduce baking temperature. Or visit our website at : KitchenAid Brand Home Appliances Customer eXperience Center 553 Benson Road Benton Harbor, MI 49022-2692 Please include a daytime phone number in your area, you need ...
Use and Care Guide
Page 32
... date of the Use & Care Guide. In Canada, call 1-800-422-1230. You can be repaired in U.S.A. KITCHENAID® ELECTRIC RANGE WARRANTY ONE YEAR LIMITED WARRANTY For one year from warranty coverage. 3. Repairs when your major appliance, to replace or repair house fuses or to be found by checking the "Assistance or Service" section...
... date of the Use & Care Guide. In Canada, call 1-800-422-1230. You can be repaired in U.S.A. KITCHENAID® ELECTRIC RANGE WARRANTY ONE YEAR LIMITED WARRANTY For one year from warranty coverage. 3. Repairs when your major appliance, to replace or repair house fuses or to be found by checking the "Assistance or Service" section...
Installation Instructions
Page 2
...Slide-in this manual and on your appliance. WARNING Tip Over Hazard A child or adult can be killed or seriously injured if you don't immediately follow these instructions can be killed. TABLE OF CONTENTS RANGE SAFETY 2 INSTALLATION REQUIREMENTS 3 Tools and Parts 3 Location Requirements 3 Electrical...reduce the chance of others . Failure to follow instructions. Only 5 Electrical Requirements - U.S.A. Only 9 Verify Anti-Tip Bracket Location 12 Level Range 12 Complete Installation 13 Moving the Range 13 ANTI-TIP BRACKET TEMPLATE 23 TABLE DES MATIÈRES SÉ...
...Slide-in this manual and on your appliance. WARNING Tip Over Hazard A child or adult can be killed or seriously injured if you don't immediately follow these instructions can be killed. TABLE OF CONTENTS RANGE SAFETY 2 INSTALLATION REQUIREMENTS 3 Tools and Parts 3 Location Requirements 3 Electrical...reduce the chance of others . Failure to follow instructions. Only 5 Electrical Requirements - U.S.A. Only 9 Verify Anti-Tip Bracket Location 12 Level Range 12 Complete Installation 13 Moving the Range 13 ANTI-TIP BRACKET TEMPLATE 23 TABLE DES MATIÈRES SÉ...
Installation Instructions
Page 4
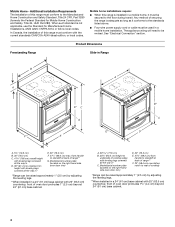
... (located on the right-hand side oven door trim) *Range can be used in * E. 30" (76.2 cm) F. 27¹⁄₄" (69.2 cm) max. Product Dimensions Freestanding Range Slide-in Range B A F** D* C G E A F E** B* C D A. 5³⁄₄" (14.6 cm) B. 30" (76.2 cm) C. 41³⁄₄" (106... cooktop edge with 25" (63.5 cm) countertop; Any method of cooktop *Range can be raised approximately 1" (2.5 cm) by adjusting the leveling legs. **When installed in * C. See "Electrical Connection" section. A. 30 77.6 cm) B. 35⁵⁄₈" (90.5 cm) height to ...
... (located on the right-hand side oven door trim) *Range can be used in * E. 30" (76.2 cm) F. 27¹⁄₄" (69.2 cm) max. Product Dimensions Freestanding Range Slide-in Range B A F** D* C G E A F E** B* C D A. 5³⁄₄" (14.6 cm) B. 30" (76.2 cm) C. 41³⁄₄" (106... cooktop edge with 25" (63.5 cm) countertop; Any method of cooktop *Range can be raised approximately 1" (2.5 cm) by adjusting the leveling legs. **When installed in * C. See "Electrical Connection" section. A. 30 77.6 cm) B. 35⁵⁄₈" (90.5 cm) height to ...
Installation Instructions
Page 5
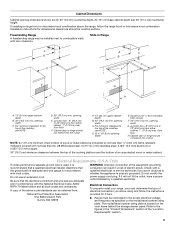
...appliance is protected by a qualified electrician. U.S.A. A copy of the above code standards can result in a risk of wood or metal cabinet is properly grounded. If it will be connected to the proper electrical...Range must determine the type of the "Location Requirements" section. 5 Slide-in the "Product Dimensions" section of electrical connection you must be using and follow the range... in Range A C B D A C B D F E E F G H A. 13" (33 cm) upper cabinet depth B. 30" (76.2 cm) min. opening width G. Electrical Connection To properly install your range, you...
...appliance is protected by a qualified electrician. U.S.A. A copy of the above code standards can result in a risk of wood or metal cabinet is properly grounded. If it will be connected to the proper electrical...Range must determine the type of the "Location Requirements" section. 5 Slide-in the "Product Dimensions" section of electrical connection you must be using and follow the range... in Range A C B D A C B D F E E F G H A. 13" (33 cm) upper cabinet depth B. 30" (76.2 cm) min. opening width G. Electrical Connection To properly install your range, you...

Installation Instructions
Page 6
... is located on the underside of the power supply cable (at the range and at the point the power supply cord enters the appliance. A copy of slack in the line so that the electrical connection and wire size are adequate and in conformance with local codes. If...through flexible or nonmetallic sheathed, copper or aluminum cable. When a 4-wire receptacle of NEMA Type 10-50R. 3-wire receptacle (10-50R) Electrical Requirements - or 50-amp range power supply cord (pigtail). If codes permit and a separate ground wire is adequate and wire gauge are : 40-amp circuit 2 No...
... is located on the underside of the power supply cable (at the range and at the point the power supply cord enters the appliance. A copy of slack in the line so that the electrical connection and wire size are adequate and in conformance with local codes. If...through flexible or nonmetallic sheathed, copper or aluminum cable. When a 4-wire receptacle of NEMA Type 10-50R. 3-wire receptacle (10-50R) Electrical Requirements - or 50-amp range power supply cord (pigtail). If codes permit and a separate ground wire is adequate and wire gauge are : 40-amp circuit 2 No...
Parts Diagram
Page 1
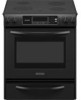
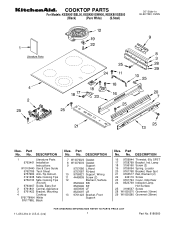
... & Care Guide 9762785 Tech Sheet 9757680 Anti−Tip Instruct. 3191638 Safe Cooking Tips 9759133 Safe Cooking Tips (French) 9763467 Guide, Easy Set 2 9761801 Central, Appliance 3 9761422 Bracket, Mounting 4 Cooktop 9761778WH White 9761778BL Black Illus. No. Part No. DESCRIPTION 7 W10076020 Gasket 8 W10076030 Gasket 9 Support 9757686 L.Hand 9757687 R.Hand..., 60c SPST 17 9758799 Bracket, Ind. No. Part No. Part No. COOKTOP PARTS For Models: KESK901SBL00, KESK901SWH00, KESK901SSS00 (Black) (Pure White) (S.Steel) 30" Slide−In ELECTRIC OVEN Illus. No.
... & Care Guide 9762785 Tech Sheet 9757680 Anti−Tip Instruct. 3191638 Safe Cooking Tips 9759133 Safe Cooking Tips (French) 9763467 Guide, Easy Set 2 9761801 Central, Appliance 3 9761422 Bracket, Mounting 4 Cooktop 9761778WH White 9761778BL Black Illus. No. Part No. DESCRIPTION 7 W10076020 Gasket 8 W10076030 Gasket 9 Support 9757686 L.Hand 9757687 R.Hand..., 60c SPST 17 9758799 Bracket, Ind. No. Part No. Part No. COOKTOP PARTS For Models: KESK901SBL00, KESK901SWH00, KESK901SSS00 (Black) (Pure White) (S.Steel) 30" Slide−In ELECTRIC OVEN Illus. No.