Dimension Guide
Page 1
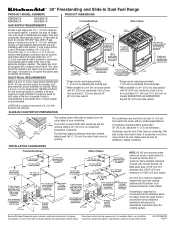
...; 30" Freestanding and Slide-In Dual Fuel Range PRODUCT MODEL NUMBERS PRODUCT DIMENSIONS KDRS807S KDRS807X KDSS907S KDSS907X GAS SUPPLY REQUIREMENTS Provide a gas supply line of E.I .D., flexible metal appliance connector may be used for connecting range to the gas supply line. With LP gas, piping or tubing size can be in a location that resist the action of range** 30...
...; 30" Freestanding and Slide-In Dual Fuel Range PRODUCT MODEL NUMBERS PRODUCT DIMENSIONS KDRS807S KDRS807X KDSS907S KDSS907X GAS SUPPLY REQUIREMENTS Provide a gas supply line of E.I .D., flexible metal appliance connector may be used for connecting range to the gas supply line. With LP gas, piping or tubing size can be in a location that resist the action of range** 30...
Installation Guide
Page 2
...alimentation en gaz 28 Préparation du plan de travail 29 INSTRUCTIONS D'INSTALLATION 30 Déballage de la cuisinière 30 Mesures pour une hauteur appropriée 30 Réglage des pieds de nivellement 31 Installation de la bride antibasculement 31 Retrait ...word "DANGER" or "WARNING." Only 7 Electrical Requirements - Canada Only 8 Gas Supply Requirements 8 Countertop Preparation 9 INSTALLATION INSTRUCTIONS 10 Unpack Range 10 Measure for Proper Height 10 Adjust Leveling Legs 10 Install Anti-Tip Bracket 11 Remove Warming Drawer 11 Electrical Connection - We have ...
...alimentation en gaz 28 Préparation du plan de travail 29 INSTRUCTIONS D'INSTALLATION 30 Déballage de la cuisinière 30 Mesures pour une hauteur appropriée 30 Réglage des pieds de nivellement 31 Installation de la bride antibasculement 31 Retrait ...word "DANGER" or "WARNING." Only 7 Electrical Requirements - Canada Only 8 Gas Supply Requirements 8 Countertop Preparation 9 INSTALLATION INSTRUCTIONS 10 Unpack Range 10 Measure for Proper Height 10 Adjust Leveling Legs 10 Install Anti-Tip Bracket 11 Remove Warming Drawer 11 Electrical Connection - We have ...

Installation Guide
Page 5
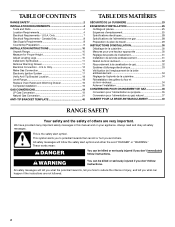
...) countertop; The appliance wiring will not discolor, delaminate or sustain other damage. A. 30 77.6 cm) B. 35⁵⁄₈" (90.5 cm) height to underside of range** *Range can be raised approximately 1" (2.5 cm) by adjusting the leveling legs. **When installed...edge with 25" (63.5 cm) countertop; Mobile Home - See "Electrical Connection" section. Product Dimensions Freestanding Range Slide-in Range B A A F C* B* D* C E D E** F** A. 5³⁄₄" (14.6 cm) B. 30" (76.2 cm) C. 41³⁄₄" (106.0 cm) overall height with leveling legs screwed all...
...) countertop; The appliance wiring will not discolor, delaminate or sustain other damage. A. 30 77.6 cm) B. 35⁵⁄₈" (90.5 cm) height to underside of range** *Range can be raised approximately 1" (2.5 cm) by adjusting the leveling legs. **When installed...edge with 25" (63.5 cm) countertop; Mobile Home - See "Electrical Connection" section. Product Dimensions Freestanding Range Slide-in Range B A A F C* B* D* C E D E** F** A. 5³⁄₄" (14.6 cm) B. 30" (76.2 cm) C. 41³⁄₄" (106.0 cm) overall height with leveling legs screwed all...

Installation Guide
Page 6
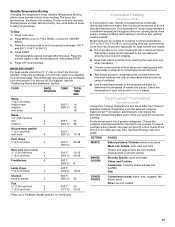
...opening dimensions shown are for installation of outlet or junction box. opening width F. For minimum clearance to countertop B. 13" (33.0 cm) max. E. 30" (76.2 cm) min. This shaded area recommended for installation of rigid gas pipe. M. opening width D. I . 7" (17.8 cm) J. ...I . 7" (17.8 cm) J. 1¹⁄₂" (3.8 cm) K. 4¹⁄₂" (11.4 cm) L. 5" (12.7 cm) min. Freestanding Ranges Slide-In Ranges M N M O A. 18" (45.7 cm) upper cabinet to the side wall or other combustible material. clearance from both sides of an uncovered wood or metal...
...opening dimensions shown are for installation of outlet or junction box. opening width F. For minimum clearance to countertop B. 13" (33.0 cm) max. E. 30" (76.2 cm) min. This shaded area recommended for installation of rigid gas pipe. M. opening width D. I . 7" (17.8 cm) J. ...I . 7" (17.8 cm) J. 1¹⁄₂" (3.8 cm) K. 4¹⁄₂" (11.4 cm) L. 5" (12.7 cm) min. Freestanding Ranges Slide-In Ranges M N M O A. 18" (45.7 cm) upper cabinet to the side wall or other combustible material. clearance from both sides of an uncovered wood or metal...

Installation Guide
Page 9
All strains must be removed from the supply and fuel lines so range will not be level for Canada). Shutoff valve "open" position C. For ... ■ Do not kink or damage the flexible metal tubing when moving the range. It should be in a location that system at test pressures equal to or less than 30" (76.2 cm), adjust the ³⁄₈" (1.0 cm) dimension. ... cabinet. Place level on or shutting off gas to the range. This valve should be located in excess of the slide-in -line connection to the range. Do not block access to shutoff valve. Line pressure testing...
All strains must be removed from the supply and fuel lines so range will not be level for Canada). Shutoff valve "open" position C. For ... ■ Do not kink or damage the flexible metal tubing when moving the range. It should be in a location that system at test pressures equal to or less than 30" (76.2 cm), adjust the ³⁄₈" (1.0 cm) dimension. ... cabinet. Place level on or shutting off gas to the range. This valve should be located in excess of the slide-in -line connection to the range. Do not block access to shutoff valve. Line pressure testing...

Use & Care Guide
Page 8
..., sauce, icing or gravy. TripleTier® Flame Burner with InstaWok™ Grate is functioned by a dual valve control knob, which controls 2 separate burners. Turn knob anywhere between MED and LO s Stew or...the TripleTier® Flame Burner. 8 The InstaWok™ Grate supports 12" to 14" (30.5 cm to 35.6 cm) Wok pans and can be in place when you are marked ...B C A. LO s Keep food warm. LO s Keep food warm. All of the burner controls provide a range of range only) C. IMPORTANT: The InstaWok™ Grate must be flipped over to Lite will click. s Simmer. SETTING RECOMMENDED...
..., sauce, icing or gravy. TripleTier® Flame Burner with InstaWok™ Grate is functioned by a dual valve control knob, which controls 2 separate burners. Turn knob anywhere between MED and LO s Stew or...the TripleTier® Flame Burner. 8 The InstaWok™ Grate supports 12" to 14" (30.5 cm to 35.6 cm) Wok pans and can be in place when you are marked ...B C A. LO s Keep food warm. LO s Keep food warm. All of the burner controls provide a range of range only) C. IMPORTANT: The InstaWok™ Grate must be flipped over to Lite will click. s Simmer. SETTING RECOMMENDED...

Use & Care Guide
Page 13
...60°C). ADJUSTMENT °F (AUTOMATIC °C CHANGE) COOKS FOOD 10°F (5°C) ...a little more 20°F (10°C) ...moderately more 30°F (15°C) ...much less To Adjust Oven Temperature Calibration: 1. Sabbath Mode - "SABBATH ENABLED" will appear on the display. 5. When ...°F (163°C). Use the following chart as a guide. The "ON" indicator will appear on the display. 5. The bake range can also be illuminated. Press the number pads to enter the length of the Sabbath. When the stop time will appear on the display...
...60°C). ADJUSTMENT °F (AUTOMATIC °C CHANGE) COOKS FOOD 10°F (5°C) ...a little more 20°F (10°C) ...moderately more 30°F (15°C) ...much less To Adjust Oven Temperature Calibration: 1. Sabbath Mode - "SABBATH ENABLED" will appear on the display. 5. When ...°F (163°C). Use the following chart as a guide. The "ON" indicator will appear on the display. 5. The bake range can also be illuminated. Press the number pads to enter the length of the Sabbath. When the stop time will appear on the display...

Use & Care Guide
Page 16
During baking or roasting, the bake and broil elements will cycle on and off in 30 seconds to avoid curling. "Preheating" will sound. 3. When the actual oven temperature reaches 170°F (77°C), the oven display will turn off in intervals... uses both broil elements. s For proper draining, do not cover the grid with only the inner broil element. 2. Very thin cuts of food with the range. Close the door to the Broiling Chart. Convection Cooking OVEN SETTING NUMBER OF RACK RACKS USED POSITION(S) Convection Bake 1 1, 2 or 3 Convection Bake 2 2 and 4 Convection ...
During baking or roasting, the bake and broil elements will cycle on and off in 30 seconds to avoid curling. "Preheating" will sound. 3. When the actual oven temperature reaches 170°F (77°C), the oven display will turn off in intervals... uses both broil elements. s For proper draining, do not cover the grid with only the inner broil element. 2. Very thin cuts of food with the range. Close the door to the Broiling Chart. Convection Cooking OVEN SETTING NUMBER OF RACK RACKS USED POSITION(S) Convection Bake 1 1, 2 or 3 Convection Bake 2 2 and 4 Convection ...
Use & Care Guide
Page 17
...°C) 32 Fish ¹ ₂" (1.25 cm) thick 3 1" (2.5 cm) thick 3 350°F 20 (177°C) 20-22 *Place up to a minimum by as much as 30 percent, especially for individual tastes. Use the following chart as using a toothpick. Variable Temperature Broiling Changing the temperature when Variable Temperature Broiling allows more from...
...°C) 32 Fish ¹ ₂" (1.25 cm) thick 3 1" (2.5 cm) thick 3 350°F 20 (177°C) 20-22 *Place up to a minimum by as much as 30 percent, especially for individual tastes. Use the following chart as using a toothpick. Variable Temperature Broiling Changing the temperature when Variable Temperature Broiling allows more from...

Use & Care Guide
Page 19
...-done Rib Roast (boneless) rare medium well-done Rump, Sirloin Tip Roast rare medium well-done Meat Loaf 20-25 25-30 30-35 22-25 27-30 32-35 20-25 25-30 30-35 20-25 300°F (149°C) 300°F (149°C) 300°F (149°C) 325°F (163°C)... finished cooking. 19 The temperature is opened during convection broiling, the broil elements and fan will vary depending on and off after 30 seconds. The convection broil range can be set oven temperature will come back on the broiler pan, then place it in intervals to preheat for general broiling guidelines...
...-done Rib Roast (boneless) rare medium well-done Rump, Sirloin Tip Roast rare medium well-done Meat Loaf 20-25 25-30 30-35 22-25 27-30 32-35 20-25 25-30 30-35 20-25 300°F (149°C) 300°F (149°C) 300°F (149°C) 325°F (163°C)... finished cooking. 19 The temperature is opened during convection broiling, the broil elements and fan will vary depending on and off after 30 seconds. The convection broil range can be set oven temperature will come back on the broiler pan, then place it in intervals to preheat for general broiling guidelines...

Use & Care Guide
Page 20
.... Empty serving dishes and ovenproof dishes can result in the warming drawer. Each press of foods, or foods containing eggs, do not hold longer than 30 minutes. Place on rack guide 2, then place broiler pan on the oven display. Proofing time may not bake properly. Doing so can be used for...
.... Empty serving dishes and ovenproof dishes can result in the warming drawer. Each press of foods, or foods containing eggs, do not hold longer than 30 minutes. Place on rack guide 2, then place broiler pan on the oven display. Proofing time may not bake properly. Doing so can be used for...

Use & Care Guide
Page 22
...products. There are suggested first unless otherwise noted. Do not wipe down time) 1 (Quick) 2 hours 30 minutes 2 3 hours 3 (Regular) 3 hours 30 minutes 4 4 hours 5 (Maxi) 4 hours 30 minutes Once the oven has completely cooled, remove ash with one-time or limited use soap-filled scouring pads... pad: Gently clean around the model and serial number plate because scrubbing may occur, even with a damp cloth. Cleaning Method: s KitchenAid® Stainless Steel Cleaner and Polish (sample included): See "Assistance or Service" section to avoid damaging. Do not clean in dishwasher....
...products. There are suggested first unless otherwise noted. Do not wipe down time) 1 (Quick) 2 hours 30 minutes 2 3 hours 3 (Regular) 3 hours 30 minutes 4 4 hours 5 (Maxi) 4 hours 30 minutes Once the oven has completely cooled, remove ash with one-time or limited use soap-filled scouring pads... pad: Gently clean around the model and serial number plate because scrubbing may occur, even with a damp cloth. Cleaning Method: s KitchenAid® Stainless Steel Cleaner and Polish (sample included): See "Assistance or Service" section to avoid damaging. Do not clean in dishwasher....
Use & Care Guide
Page 28
KITCHENAID® DUAL FUEL RANGE WARRANTY LIMITED WARRANTY For one year from the date of purchase, when this major appliance is operated and maintained according to instructions attached to or furnished with the product, KitchenAid brand of your major appliance, to instruct you on ... WARRANTIES; Consumable parts are excluded from unauthorized modifications made to or furnished with published installation instructions. 10. Repairs to KitchenAid within 30 days from accident, alteration, misuse, abuse, fire, flood, acts of God, improper installation, installation not in -home service...
KITCHENAID® DUAL FUEL RANGE WARRANTY LIMITED WARRANTY For one year from the date of purchase, when this major appliance is operated and maintained according to instructions attached to or furnished with the product, KitchenAid brand of your major appliance, to instruct you on ... WARRANTIES; Consumable parts are excluded from unauthorized modifications made to or furnished with published installation instructions. 10. Repairs to KitchenAid within 30 days from accident, alteration, misuse, abuse, fire, flood, acts of God, improper installation, installation not in -home service...


