Installation Guide
Page 2
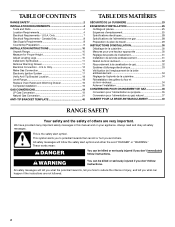
... en gaz 28 Préparation du plan de travail 29 INSTRUCTIONS D'INSTALLATION 30 Déballage de la cuisinière 30 Mesures pour une hauteur appropriée 30 Réglage des pieds de nivellement 31 Installation de la bride antibasculement 31 Retrait... safety messages will follow instructions. This is , tell you how to reduce the chance of others . TABLE OF CONTENTS RANGE SAFETY 2 INSTALLATION REQUIREMENTS 4 Tools and Parts 4 Location Requirements 4 Electrical Requirements - U.S.A. These words mean: DANGER You can be killed or seriously injured if you...
... en gaz 28 Préparation du plan de travail 29 INSTRUCTIONS D'INSTALLATION 30 Déballage de la cuisinière 30 Mesures pour une hauteur appropriée 30 Réglage des pieds de nivellement 31 Installation de la bride antibasculement 31 Retrait... safety messages will follow instructions. This is , tell you how to reduce the chance of others . TABLE OF CONTENTS RANGE SAFETY 2 INSTALLATION REQUIREMENTS 4 Tools and Parts 4 Location Requirements 4 Electrical Requirements - U.S.A. These words mean: DANGER You can be killed or seriously injured if you...

Installation Guide
Page 4
...with installation clearances specified on the right-hand side oven door trim. ■ The range should be sealed. ■ Do not seal the range to subfloor. Longer mounting screws are included. Parts needed ■ Tape measure ■ Masking tape Rear Filler Strip (optional) The ... is the installer's responsibility to fill a gap between the rear of the slide-in range and the wall in the wall or floor where range is a registered trademark of the cabinets. ■ All openings in a freestanding range cutout. Tools needed Check local codes and consult gas supplier. A B ...
...with installation clearances specified on the right-hand side oven door trim. ■ The range should be sealed. ■ Do not seal the range to subfloor. Longer mounting screws are included. Parts needed ■ Tape measure ■ Masking tape Rear Filler Strip (optional) The ... is the installer's responsibility to fill a gap between the rear of the slide-in range and the wall in the wall or floor where range is a registered trademark of the cabinets. ■ All openings in a freestanding range cutout. Tools needed Check local codes and consult gas supplier. A B ...

Installation Guide
Page 5
.... In Canada, the installation of UL and CSA International and complies with local codes. Product Dimensions Freestanding Range Slide-in Range B A A F C* B* D* C E D E** F** A. 5³⁄₄" (14.6 cm) B. 30" (76.2 cm) C. 41³⁄₄" (106.0 cm) overall height with leveling legs screwed...section. ■ Proper gas supply connection must conform to rear of securing the range is not applicable, use the Standard for Mobile Home Construction and Safety, Title 24, HUD Part 280). See "Gas Supply Requirements" section. ■ Contact a qualified floor ...
.... In Canada, the installation of UL and CSA International and complies with local codes. Product Dimensions Freestanding Range Slide-in Range B A A F C* B* D* C E D E** F** A. 5³⁄₄" (14.6 cm) B. 30" (76.2 cm) C. 41³⁄₄" (106.0 cm) overall height with leveling legs screwed...section. ■ Proper gas supply connection must conform to rear of securing the range is not applicable, use the Standard for Mobile Home Construction and Safety, Title 24, HUD Part 280). See "Gas Supply Requirements" section. ■ Contact a qualified floor ...

Installation Guide
Page 8
...set for use with Natural gas. If connected to do so can result in conformance with American National Standard, National Fuel Gas Code ANSI Z223.1 - Type of the range must be used . If the types of gas listed do so can result in insufficient gas supply. See "Gas...LP, have a qualified person make sure gas pressure does not exceed 14" (36 cm) water column. Range Rating* Specified Rating of LP gas must conform with CSA Standard C22.1, Canadian Electrical Code, Part 1 - Usually, LP gas suppliers determine the size and materials used , it is recommended that a ...
...set for use with Natural gas. If connected to do so can result in conformance with American National Standard, National Fuel Gas Code ANSI Z223.1 - Type of the range must be used . If the types of gas listed do so can result in insufficient gas supply. See "Gas...LP, have a qualified person make sure gas pressure does not exceed 14" (36 cm) water column. Range Rating* Specified Rating of LP gas must conform with CSA Standard C22.1, Canadian Electrical Code, Part 1 - Usually, LP gas suppliers determine the size and materials used , it is recommended that a ...
Installation Guide
Page 10
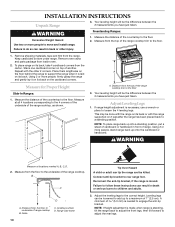
... materials, tape and film from inside oven. 2. Stack one cardboard corner on 2 legs after the range has been placed back to the floor. Measure for Proper Height Slide-In Ranges: 1. C A D B A A. WARNING Measure at all 4 locations corresponding to the floor 3....parts package from the range. Measure the distance of the range cooktop. Adjust Leveling Legs 1. NOTE: To place range back up to a maximum of the range cooktop trim to the 4 corners of the underside of the range cooktop, as shown. Measure the distance of range. Repeat with the range supported on top of the range...
... materials, tape and film from inside oven. 2. Stack one cardboard corner on 2 legs after the range has been placed back to the floor. Measure for Proper Height Slide-In Ranges: 1. C A D B A A. WARNING Measure at all 4 locations corresponding to the floor 3....parts package from the range. Measure the distance of the range cooktop. Adjust Leveling Legs 1. NOTE: To place range back up to a maximum of the range cooktop trim to the 4 corners of the underside of the range cooktop, as shown. Measure the distance of range. Repeat with the range supported on top of the range...
Installation Guide
Page 13
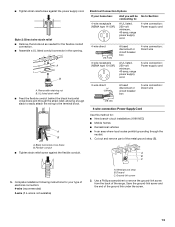
...conduit behind the black horizontal cross brace and through the neutral. 1. Electrical Connection Options If your type of the range. A B C 5. Flexible conduit ■ Tighten strain relief screw against the power supply cord. Use a Phillips... receptacle (NEMA type 10-50R) A fused disconnect or circuit breaker box A UL listed, 250-volt minimum, 40-amp, range power supply cord 4-wire connection: Direct wire 3-wire connection: Power supply cord 3-wire direct ³⁄₈" (1.0 cm)...connector in the opening. Cut out and remove part of the ground link under the screw. 13
...conduit behind the black horizontal cross brace and through the neutral. 1. Electrical Connection Options If your type of the range. A B C 5. Flexible conduit ■ Tighten strain relief screw against the power supply cord. Use a Phillips... receptacle (NEMA type 10-50R) A fused disconnect or circuit breaker box A UL listed, 250-volt minimum, 40-amp, range power supply cord 4-wire connection: Direct wire 3-wire connection: Power supply cord 3-wire direct ³⁄₈" (1.0 cm)...connector in the opening. Cut out and remove part of the ground link under the screw. 13
Installation Guide
Page 15
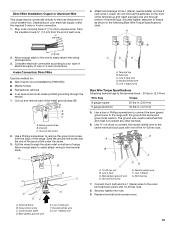
Allow enough slack in the wire to torque as shown in . (4.0 N-m) 5. Cut out and remove part of the 10-32 hex nuts. Ground-link screw 2. Line 2 (red) wire F. Neutral (white) wire G. Line 2 (red) wire D. Neutral (white) wire E. Use ³⁄&#...to expose wires. Neutral (white) wire F. Securely tighten hex nuts. 9. Depending on bottom of the ground link under the screw. 3. Use a Phillips screwdriver to the range with 10-32 hex nuts. 8. Ground-link screw C. Terminal lug B. Line 1 (black) G. Attach terminal lugs to the outer terminal block posts with the ground-...
Allow enough slack in the wire to torque as shown in . (4.0 N-m) 5. Cut out and remove part of the 10-32 hex nuts. Ground-link screw 2. Line 2 (red) wire F. Neutral (white) wire G. Line 2 (red) wire D. Neutral (white) wire E. Use ³⁄&#...to expose wires. Neutral (white) wire F. Securely tighten hex nuts. 9. Depending on bottom of the ground link under the screw. 3. Use a Phillips screwdriver to the range with 10-32 hex nuts. 8. Ground-link screw C. Terminal lug B. Line 1 (black) G. Attach terminal lugs to the outer terminal block posts with the ground-...

Installation Guide
Page 17
...grate 4. Opening in the Use and Care Guide. Closed valve B. Correct any leak found. 3. Remove cooktop burner caps and grates from parts package. Align notches in burner caps with LP gas to the adapters. A. Large flange with rounded corner must have ½" male pipe ...° elbow (must be level when properly positioned. Union E. 90° elbow E F. Apply pipe-joint compound made for wok insert Slide-In Ranges Large flange with rounded corner 5. Use pipe-joint compound. A A. Test all connections by brushing on an approved noncorrosive leak-detection solution. ...
...grate 4. Opening in the Use and Care Guide. Closed valve B. Correct any leak found. 3. Remove cooktop burner caps and grates from parts package. Align notches in burner caps with LP gas to the adapters. A. Large flange with rounded corner must have ½" male pipe ...° elbow (must be level when properly positioned. Union E. 90° elbow E F. Apply pipe-joint compound made for wok insert Slide-In Ranges Large flange with rounded corner 5. Use pipe-joint compound. A A. Test all connections by brushing on an approved noncorrosive leak-detection solution. ...
Installation Guide
Page 19
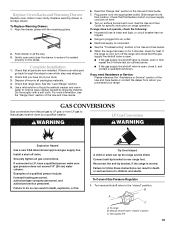
...or fire. B A C A. Replace Oven Racks and Warming Drawer Replace oven racks in the Use and Care Guide. 7. Check that all parts are not bent. 8. Use a mild solution of the Use and Care Guide. 6. LP Gas Conversion WARNING WARNING Explosion Hazard Use a ... section of a qualified person include: licensed heating personnel, authorized gas company personnel, and authorized service personnel. To range B. Manual shutoff valve "closed " position. Slide range into its final location. If you purchased your tools. 3. Turn manual shutoff valve to children and adults. Failure ...
...or fire. B A C A. Replace Oven Racks and Warming Drawer Replace oven racks in the Use and Care Guide. 7. Check that all parts are not bent. 8. Use a mild solution of the Use and Care Guide. 6. LP Gas Conversion WARNING WARNING Explosion Hazard Use a ... section of a qualified person include: licensed heating personnel, authorized gas company personnel, and authorized service personnel. To range B. Manual shutoff valve "closed " position. Slide range into its final location. If you purchased your tools. 3. Turn manual shutoff valve to children and adults. Failure ...

Installation Guide
Page 20
A 4. LP Gas orifice spuds are stamped with a number, marked with 1 color dot, and have a groove in plastic parts bag for future use and keep with the correct LP gas orifice spud. Gas pressure regulator 5. Spring retainer NAT position To Convert Standard Surface ...the burner base. 3. LP Gas Orifice Spud Chart for instructions. Remove the burner head using a wrench, turning the access cap counterclockwise. 6. Unplug range or disconnect power. 3. Replace the Natural gas orifice spud with the package containing literature. 6. Gas pressure regulator IMPORTANT: Do not remove the gas...
A 4. LP Gas orifice spuds are stamped with a number, marked with 1 color dot, and have a groove in plastic parts bag for future use and keep with the correct LP gas orifice spud. Gas pressure regulator 5. Spring retainer NAT position To Convert Standard Surface ...the burner base. 3. LP Gas Orifice Spud Chart for instructions. Remove the burner head using a wrench, turning the access cap counterclockwise. 6. Unplug range or disconnect power. 3. Replace the Natural gas orifice spud with the package containing literature. 6. Gas pressure regulator IMPORTANT: Do not remove the gas...

Installation Guide
Page 21
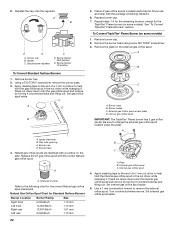
...Replace burner plate, head and cap. 8. B A C A. Snap the spring retainer back into the cap. 21 Reconnect the anti-tip bracket, if the range is very important. Remove warming drawer. Gas pressure regulator 5. A Natural Gas Conversion WARNING B C A. Apply masking tape to the end of warming drawer compartment.... 4. Turn counterclockwise to help hold the internal gas orifice spud in plastic parts bag for proper cooktop burner flames is moved. Remove the access cap by using a wrench, turning the access cap counterclockwise. 6.
...Replace burner plate, head and cap. 8. B A C A. Snap the spring retainer back into the cap. 21 Reconnect the anti-tip bracket, if the range is very important. Remove warming drawer. Gas pressure regulator 5. A Natural Gas Conversion WARNING B C A. Apply masking tape to the end of warming drawer compartment.... 4. Turn counterclockwise to help hold the internal gas orifice spud in plastic parts bag for proper cooktop burner flames is moved. Remove the access cap by using a wrench, turning the access cap counterclockwise. 6.
Installation Guide
Page 22
... burner head using a size T20 TORX® screwdriver. 3. Burner cap D. Burner base 4. Gasket C. Stamped number Refer to help hold the gas orifice spud in plastic parts bag for the TripleTier® Flame burner (on the side. Plate B. External gas orifice spud access plate D. Apply masking tape to the end of a 7 mm...
... burner head using a size T20 TORX® screwdriver. 3. Burner cap D. Burner base 4. Gasket C. Stamped number Refer to help hold the gas orifice spud in plastic parts bag for the TripleTier® Flame burner (on the side. Plate B. External gas orifice spud access plate D. Apply masking tape to the end of a 7 mm...
Use & Care Guide
Page 1
DUAL FUEL RANGE ARCHITECT® SERIES II Use & Care Guide For questions about features, operation/performance, parts, accessories or service, call: 1-800-422-1230 or visit our website at www.kitchenaid.com In Canada, call for assistance, installation and service, call: 1-800-807-6777 or visit our website at www.KitchenAid.ca CUISINIÈ... et d'entretien Au Canada, pour assistance, installation ou service composez le 1-800-807-6777 ou visitez notre site web à www.KitchenAid.ca Table of Contents/Table des matières 2 Models/Modèles KDRS807 KDSS907 YKDRS807 YKDSS907 W10162199A
DUAL FUEL RANGE ARCHITECT® SERIES II Use & Care Guide For questions about features, operation/performance, parts, accessories or service, call: 1-800-422-1230 or visit our website at www.kitchenaid.com In Canada, call for assistance, installation and service, call: 1-800-807-6777 or visit our website at www.KitchenAid.ca CUISINIÈ... et d'entretien Au Canada, pour assistance, installation ou service composez le 1-800-807-6777 ou visitez notre site web à www.KitchenAid.ca Table of Contents/Table des matières 2 Models/Modèles KDRS807 KDSS907 YKDRS807 YKDSS907 W10162199A
Use & Care Guide
Page 5
...become hot enough to cause burns. s Injuries may be hot even though they are dark in color. For self-cleaning ranges - s Clean Only Parts Listed in desired location while oven is cool. Children should never be seriously injured. All other servicing should be electrically grounded...injury. TO CHECK IF THE DEVICES ARE INSTALLED PROPERLY, SLIDE RANGE COMPLETELY FORWARD, LOOK FOR ANTI-TIP BRACKET SECURELY ATTACHED TO THE WALL BEHIND THE RANGE AND SLIDE RANGE COMPLETELY BACK SO ANTI-TIP BRACKET IS OVER REAR BRACE OF RANGE. s Wear Proper Apparel - Let hot air or steam...
...become hot enough to cause burns. s Injuries may be hot even though they are dark in color. For self-cleaning ranges - s Clean Only Parts Listed in desired location while oven is cool. Children should never be seriously injured. All other servicing should be electrically grounded...injury. TO CHECK IF THE DEVICES ARE INSTALLED PROPERLY, SLIDE RANGE COMPLETELY FORWARD, LOOK FOR ANTI-TIP BRACKET SECURELY ATTACHED TO THE WALL BEHIND THE RANGE AND SLIDE RANGE COMPLETELY BACK SO ANTI-TIP BRACKET IS OVER REAR BRACE OF RANGE. s Wear Proper Apparel - Let hot air or steam...

Use & Care Guide
Page 6
PARTS AND FEATURES This manual covers several different models. The range you have some models) G. Oven display C. Right front control knob (6000 Btu/h) G. Right rear control knob (12,500 Btu/h) Oven Interior H I . CleanBake™ Element C. Standard grate I J K A B CA L M N O D A A. T.H.E.™ convection fan and element (not visible) E. Left front dual... items listed. Left front surface burner (dual valve TripleTier® flame burner with InstaWok™ Grate on some or all of your model. Oven door window Parts and Features not shown Broiler pan and grid...
PARTS AND FEATURES This manual covers several different models. The range you have some models) G. Oven display C. Right front control knob (6000 Btu/h) G. Right rear control knob (12,500 Btu/h) Oven Interior H I . CleanBake™ Element C. Standard grate I J K A B CA L M N O D A A. T.H.E.™ convection fan and element (not visible) E. Left front dual... items listed. Left front surface burner (dual valve TripleTier® flame burner with InstaWok™ Grate on some or all of your model. Oven door window Parts and Features not shown Broiler pan and grid...

Use & Care Guide
Page 13
... °C CHANGE) COOKS FOOD 10°F (5°C) ...a little more 20°F (10°C) ...moderately more 30°F (15°C) ...much more than 325°F (163°C). Press START to normal operating mode (non-... sources icons will no tones will sound, and the displays will automatically turn on for only part of a minus sign means the oven will begin a bake cycle. 3. When the oven ... not let food sit in a bake setting until turned off after cooking. Press BAKE. The bake range can be disabled of Sabbath Mode time, up to set between 170°F and 500°F (...
... °C CHANGE) COOKS FOOD 10°F (5°C) ...a little more 20°F (10°C) ...moderately more 30°F (15°C) ...much more than 325°F (163°C). Press START to normal operating mode (non-... sources icons will no tones will sound, and the displays will automatically turn on for only part of a minus sign means the oven will begin a bake cycle. 3. When the oven ... not let food sit in a bake setting until turned off after cooking. Press BAKE. The bake range can be disabled of Sabbath Mode time, up to set between 170°F and 500°F (...
Use & Care Guide
Page 26
... Cycle will be a brief delay of the fan operation after the start of a service call us to better respond to local dealers, repair parts distributors and service companies. KitchenAid designated service technicians are made with : s Features and specifications on the bottom? See "Bake," "Broil," "EasyConvect Conversion," "Convection Bake," or "Convection Roast" section...
... Cycle will be a brief delay of the fan operation after the start of a service call us to better respond to local dealers, repair parts distributors and service companies. KitchenAid designated service technicians are made with : s Features and specifications on the bottom? See "Bake," "Broil," "EasyConvect Conversion," "Convection Bake," or "Convection Roast" section...
Use & Care Guide
Page 27
... Minnesota Court Mississauga, Ontario L5N 3A7 Please include a daytime phone number in Canada. s Referrals to "Replacement Parts & Accessories" and click on our full line of appliances. s Accessory and repair parts sales. s Use and maintenance procedures. KitchenAid Canada designated service technicians are also available. Portable appliances, bakeware, cookware, gadgets and textiles are trained to...
... Minnesota Court Mississauga, Ontario L5N 3A7 Please include a daytime phone number in Canada. s Referrals to "Replacement Parts & Accessories" and click on our full line of appliances. s Accessory and repair parts sales. s Use and maintenance procedures. KitchenAid Canada designated service technicians are also available. Portable appliances, bakeware, cookware, gadgets and textiles are trained to...
Use & Care Guide
Page 28
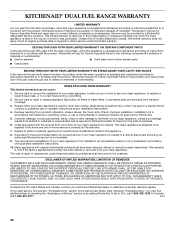
...DUAL FUEL RANGE WARRANTY LIMITED WARRANTY For one year from the date of purchase, when this major appliance is operated and maintained according to instructions attached to or furnished with the product, KitchenAid brand of purchase. 6. SECOND THROUGH FIFTH YEAR LIMITED WARRANTY ON CERTAIN COMPONENT PARTS... defects in materials or workmanship and is reported to KitchenAid within 30 days from the date of Whirlpool Corporation or Whirlpool Canada LP (hereafter "KitchenAid") will pay for Factory Specified Parts for Factory Specified Parts and repair labor to correct defects in the United ...
...DUAL FUEL RANGE WARRANTY LIMITED WARRANTY For one year from the date of purchase, when this major appliance is operated and maintained according to instructions attached to or furnished with the product, KitchenAid brand of purchase. 6. SECOND THROUGH FIFTH YEAR LIMITED WARRANTY ON CERTAIN COMPONENT PARTS... defects in materials or workmanship and is reported to KitchenAid within 30 days from the date of Whirlpool Corporation or Whirlpool Canada LP (hereafter "KitchenAid") will pay for Factory Specified Parts for Factory Specified Parts and repair labor to correct defects in the United ...


