Instruction Manual
Page 3
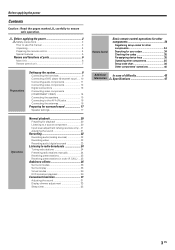
... AV AUX jacks 16 Connecting the antennas 16 Preparing for surround sound 17 Speaker settings 17 Operations Normal playback 20 Preparing for playback 20 Listening to a source component 20 Input level adjustment (analog sources only) .. 21 Adjusting the sound 21 Recording 22 Recording audio (analog sources 22 Recording video 23 Recording audio (digital sources 23 Listening to ensure safe operation. Before applying the power Contents Caution : Read the pages marked carefully to radio broadcasts 24 Tuning radio stations 24 Presetting radio stations manually 24 Receiving preset...
... AV AUX jacks 16 Connecting the antennas 16 Preparing for surround sound 17 Speaker settings 17 Operations Normal playback 20 Preparing for playback 20 Listening to a source component 20 Input level adjustment (analog sources only) .. 21 Adjusting the sound 21 Recording 22 Recording audio (analog sources 22 Recording video 23 Recording audio (digital sources 23 Listening to ensure safe operation. Before applying the power Contents Caution : Read the pages marked carefully to radio broadcasts 24 Tuning radio stations 24 Presetting radio stations manually 24 Receiving preset...
Instruction Manual
Page 4
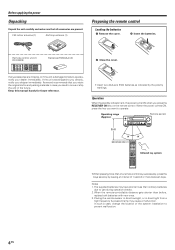
... power Unpacking Unpack the unit carefully and make sure that you retain the original carton and packing materials in case you need to move or ship the unit in direct light from a high frequency fluorescent lamp may have shorter lives than ordinary batteries due to use during operation checks. 2. When the remote-controllable distance gets shorter than before, replace...
... power Unpacking Unpack the unit carefully and make sure that you retain the original carton and packing materials in case you need to move or ship the unit in direct light from a high frequency fluorescent lamp may have shorter lives than ordinary batteries due to use during operation checks. 2. When the remote-controllable distance gets shorter than before, replace...

Instruction Manual
Page 5
... and audio source. Video up conversion This receiver can also operate almost all of your monitor TV has S-Video jacks, it is turned on the front panel, the input selector of surround modes to bring you maximum enjoyment from your convenience in any condition. If your remote controllable audio and video components. You can enjoy a more dynamic sound quality in playing video games. GAME mode function ) When you connect a game machine to the AV AUX jacks...
... and audio source. Video up conversion This receiver can also operate almost all of your monitor TV has S-Video jacks, it is turned on the front panel, the input selector of surround modes to bring you maximum enjoyment from your convenience in any condition. If your remote controllable audio and video components. You can enjoy a more dynamic sound quality in playing video games. GAME mode function ) When you connect a game machine to the AV AUX jacks...
Instruction Manual
Page 6
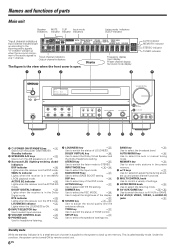
... DSP ACTIVE EQ DIMMER VOLUME CONTROL SOUND TONE SETUP BAND AUTO/MONO MEMORY MULTI CONTROL LISTEN MODE INPUT SELECTOR AV AUX/GAME S VIDEO VIDEO L-AUDIO-R 1 (POWER ON/STANDBY) key & Use to the SP MUTE AUTO DETECT DIGITAL DOLBY DIGITAL EX DTS 96/24 DOLBY H STEREO NEO:6 L C SW R A B CLIP LFE DOLBY EX ES MATRIX6.1 DOLBY VS 96kHzfs 6CH INPUT DOLBY PL II x ES DISCRETE6.1 LOUDNESS SLEEP DSP MODE AUTO MEMORY incoming audio signals. BASS BOOST key ¡ Use to adjust the sound quality and the ambience effects. LOUDNESS indicator ¡ Lights...
... DSP ACTIVE EQ DIMMER VOLUME CONTROL SOUND TONE SETUP BAND AUTO/MONO MEMORY MULTI CONTROL LISTEN MODE INPUT SELECTOR AV AUX/GAME S VIDEO VIDEO L-AUDIO-R 1 (POWER ON/STANDBY) key & Use to the SP MUTE AUTO DETECT DIGITAL DOLBY DIGITAL EX DTS 96/24 DOLBY H STEREO NEO:6 L C SW R A B CLIP LFE DOLBY EX ES MATRIX6.1 DOLBY VS 96kHzfs 6CH INPUT DOLBY PL II x ES DISCRETE6.1 LOUDNESS SLEEP DSP MODE AUTO MEMORY incoming audio signals. BASS BOOST key ¡ Use to adjust the sound quality and the ambience effects. LOUDNESS indicator ¡ Lights...
Instruction Manual
Page 7
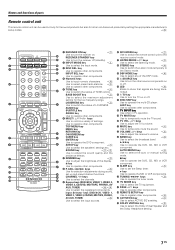
...control a variety of settings. Input Selector keys (DVD/6CH, VIDEO 1, VIDEO 2, VIDEO 3, CD/DVD, MD/TAPE, PHONO, AV AUX, TUNER) ) Use to select the input sources. 0 RCV MODE key & Use to switch the remote control unit to select the maximum adjustment setting for the low frequency range. Use to select preset radio stations. › ∞ Use to operate other components. 4 Numeric keys Use to input numeric characters. BASS BOOST key ¡ Use to the receiver control mode. ! key Use to operate other components. 5 TONE key ¡ Use to switch the status of TONE control...
...control a variety of settings. Input Selector keys (DVD/6CH, VIDEO 1, VIDEO 2, VIDEO 3, CD/DVD, MD/TAPE, PHONO, AV AUX, TUNER) ) Use to select the input sources. 0 RCV MODE key & Use to switch the remote control unit to select the maximum adjustment setting for the low frequency range. Use to select preset radio stations. › ∞ Use to operate other components. 4 Numeric keys Use to input numeric characters. BASS BOOST key ¡ Use to the receiver control mode. ! key Use to operate other components. 5 TONE key ¡ Use to switch the status of TONE control...
Instruction Manual
Page 8
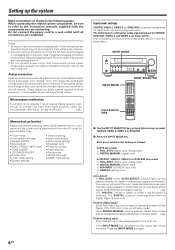
... lights up when a digital signal is disconnected from the AC outlet for approximately 1 day. • Power mode • Input selector settings • Speaker ON/OFF • Volume level • BASS, TREBLE, INPUT level • TONE ON/OFF • LOUDNESS ON/OFF • Dimmer level • Listen mode setting • Speaker settings • Distance setting • Input mode setting • Sound mode settings • Broadcast band • Frequency setting • Preset stations • Tuning mode • ACTIVE EQ mode • GAME mode setting Input mode settings CD/DVD, VIDEO...
... lights up when a digital signal is disconnected from the AC outlet for approximately 1 day. • Power mode • Input selector settings • Speaker ON/OFF • Volume level • BASS, TREBLE, INPUT level • TONE ON/OFF • LOUDNESS ON/OFF • Dimmer level • Listen mode setting • Speaker settings • Distance setting • Input mode setting • Sound mode settings • Broadcast band • Frequency setting • Preset stations • Tuning mode • ACTIVE EQ mode • GAME mode setting Input mode settings CD/DVD, VIDEO...

Instruction Manual
Page 9
... directivity than other than that can offer the best low frequency reproduction according to the speakers or receiver. speaker cords. • If the left and right surround speakers. • Although the ideal surround system consists of the receiver, connect speakers with ambiguous acoustic imaging. Center Speaker Place front and center. Center Speaker 1 Strip coating. 2 Push the lever. 3 Insert the cord. 4 Return the lever. Speaker impedance After confirming the speaker impedance indications printed on the rear panel...
... directivity than other than that can offer the best low frequency reproduction according to the speakers or receiver. speaker cords. • If the left and right surround speakers. • Although the ideal surround system consists of the receiver, connect speakers with ambiguous acoustic imaging. Center Speaker Place front and center. Center Speaker 1 Strip coating. 2 Push the lever. 3 Insert the cord. 4 Return the lever. Speaker impedance After confirming the speaker impedance indications printed on the rear panel...

Instruction Manual
Page 13
... jacks. (See "Connecting video components".) 13 EN Connect the video signal and analog audio signals to the DIGITAL IN jacks of outputting DTS, Dolby Digital, or standard PCM (CD) format digital signals. Setting up the system Digital connections The digital in jacks can accept DTS, Dolby Digital, or PCM signals. If you have connected any digital components to the receiver, be sure to read the "Input mode settings" section carefully. 8 COAXIAL VIDEO 2 OPTICAL OPTICAL OPTICAL CD/DVD VIDEO 3 MONITOR DVD/ 6CH DIGITAL IN DIGITAL OUT OPTICAL DIGITAL IN (AUDIO) Optical fiber cable...
... jacks. (See "Connecting video components".) 13 EN Connect the video signal and analog audio signals to the DIGITAL IN jacks of outputting DTS, Dolby Digital, or standard PCM (CD) format digital signals. Setting up the system Digital connections The digital in jacks can accept DTS, Dolby Digital, or PCM signals. If you have connected any digital components to the receiver, be sure to read the "Input mode settings" section carefully. 8 COAXIAL VIDEO 2 OPTICAL OPTICAL OPTICAL CD/DVD VIDEO 3 MONITOR DVD/ 6CH DIGITAL IN DIGITAL OUT OPTICAL DIGITAL IN (AUDIO) Optical fiber cable...
Instruction Manual
Page 18
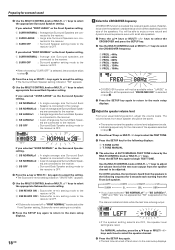
... the SETUP key. 2 Use the MULTI CONTROL knob or MULTI %/fi keys to select the CROSSOVER frequency. 1 FREQ. : 40Hz 2 FREQ. : 60Hz 3 FREQ. : 80Hz 4 FREQ. : 100Hz 5 FREQ. : 120Hz 6 FREQ. : 150Hz SP MUTE L R A B CLIP STEREO • CROSSOVER function will be the same. • The receiver enters the speaker volume level adjustment mode. • Indicators appear only for the channels of the test tone output from the Front Left speaker. nected to the receiver. 3 SURR OFF : Surround Speaker setting mode...
... the SETUP key. 2 Use the MULTI CONTROL knob or MULTI %/fi keys to select the CROSSOVER frequency. 1 FREQ. : 40Hz 2 FREQ. : 60Hz 3 FREQ. : 80Hz 4 FREQ. : 100Hz 5 FREQ. : 120Hz 6 FREQ. : 150Hz SP MUTE L R A B CLIP STEREO • CROSSOVER function will be the same. • The receiver enters the speaker volume level adjustment mode. • Indicators appear only for the channels of the test tone output from the Front Left speaker. nected to the receiver. 3 SURR OFF : Surround Speaker setting mode...
Instruction Manual
Page 19
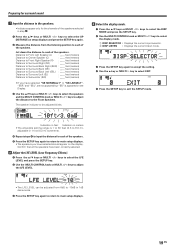
... (meters) • If you have been correctly selected. 8 Adjust the LFE LEVEL (Low Frequency Effects). 1 Press the 5/∞ keys or MULTI @/# keys to select the LFE LEVEL and press the SETUP key. 2 Use the MULTI CONTROL knob or MULTI %/fi keys to adjust the LFE LEVEL. Jot down the distance to each of the speakers. Preparing for surround sound 7 Input the distance to the speakers. • Indicators appear only for each of the...
... (meters) • If you have been correctly selected. 8 Adjust the LFE LEVEL (Low Frequency Effects). 1 Press the 5/∞ keys or MULTI @/# keys to select the LFE LEVEL and press the SETUP key. 2 Use the MULTI CONTROL knob or MULTI %/fi keys to adjust the LFE LEVEL. Jot down the distance to each of the speakers. Preparing for surround sound 7 Input the distance to the speakers. • Indicators appear only for each of the...

Instruction Manual
Page 20
... of playing a video game using each key. 1 TUNER 2 CD/DVD 3 MD/TAPE 4 VIDEO 1 5 VIDEO 2 6 VIDEO 3 7 DVD/6CH 8 PHONO 9 AV AUX [GAME] (or AV AUX) 2 Start playback from the subwoofer. SPEAKERS (POWER ON/STANDBY) INPUT MODE Listening to a source component VOLUME CONTROL AV AUX/GAME INPUT SELECTOR Turning on the receiver 1 Turn on the power to STEREO. No sound will be used . 8 Selecting the speaker system Press the SPEAKERS keys to select the speaker system to be switched to the related components. 2 Turn on the rear panel. No sound from both the speakers connected to...
... of playing a video game using each key. 1 TUNER 2 CD/DVD 3 MD/TAPE 4 VIDEO 1 5 VIDEO 2 6 VIDEO 3 7 DVD/6CH 8 PHONO 9 AV AUX [GAME] (or AV AUX) 2 Start playback from the subwoofer. SPEAKERS (POWER ON/STANDBY) INPUT MODE Listening to a source component VOLUME CONTROL AV AUX/GAME INPUT SELECTOR Turning on the receiver 1 Turn on the power to STEREO. No sound will be used . 8 Selecting the speaker system Press the SPEAKERS keys to select the speaker system to be switched to the related components. 2 Turn on the rear panel. No sound from both the speakers connected to...

Instruction Manual
Page 21
...TONE MULTI CONTROL SOUND INPUT SELECTOR PHONES BASS BOOST VOLUME CONTROL MULTI Input Selector keys SOUND RCV MODE TONE BASS BOOST MULTI %/ fi RCV MODE MUTE LOUDNESS VOLUME%/fi ACTIVE EQ Input level adjustment (analog sources only) If the input level of an analog source signal is in the PCM stereo and analog stereo mode. SP MUTE L C R A B CLIP LFE DOLBY PL II x SL S SB SR • The adjustment mode is available only for speakers connected to adjust the sound quality. BASS : Select this to adjust the high frequency range. 5 Use the MULTI CONTROL knob or MULTI...
...TONE MULTI CONTROL SOUND INPUT SELECTOR PHONES BASS BOOST VOLUME CONTROL MULTI Input Selector keys SOUND RCV MODE TONE BASS BOOST MULTI %/ fi RCV MODE MUTE LOUDNESS VOLUME%/fi ACTIVE EQ Input level adjustment (analog sources only) If the input level of an analog source signal is in the PCM stereo and analog stereo mode. SP MUTE L C R A B CLIP LFE DOLBY PL II x SL S SB SR • The adjustment mode is available only for speakers connected to adjust the sound quality. BASS : Select this to adjust the high frequency range. 5 Use the MULTI CONTROL knob or MULTI...

Instruction Manual
Page 22
... VOLUME %/fi keys. This is in REC MODE, or when searching or presetting radio stations. PHONES Recording Recording audio (analog sources) INPUT SELECTOR Input Selector keys Recording a music source 1 Use the INPUT SELECTOR key or Input Selector keys to select the source (other than "MD/TAPE") you want to record. 2 Set the MD or TAPE recorder to record. 3 Start playback, then start recording. • Recording may not be normal for speakers connected...
... VOLUME %/fi keys. This is in REC MODE, or when searching or presetting radio stations. PHONES Recording Recording audio (analog sources) INPUT SELECTOR Input Selector keys Recording a music source 1 Use the INPUT SELECTOR key or Input Selector keys to select the source (other than "MD/TAPE") you want to record. 2 Set the MD or TAPE recorder to record. 3 Start playback, then start recording. • Recording may not be normal for speakers connected...
Instruction Manual
Page 24
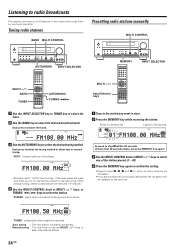
... 1 Use the INPUT SELECTOR key or TUNER key to select the tuner. 2 Use the BAND key to select the desired tuning method. If the radio waves are weak and there is being received in monaural.) 4 Use the MULTI CONTROL knob or MULTI %/ fi keys, or TUNING 1 / ¡ keys to select the station. STEREO AUTO MEMO STEREO TUNED "TUNED" is displayed when a station is tuned automatically. Each press switches the band. "STEREO" lights when a broadcast is a lot of the station presets...
... 1 Use the INPUT SELECTOR key or TUNER key to select the tuner. 2 Use the BAND key to select the desired tuning method. If the radio waves are weak and there is being received in monaural.) 4 Use the MULTI CONTROL knob or MULTI %/ fi keys, or TUNING 1 / ¡ keys to select the station. STEREO AUTO MEMO STEREO TUNED "TUNED" is displayed when a station is tuned automatically. Each press switches the band. "STEREO" lights when a broadcast is a lot of the station presets...
Instruction Manual
Page 27
... 7.1 channel surround sound from Dolby Surround encoded sources (such as described below should be connected to the digital output (S/P DIF, AES/EBU or TosLink) of a CD, LD or DVD player. The Pro Logic II modes programmed into this feature. Dolby Headphone When headphones are incorporated with Dolby Digital Surround EX which synthesised within the left and right headphone signals. To enjoy DTS Digital Surround playback, an external 5.1 channel DTS Digital Surround decoder system or an amplifier with multi-channels. DTS...
... 7.1 channel surround sound from Dolby Surround encoded sources (such as described below should be connected to the digital output (S/P DIF, AES/EBU or TosLink) of a CD, LD or DVD player. The Pro Logic II modes programmed into this feature. Dolby Headphone When headphones are incorporated with Dolby Digital Surround EX which synthesised within the left and right headphone signals. To enjoy DTS Digital Surround playback, an external 5.1 channel DTS Digital Surround decoder system or an amplifier with multi-channels. DTS...

Instruction Manual
Page 28
... to play back with stereo program sources, like equipped with six (5.1) output channels and this model, you can be used when playing video, DVD, or LD software bearing the mark. The way a sound is set to almost any type of input signal and the speaker settings. Each turn of the LISTEN MODE knob or press of different factors. Note LFE = Low Frequency Effects. Dolby Digital can enjoy multi-channel encoded DVD source material in the display during "Input mode settings" (8), this case, select...
... to play back with stereo program sources, like equipped with six (5.1) output channels and this model, you can be used when playing video, DVD, or LD software bearing the mark. The way a sound is set to almost any type of input signal and the speaker settings. Each turn of the LISTEN MODE knob or press of different factors. Note LFE = Low Frequency Effects. Dolby Digital can enjoy multi-channel encoded DVD source material in the display during "Input mode settings" (8), this case, select...

Instruction Manual
Page 30
... "6CH INPUT" is selected as the input mode, it switches off and speaker system A turns on the reproduced signals. • DOLBY VIRTUAL DVD 6-channel playback Using a DVD player or the like equipped with six (5.1) output channels and the receiver, you can enjoy surround sound playback. Connecting a DVD player which can adjust the volume of the subwoofer using headphones): Press the DOLBY VIRTUAL key for the following selections: 1 DOLBY H DH 1 : Monitor room in a studio with small amount of reverberations. (DOLBY H indicator lights up) 2 DOLBY...
... "6CH INPUT" is selected as the input mode, it switches off and speaker system A turns on the reproduced signals. • DOLBY VIRTUAL DVD 6-channel playback Using a DVD player or the like equipped with six (5.1) output channels and the receiver, you can enjoy surround sound playback. Connecting a DVD player which can adjust the volume of the subwoofer using headphones): Press the DOLBY VIRTUAL key for the following selections: 1 DOLBY H DH 1 : Monitor room in a studio with small amount of reverberations. (DOLBY H indicator lights up) 2 DOLBY...

Instruction Manual
Page 31
... the difference in the surround mode. STEREO MULTI CONTROL DIMMER SOUND LISTEN MODE MULTI DIMMER RCV MODE LISTEN MODE %/fi SOUND SLEEP STEREO 1 For the remote control, press the RCV MODE key to switch to receiver mode. 2 Press the SOUND key and then use the 5/∞ keys or MULTI @/# keys until "MIDNIGHT" appears on the Display. 3 Use the MULTI CONTROL knob or MULTI %/fi keys to the input indication. Neo:6 Music mode only) ! Dolby Digital mode only) * The adjustment is only temporary for...
... the difference in the surround mode. STEREO MULTI CONTROL DIMMER SOUND LISTEN MODE MULTI DIMMER RCV MODE LISTEN MODE %/fi SOUND SLEEP STEREO 1 For the remote control, press the RCV MODE key to switch to receiver mode. 2 Press the SOUND key and then use the 5/∞ keys or MULTI @/# keys until "MIDNIGHT" appears on the Display. 3 Use the MULTI CONTROL knob or MULTI %/fi keys to the input indication. Neo:6 Music mode only) ! Dolby Digital mode only) * The adjustment is only temporary for...
Instruction Manual
Page 32
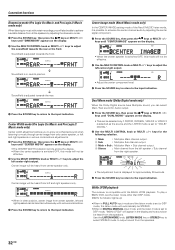
... all the speakers by adjusting the center signal component. 1 Press the SOUND key, then press the 5/∞ keys or MULTI @/# keys until "DUAL MONO" appears on the display. To play a 96kHz DVD, set to DSP mode, "96kHz LPCM" will not be effective. 2 Use the MULTI CONTROL knob or MULTI %/fi keys to adjust the left-center-right output. Use the LISTEN MODE knob, LISTEN MODE key or STEREO key to select STEREO mode to the input indication. 96kHz...
... all the speakers by adjusting the center signal component. 1 Press the SOUND key, then press the 5/∞ keys or MULTI @/# keys until "DUAL MONO" appears on the display. To play a 96kHz DVD, set to DSP mode, "96kHz LPCM" will not be effective. 2 Use the MULTI CONTROL knob or MULTI %/fi keys to adjust the left-center-right output. Use the LISTEN MODE knob, LISTEN MODE key or STEREO key to select STEREO mode to the input indication. 96kHz...
Instruction Manual
Page 45
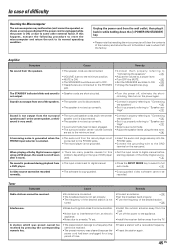
... audio cord plugs securely into the PHONO jacks. • Connect the grounding wire to digital manual. tings". & • Select a surround mode. • Adjust the speaker levels using a DVD player, the sound is ON, or due to the state it left the factory. When playing a Dolby Digital source signal • There are set to the GND terminal on the power again. tings". & Sound is not output from the road. • Turn off , eliminate the shortcircuiting, then turn on the rear panel. Tuner Symptom Radio stations cannot be received...
... audio cord plugs securely into the PHONO jacks. • Connect the grounding wire to digital manual. tings". & • Select a surround mode. • Adjust the speaker levels using a DVD player, the sound is ON, or due to the state it left the factory. When playing a Dolby Digital source signal • There are set to the GND terminal on the power again. tings". & Sound is not output from the road. • Turn off , eliminate the shortcircuiting, then turn on the rear panel. Tuner Symptom Radio stations cannot be received...

