Instruction Manual
Page 2
... the power Units are expressly approved in the instruction manual. NO USER-SERVICEABLE PARTS INSIDE. REFER SERVICING TO QUALIFIED SERVICE PERSONNEL. Changes or modifications to this equipment does cause harmful interference to radio communications, if it could lose the authority to contact cleaner Do not use contact cleaners containing oil, for help. NOTE: This equipment has been tested and found to ensure safe operation. Remote Control...
... the power Units are expressly approved in the instruction manual. NO USER-SERVICEABLE PARTS INSIDE. REFER SERVICING TO QUALIFIED SERVICE PERSONNEL. Changes or modifications to this equipment does cause harmful interference to radio communications, if it could lose the authority to contact cleaner Do not use contact cleaners containing oil, for help. NOTE: This equipment has been tested and found to ensure safe operation. Remote Control...
Instruction Manual
Page 3
... radio stations 24 Presetting radio stations manually 24 Receiving preset stations 25 Receiving preset stations in order (P.CALL) ... 25 Ambience effects 26 Surround modes 26 Surround play 28 DVD 6-channel playback 30 Convenient functions 30 Adjusting the sound 30 Display dimmer adjustment 32 Sleep timer 32 Remote Control Basic remote control operations for playback 20 Listening to a source component 20 Input level adjustment (analog sources only) .. 21 Adjusting the sound 21 Recording 22 Recording audio (analog sources 22 Recording video 22 Recording audio (digital sources...
... radio stations 24 Presetting radio stations manually 24 Receiving preset stations 25 Receiving preset stations in order (P.CALL) ... 25 Ambience effects 26 Surround modes 26 Surround play 28 DVD 6-channel playback 30 Convenient functions 30 Adjusting the sound 30 Display dimmer adjustment 32 Sleep timer 32 Remote Control Basic remote control operations for playback 20 Listening to a source component 20 Input level adjustment (analog sources only) .. 21 Adjusting the sound 21 Recording 22 Recording audio (analog sources 22 Recording video 22 Recording audio (digital sources...
Instruction Manual
Page 4
... the RECEIVER ON key on the remote control. Operation When the standby indicator is damaged or fails to operate, notify your shipper immediately. The supplied batteries may cause a malfunction. If any accessories are present. Kenwood recommends that all accessories are missing, or if the unit is lit, the power turns ON when you directly, notify your dealer immediately. When the remote-controllable...
... the RECEIVER ON key on the remote control. Operation When the standby indicator is damaged or fails to operate, notify your shipper immediately. The supplied batteries may cause a malfunction. If any accessories are present. Kenwood recommends that all accessories are missing, or if the unit is lit, the power turns ON when you directly, notify your dealer immediately. When the remote-controllable...
Instruction Manual
Page 5
... improves your video software and audio source. IR (InfraRed) remote control In addition to the basic receiver operations, this IR remote control supplied can enjoy a more dynamic sound quality in playing video games. Before applying the power Special features True home theater sound § This receiver incorporates a wide variety of surround modes to bring you connect a game machine to the AV AUX jacks on the front panel, the input selector of the receiver switches automatically to...
... improves your video software and audio source. IR (InfraRed) remote control In addition to the basic receiver operations, this IR remote control supplied can enjoy a more dynamic sound quality in playing video games. Before applying the power Special features True home theater sound § This receiver incorporates a wide variety of surround modes to bring you connect a game machine to the AV AUX jacks on the front panel, the input selector of the receiver switches automatically to...

Instruction Manual
Page 6
... A SPEAKERS B DSP 96kHz-fs ACTIVE EQ DOLBY DIGITAL DTS LOUDNESS ACTIVE EQ BASS BOOST LOUDNESS DSP STEREO INPUT MODE DIMMER PHONES DVD/6CH CD/DVD PHONO TUNER VIDEO 1 VIDEO 2 VIDEO 3 MD/TAPE SOUND TONE SETUP BAND AUTO/MONO MEMORY VOLUME CONTROL MULTI CONTROL LISTEN MODE DOWN UP MUTE AV AUX/GAME S VIDEO VIDEO L-AUDIO-R 1 (POWER ON/STANDBY) key & Use to turn the A/B speakers on or off. 3 ACTIVE EQ key ¡ Use to select ACTIVE EQ setting. 4 BASS BOOST key ¡ Use to adjust the brightness of the display. º ! DOLBY DIGITAL mode indicator ª Lights...
... A SPEAKERS B DSP 96kHz-fs ACTIVE EQ DOLBY DIGITAL DTS LOUDNESS ACTIVE EQ BASS BOOST LOUDNESS DSP STEREO INPUT MODE DIMMER PHONES DVD/6CH CD/DVD PHONO TUNER VIDEO 1 VIDEO 2 VIDEO 3 MD/TAPE SOUND TONE SETUP BAND AUTO/MONO MEMORY VOLUME CONTROL MULTI CONTROL LISTEN MODE DOWN UP MUTE AV AUX/GAME S VIDEO VIDEO L-AUDIO-R 1 (POWER ON/STANDBY) key & Use to turn the A/B speakers on or off. 3 ACTIVE EQ key ¡ Use to select ACTIVE EQ setting. 4 BASS BOOST key ¡ Use to adjust the brightness of the display. º ! DOLBY DIGITAL mode indicator ª Lights...
Instruction Manual
Page 7
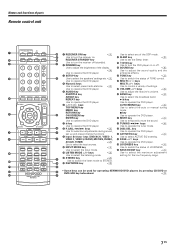
... Use to turn the receiver on. key Use to operate the DVD player. ¢ ACTIVE EQ key Use to select ACTIVE EQ's setting. ∞ PAGE %/fi keys Use to operate the DVD player. § LOUDNESS key ¡ ¢ ¡ ¡ Use to switch the status of parts Remote control unit RECEIVER ON STANDBY DVD SLEEP DIMMER SETUP TONE SOUND MULTI MULTI AUDIO SUBTITLE ANGLE REPEAT TOP MENU MENU VOLUME ENTER RETURN ON SCREEN BAND AUTO/MONO MUTE P.CALL TUNING DVD/6CH VIDEO 1 VIDEO 2 VIDEO 3 CD/DVD MD/TAPE PHONO AV AUX TUNER INPUT MODE ACTIVE...
... Use to turn the receiver on. key Use to operate the DVD player. ¢ ACTIVE EQ key Use to select ACTIVE EQ's setting. ∞ PAGE %/fi keys Use to operate the DVD player. § LOUDNESS key ¡ ¢ ¡ ¡ Use to switch the status of parts Remote control unit RECEIVER ON STANDBY DVD SLEEP DIMMER SETUP TONE SOUND MULTI MULTI AUDIO SUBTITLE ANGLE REPEAT TOP MENU MENU VOLUME ENTER RETURN ON SCREEN BAND AUTO/MONO MUTE P.CALL TUNING DVD/6CH VIDEO 1 VIDEO 2 VIDEO 3 CD/DVD MD/TAPE PHONO AV AUX TUNER INPUT MODE ACTIVE...
Instruction Manual
Page 8
...8226; Input mode setting • Sound mode settings • Broadcast band • Frequency setting • Preset stations • Tuning mode • ACTIVE EQ mode • GAME mode setting Input mode settings CD/DVD, VIDEO 2, VIDEO 3 and DVD/6CH inputs each end, one red for the right channel and one white for the left channel. When DIGITAL MANUAL mode is disconnected from the AC outlet before plugging or unplugging any connection cords. Press the INPUT MODE key again. 8 EN The initial factory settings for audio signal playback for digital audio input and analog audio input...
...8226; Input mode setting • Sound mode settings • Broadcast band • Frequency setting • Preset stations • Tuning mode • ACTIVE EQ mode • GAME mode setting Input mode settings CD/DVD, VIDEO 2, VIDEO 3 and DVD/6CH inputs each end, one red for the right channel and one white for the left channel. When DIGITAL MANUAL mode is disconnected from the AC outlet before plugging or unplugging any connection cords. Press the INPUT MODE key again. 8 EN The initial factory settings for audio signal playback for digital audio input and analog audio input...
Instruction Manual
Page 9
... Surround Back Right Speaker) for 7.1 channel surround sound system or one of the front speakers near the center speaker. (Since the subwoofer has less directivity than other than that can divide those signals between the available speakers in any position that indicated on the rear panel of banana plugs 1 Secure. 2 Insert. • Sound will be placed almost in the speaker settings steps to connect the speakers correctly. Required for 6.1 channel surround sound system. speaker cords...
... Surround Back Right Speaker) for 7.1 channel surround sound system or one of the front speakers near the center speaker. (Since the subwoofer has less directivity than other than that can divide those signals between the available speakers in any position that indicated on the rear panel of banana plugs 1 Secure. 2 Insert. • Sound will be placed almost in the speaker settings steps to connect the speakers correctly. Required for 6.1 channel surround sound system. speaker cords...
Instruction Manual
Page 12
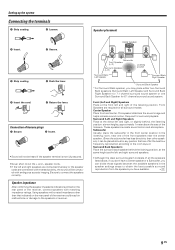
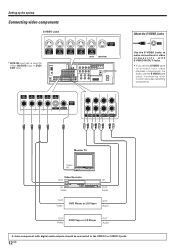
... use the S VIDEO jacks when connecting your monitor and video recording components. Setting up the system Connecting video components S VIDEO Jacks S VIDEO OUT VIDEO S VIDEO IN VIDEO S VIDEO IN VIDEO S VIDEO IN VIDEO S VIDEO OUT S VIDEO IN VIDEO (DVD) (MONITOR) * DVD IN input jack is used for either CD/DVD input or DVD/ 6CH input. OUT VIDEO IN VIDEO IN VIDEO IN VIDEO IN VIDEO VIDEO OUT DVD MONITOR REC OUT PLAY IN PLAY IN PLAY IN VIDEO 1 VIDEO 2 VIDEO 3 About the S VIDEO Jacks S VIDEO OUT Use the S VIDEO Jacks to make connections to video components with digital audio outputs...
... use the S VIDEO jacks when connecting your monitor and video recording components. Setting up the system Connecting video components S VIDEO Jacks S VIDEO OUT VIDEO S VIDEO IN VIDEO S VIDEO IN VIDEO S VIDEO IN VIDEO S VIDEO OUT S VIDEO IN VIDEO (DVD) (MONITOR) * DVD IN input jack is used for either CD/DVD input or DVD/ 6CH input. OUT VIDEO IN VIDEO IN VIDEO IN VIDEO IN VIDEO VIDEO OUT DVD MONITOR REC OUT PLAY IN PLAY IN PLAY IN VIDEO 1 VIDEO 2 VIDEO 3 About the S VIDEO Jacks S VIDEO OUT Use the S VIDEO Jacks to make connections to video components with digital audio outputs...

Instruction Manual
Page 13
... can accept DTS, Dolby Digital, or PCM signals. Next, connect the DIGITAL OUT jacks of the demodulator to the DIGITAL IN jacks of outputting DTS, Dolby Digital, or standard PCM (CD) format digital signals. If you have connected any digital components to the receiver, be sure to read the "Input mode settings" section carefully. 8 COAXIAL VIDEO 2 OPTICAL OPTICAL CD/DVD VIDEO 3 DVD/ 6CH DIGITAL IN COAXIAL DIGITAL OUT (AUDIO) RF digital demodulator (Commercially available) Optical fiber cable OPTICAL DIGITAL OUT (AUDIO) Component with a DIGITAL RF OUT, connect the LD player to the...
... can accept DTS, Dolby Digital, or PCM signals. Next, connect the DIGITAL OUT jacks of the demodulator to the DIGITAL IN jacks of outputting DTS, Dolby Digital, or standard PCM (CD) format digital signals. If you have connected any digital components to the receiver, be sure to read the "Input mode settings" section carefully. 8 COAXIAL VIDEO 2 OPTICAL OPTICAL CD/DVD VIDEO 3 DVD/ 6CH DIGITAL IN COAXIAL DIGITAL OUT (AUDIO) RF digital demodulator (Commercially available) Optical fiber cable OPTICAL DIGITAL OUT (AUDIO) Component with a DIGITAL RF OUT, connect the LD player to the...
Instruction Manual
Page 18
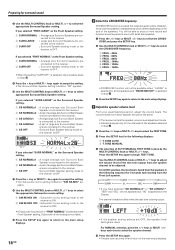
... MULTI %/fi keys to adjust the volume level of AUTO/MANUAL TEST TONE is selected, the procedure skips to step !. 9 Press the ∧ key or MULTI # keys again to accept the setting. • The Surround Back Speaker setting indication "SB" appears. 0 Use the MULTI CONTROL knob or MULTI %/fi keys to select the CROSSOVER frequency. 1 FREQ. : 40Hz 2 FREQ. : 60Hz 3 FREQ. : 80Hz 4 FREQ. : 100Hz 5 FREQ. : 120Hz 6 FREQ. : 150Hz SP MUTE L R A B CLIP STEREO • CROSSOVER function...
... MULTI %/fi keys to adjust the volume level of AUTO/MANUAL TEST TONE is selected, the procedure skips to step !. 9 Press the ∧ key or MULTI # keys again to accept the setting. • The Surround Back Speaker setting indication "SB" appears. 0 Use the MULTI CONTROL knob or MULTI %/fi keys to select the CROSSOVER frequency. 1 FREQ. : 40Hz 2 FREQ. : 60Hz 3 FREQ. : 80Hz 4 FREQ. : 100Hz 5 FREQ. : 120Hz 6 FREQ. : 150Hz SP MUTE L R A B CLIP STEREO • CROSSOVER function...
Instruction Manual
Page 19
... been correctly selected. 7 Adjust the LFE LEVEL (Low Frequency Effects). 1 Press the ∧/∨ keys or MULTI @/#keys to select the LFE LEVEL. 2 Use the MULTI CONTROL knob or MULTI %/fi keys to adjust the LFE LEVEL. Preparing for surround sound 6 Input the distance to the speakers. • Indicators appear only for each of the speakers. SP MUTE L R A B CLIP STEREO SL S SB SR 5 Press the SETUP key to exit the SETUP mode. • The LFE LEVEL can be adjusted blinks.
... been correctly selected. 7 Adjust the LFE LEVEL (Low Frequency Effects). 1 Press the ∧/∨ keys or MULTI @/#keys to select the LFE LEVEL. 2 Use the MULTI CONTROL knob or MULTI %/fi keys to adjust the LFE LEVEL. Preparing for surround sound 6 Input the distance to the speakers. • Indicators appear only for each of the speakers. SP MUTE L R A B CLIP STEREO SL S SB SR 5 Press the SETUP key to exit the SETUP mode. • The LFE LEVEL can be adjusted blinks.
Instruction Manual
Page 20
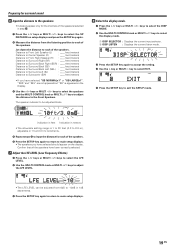
... on the rear panel. SP MUTE L C R A B CLIP LFE SL S SB SR • Selecting "6CH INPUT" by pressing the (POWER ON/STANDBY) key. Set up the AV AUX jacks on the front panel Perform the setup for convenience of playing a video game using each key. 1 TUNER 2 CD/DVD 3 MD/TAPE 4 VIDEO 1 5 VIDEO 2 6 VIDEO 3 7 DVD/6CH 8 PHONO 9 AV AUX [GAME] (or AV AUX) 2 Start playback from the speakers connected to adjust the volume. In addition, the ACTIVE EQ function is switched to "ACTIVE...
... on the rear panel. SP MUTE L C R A B CLIP LFE SL S SB SR • Selecting "6CH INPUT" by pressing the (POWER ON/STANDBY) key. Set up the AV AUX jacks on the front panel Perform the setup for convenience of playing a video game using each key. 1 TUNER 2 CD/DVD 3 MD/TAPE 4 VIDEO 1 5 VIDEO 2 6 VIDEO 3 7 DVD/6CH 8 PHONO 9 AV AUX [GAME] (or AV AUX) 2 Start playback from the speakers connected to adjust the volume. In addition, the ACTIVE EQ function is switched to "ACTIVE...
Instruction Manual
Page 21
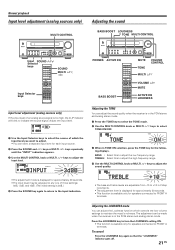
... the following displays. Adjusting the TONE You can adjust the sound quality when the receiver is in TONE ON selection, press the TONE key for speakers connected to adjust the input level. SP MUTE L C R A B CLIP LFE SL S SB SR STEREO 3 When in the PCM stereo and analog stereo mode. 1 Press the TONE key to select the TONE mode. 2 Use the MULTI CONTROL knob or MULTI %/fi keys to adjust the low frequency range. TREBLE : Select this to select TONE ON/OFF. Adjust the input level. The adjustment can be adjusted to any...
... the following displays. Adjusting the TONE You can adjust the sound quality when the receiver is in TONE ON selection, press the TONE key for speakers connected to adjust the input level. SP MUTE L C R A B CLIP LFE SL S SB SR STEREO 3 When in the PCM stereo and analog stereo mode. 1 Press the TONE key to select the TONE mode. 2 Use the MULTI CONTROL knob or MULTI %/fi keys to adjust the low frequency range. TREBLE : Select this to select TONE ON/OFF. Adjust the input level. The adjustment can be adjusted to any...
Instruction Manual
Page 22
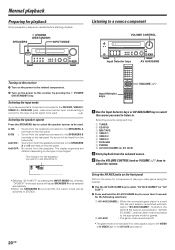
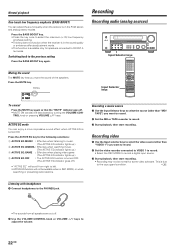
... to adjust the volume. 22 EN This is turned ON. Switching back to the PHONES jack. ACTIVE EQ mode You can also be available when in REC MODE, or when searching or presetting radio stations. TROL knob or pressing VOLUME %/fi keys. Recording video 1 Use the Input selector keys to record a digital input source. 3 Start playback, then start recording. Input Selector keys Recording a music source 1 Use the Input Selector keys to select the source...
... to adjust the volume. 22 EN This is turned ON. Switching back to the PHONES jack. ACTIVE EQ mode You can also be available when in REC MODE, or when searching or presetting radio stations. TROL knob or pressing VOLUME %/fi keys. Recording video 1 Use the Input selector keys to record a digital input source. 3 Start playback, then start recording. Input Selector keys Recording a music source 1 Use the Input Selector keys to select the source...
Instruction Manual
Page 27
... stereo or 5.1 channel signals. gent, built-in the other surround modes. For this channel. Thus, it as 96 kHz/24 bit PCM. Especially 7.1 channel surround sound can automatically select the best matched mode. DTS-ES DTS-ES (Digital Theater System-Extended Surround) presents 6.1 channels surround system with an intelli- Compared with side wall imaging. The Pro Logic II modes programmed into this channel. the "Center Width" control allows various adjustment of a CD, LD or DVD player. It creates 6.1 channel and 7.1 channel surround sound...
... stereo or 5.1 channel signals. gent, built-in the other surround modes. For this channel. Thus, it as 96 kHz/24 bit PCM. Especially 7.1 channel surround sound can automatically select the best matched mode. DTS-ES DTS-ES (Digital Theater System-Extended Surround) presents 6.1 channels surround system with an intelli- Compared with side wall imaging. The Pro Logic II modes programmed into this channel. the "Center Width" control allows various adjustment of a CD, LD or DVD player. It creates 6.1 channel and 7.1 channel surround sound...

Instruction Manual
Page 30
.... 4 Adjust the volume. • It is displayed for the current input selection. The value will be functional) of the channels separately when the receiver is in the 6CH INPUT mode. Ambience effects DVD 6-channel playback Using a DVD player or the like equipped with the controls of the DVD player. STEREO DIMMER MULTI CONTROL DVD/6CH SOUND DIMMER LISTEN MODE SLEEP SOUND MULTI DVD/6CH INPUT MODE VOLUME%/fi Preparations • Connect your DVD player to the DVD/6CH jacks of the receiver. • Turn on all other components...
.... 4 Adjust the volume. • It is displayed for the current input selection. The value will be functional) of the channels separately when the receiver is in the 6CH INPUT mode. Ambience effects DVD 6-channel playback Using a DVD player or the like equipped with the controls of the DVD player. STEREO DIMMER MULTI CONTROL DVD/6CH SOUND DIMMER LISTEN MODE SLEEP SOUND MULTI DVD/6CH INPUT MODE VOLUME%/fi Preparations • Connect your DVD player to the DVD/6CH jacks of the receiver. • Turn on all other components...

Instruction Manual
Page 32
..., turn the receiver OFF (standby mode) or press the SLEEP key repeatedly until "CENTER IMAGE" appears on the display. SP MUTE AUTO DETECT DIGITAL DOLBY DIGITAL A B CLIP LFE STEREO • The adjustment item is compatible with the 96kHz LPCM playback. You might find most pleasing. Dual Mono mode (Dolby Digital mode only) When the Dolby Digital source have Multiplex sound, you want to use the remote control unit, press the VIDEO 1, VIDEO 2, VIDEO 3, MD/TAPE, PHONO, AV AUX or TUNER key...
..., turn the receiver OFF (standby mode) or press the SLEEP key repeatedly until "CENTER IMAGE" appears on the display. SP MUTE AUTO DETECT DIGITAL DOLBY DIGITAL A B CLIP LFE STEREO • The adjustment item is compatible with the 96kHz LPCM playback. You might find most pleasing. Dual Mono mode (Dolby Digital mode only) When the Dolby Digital source have Multiplex sound, you want to use the remote control unit, press the VIDEO 1, VIDEO 2, VIDEO 3, MD/TAPE, PHONO, AV AUX or TUNER key...

Instruction Manual
Page 33
... MENU ENTER MENU VOLUME RETURN 8 (Pause) 3/8 (Play/Pause) RETURN BAND ON SCREEN AUTO/MONO MUTE P.CALL TUNING ¢ (Skip) 4 (Skip) - Refer to operate the DVD player with the DVD player. DSP MODE BASS BOOST RDS DISP. Basic remote control operations for KENWOOD DVD players DVD player operation keys The remote control of this unit can perform these basic operations using the remote control supplied with the remote control 1. Press the CD/DVD key or DVD/6CH key to turn the DVD player on. 2. CHANNEL + DVD/6CH VIDEO 1 VIDEO 2 VIDEO 3 CD/DVD MD/TAPE PHONO AV AUX TUNER...
... MENU ENTER MENU VOLUME RETURN 8 (Pause) 3/8 (Play/Pause) RETURN BAND ON SCREEN AUTO/MONO MUTE P.CALL TUNING ¢ (Skip) 4 (Skip) - Refer to operate the DVD player with the DVD player. DSP MODE BASS BOOST RDS DISP. Basic remote control operations for KENWOOD DVD players DVD player operation keys The remote control of this unit can perform these basic operations using the remote control supplied with the remote control 1. Press the CD/DVD key or DVD/6CH key to turn the DVD player on. 2. CHANNEL + DVD/6CH VIDEO 1 VIDEO 2 VIDEO 3 CD/DVD MD/TAPE PHONO AV AUX TUNER...

Instruction Manual
Page 34
... the PHONO jacks. • Connect the grounding wire to the appliance. • Install the receiver farther away from the road. • Turn off , eliminate the shortcircuiting, then turn on the rear panel. not output. • Turn the power off the power to the GND terminal on the power again. tings". & • Select a surround mode. • Adjust the speaker levels using a DVD player, the sound is • Speaker cords are many possible causes for a long period of the Dolby Digital source...
... the PHONO jacks. • Connect the grounding wire to the appliance. • Install the receiver farther away from the road. • Turn off , eliminate the shortcircuiting, then turn on the rear panel. not output. • Turn the power off the power to the GND terminal on the power again. tings". & • Select a surround mode. • Adjust the speaker levels using a DVD player, the sound is • Speaker cords are many possible causes for a long period of the Dolby Digital source...

