
Instruction Manual
Page 2
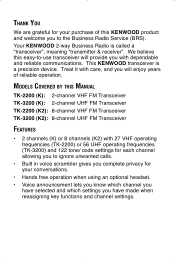
... reassigning key functions and channel settings. THANK YOU We are grateful for your purchase of this easy-to-use transceiver will enjoy years of reliable operation. This KENWOOD transceiver is called a "transceiver", meaning "transmitter & receiver". MODELS COVERED BY THIS MANUAL TK-2200 (K): 2-channel VHF FM Transceiver TK-3200 (K): 2-channel UHF FM Transceiver TK-2200 (K2): 8-channel VHF FM Transceiver TK-3200 (K2): 8-channel UHF FM Transceiver FEATURES • 2 channels (K) or 8 channels (K2) with care, and you to the Business Radio Service (BRS). We believe...
... reassigning key functions and channel settings. THANK YOU We are grateful for your purchase of this easy-to-use transceiver will enjoy years of reliable operation. This KENWOOD transceiver is called a "transceiver", meaning "transmitter & receiver". MODELS COVERED BY THIS MANUAL TK-2200 (K): 2-channel VHF FM Transceiver TK-3200 (K): 2-channel UHF FM Transceiver TK-2200 (K2): 8-channel VHF FM Transceiver TK-3200 (K2): 8-channel UHF FM Transceiver FEATURES • 2 channels (K) or 8 channels (K2) with care, and you to the Business Radio Service (BRS). We believe...

Instruction Manual
Page 4
FCC LICENSE INFORMATION Your KENWOOD transceiver operates on communications frequencies which frequencies you by fax from the FCC Fax-OnDemand system. FCC Rules require that all operators using 25 kHz channel spacing. See the frequency charts on which are subject to you will be downloaded from your Form 601 application Technical Data section, you must be made on FCC form 601, schedules D and H, and Remittance form 159...
FCC LICENSE INFORMATION Your KENWOOD transceiver operates on communications frequencies which frequencies you by fax from the FCC Fax-OnDemand system. FCC Rules require that all operators using 25 kHz channel spacing. See the frequency charts on which are subject to you will be downloaded from your Form 601 application Technical Data section, you must be made on FCC form 601, schedules D and H, and Remittance form 159...
Instruction Manual
Page 5
... operation of any reason. • Do not expose the transceiver to long periods of direct sunlight, nor place it close to qualified technicians only. iii This transceiver can be used in mild weather conditions and is detected coming from the transceiver, immediately switch OFF the power and remove the battery pack from the transceiver. EXPLOSIVE ATMOSPHERES (GASES, DUST, FUMES, etc.) Turn off your KENWOOD...
... operation of any reason. • Do not expose the transceiver to long periods of direct sunlight, nor place it close to qualified technicians only. iii This transceiver can be used in mild weather conditions and is detected coming from the transceiver, immediately switch OFF the power and remove the battery pack from the transceiver. EXPLOSIVE ATMOSPHERES (GASES, DUST, FUMES, etc.) Turn off your KENWOOD...
Instruction Manual
Page 6
...; Connect the equipment to an outlet on , the user is made. INFORMATION TO THE DIGITAL DEVICE USER REQUIRED BY THE FCC This equipment has been tested and found to comply with the instructions, may cause harmful interference unless the modifications are designed to radio or television reception, which can generate radio frequency energy and, if not installed and used in the instruction manual...
...; Connect the equipment to an outlet on , the user is made. INFORMATION TO THE DIGITAL DEVICE USER REQUIRED BY THE FCC This equipment has been tested and found to comply with the instructions, may cause harmful interference unless the modifications are designed to radio or television reception, which can generate radio frequency energy and, if not installed and used in the instruction manual...
Instruction Manual
Page 8
... VOX GAIN 10 VOX OPERATION 12 KEY FUNCTIONS 13 LOCK KEY 13 SCAN KEY 13 BACKGROUND OPERATIONS 15 TIME-OUT TIMER (TOT 15 LOW BATTERY WARNING 15 QUIET TALK (QT)/ DIGITAL QUIET TALK (DQT 16 CHANNEL SETUP MODE 17 CHANNEL OPERATING FREQUENCIES 18 QUIET TALK (QT)/ DIGITAL QUIET TALK (DQT) SETTINGS 21 KEY ASSIGNMENT MODE 25 CALLING ALERT 28 KEY LOCK 28 SUPER LOCK 28 MONITOR/ SQUELCH OFF 29 SCAN 29 SCRAMBLER 30 ALL RESET MODE 31 OPTIONAL ACCESSORIES 32 TROUBLESHOOTING GUIDE...
... VOX GAIN 10 VOX OPERATION 12 KEY FUNCTIONS 13 LOCK KEY 13 SCAN KEY 13 BACKGROUND OPERATIONS 15 TIME-OUT TIMER (TOT 15 LOW BATTERY WARNING 15 QUIET TALK (QT)/ DIGITAL QUIET TALK (DQT 16 CHANNEL SETUP MODE 17 CHANNEL OPERATING FREQUENCIES 18 QUIET TALK (QT)/ DIGITAL QUIET TALK (DQT) SETTINGS 21 KEY ASSIGNMENT MODE 25 CALLING ALERT 28 KEY LOCK 28 SUPER LOCK 28 MONITOR/ SQUELCH OFF 29 SCAN 29 SCRAMBLER 30 ALL RESET MODE 31 OPTIONAL ACCESSORIES 32 TROUBLESHOOTING GUIDE...
Instruction Manual
Page 9
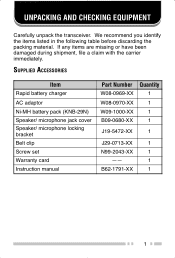
SUPPLIED ACCESSORIES Item Rapid battery charger AC adaptor Ni-MH battery pack (KNB-29N) Speaker/ microphone jack cover Speaker/ microphone locking bracket Belt clip Screw set Warranty card Instruction manual Part Number Quantity W08-0969-XX 1 W08-0970-XX 1 W09-1000-XX 1 B09-0680-XX 1 J19-5472-XX 1 J29-0713-XX 1 N99-2043-XX...or have been damaged during shipment, file a claim with the carrier immediately. UNPACKING AND CHECKING EQUIPMENT Carefully unpack the transceiver. We recommend you identify the items listed in the following table before discarding the packing material.
SUPPLIED ACCESSORIES Item Rapid battery charger AC adaptor Ni-MH battery pack (KNB-29N) Speaker/ microphone jack cover Speaker/ microphone locking bracket Belt clip Screw set Warranty card Instruction manual Part Number Quantity W08-0969-XX 1 W08-0970-XX 1 W09-1000-XX 1 B09-0680-XX 1 J19-5472-XX 1 J29-0713-XX 1 N99-2043-XX...or have been damaged during shipment, file a claim with the carrier immediately. UNPACKING AND CHECKING EQUIPMENT Carefully unpack the transceiver. We recommend you identify the items listed in the following table before discarding the packing material.

Instruction Manual
Page 11
... Talk) switch Press and hold to switch the power OFF. Channel selector Rotate to transmit. ORIENTATION Antenna (optional) LED indicator Indicates the transceiver status. Rotate to remove a channel from 1 ~ 2 or 1 ~ 8. Speaker/ microphone jacks Scan key Press to scan the channels for a signal or to adjust the volume. Battery pack (KNB-29N) Note: The Lock and Scan keys can be reprogrammed {page 25}. 3 Lights red while transmitting, green while receiving, and flashes red while the battery power is low while transmitting...
... Talk) switch Press and hold to switch the power OFF. Channel selector Rotate to transmit. ORIENTATION Antenna (optional) LED indicator Indicates the transceiver status. Rotate to remove a channel from 1 ~ 2 or 1 ~ 8. Speaker/ microphone jacks Scan key Press to scan the channels for a signal or to adjust the volume. Battery pack (KNB-29N) Note: The Lock and Scan keys can be reprogrammed {page 25}. 3 Lights red while transmitting, green while receiving, and flashes red while the battery power is low while transmitting...

Instruction Manual
Page 12
... not recharge the battery pack if it is already fully charged. Using the transceiver while charging its battery pack will not bring the battery pack to its operating time decreases even though it from the charger. Doing so may cause the life of the battery pack after purchase or extended storage (greater than 5 days may reduce the battery pack life due to overcharging. Charging the battery pack...
... not recharge the battery pack if it is already fully charged. Using the transceiver while charging its battery pack will not bring the battery pack to its operating time decreases even though it from the charger. Doing so may cause the life of the battery pack after purchase or extended storage (greater than 5 days may reduce the battery pack life due to overcharging. Charging the battery pack...

Instruction Manual
Page 14
Average battery pack life (calculated using 5% transmit time, 5% receive time, and 90% standby time) is not charged at the factory; To remove the battery pack, lift the safety catch on the base of the transceiver locks. While pressing the release 3 latch, pull the battery pack away from the battery pack. Align the battery pack with the back of the transceiver, then press the battery pack and 1 transceiver firmly together until the...
Average battery pack life (calculated using 5% transmit time, 5% receive time, and 90% standby time) is not charged at the factory; To remove the battery pack, lift the safety catch on the base of the transceiver locks. While pressing the release 3 latch, pull the battery pack away from the battery pack. Align the battery pack with the back of the transceiver, then press the battery pack and 1 transceiver firmly together until the...

Instruction Manual
Page 17
..., you will hear audio from your desired channel. To make a call, press and hold the PTT switch, then speak into the microphone in your normal voice while holding the microphone approximately 1.5 inches (3 to receive. The LED lights red while transmitting. GETTING STARTED 1 1 2 1 3 Turn the Power switch/ Volume control clockwise to transmit. A beep sounds. Adjust the volume as necessary. For best sound quality, speak into the microphone to switch the transceiver power ON. Release the PTT switch to 4 cm...
..., you will hear audio from your desired channel. To make a call, press and hold the PTT switch, then speak into the microphone in your normal voice while holding the microphone approximately 1.5 inches (3 to receive. The LED lights red while transmitting. GETTING STARTED 1 1 2 1 3 Turn the Power switch/ Volume control clockwise to transmit. A beep sounds. Adjust the volume as necessary. For best sound quality, speak into the microphone to switch the transceiver power ON. Release the PTT switch to 4 cm...

Instruction Manual
Page 18
..., we recommend you set the VOX Gain level: With the transceiver power OFF, connect the headset to the transceiver {page 8}. 1 The VOX function does not activate when a headset is not so loud that rests in front of the transceiver. Continue to the speaker/ microphone jack of your voice level will announce the current VOX Gain level. 10 VOICE OPERATED TRANSMISSION (VOX) Using the VOX feature, you must...
..., we recommend you set the VOX Gain level: With the transceiver power OFF, connect the headset to the transceiver {page 8}. 1 The VOX function does not activate when a headset is not so loud that rests in front of the transceiver. Continue to the speaker/ microphone jack of your voice level will announce the current VOX Gain level. 10 VOICE OPERATED TRANSMISSION (VOX) Using the VOX feature, you must...

Instruction Manual
Page 19
... selected, the transceiver announces "Off". Press the Lock key to increase the VOX Gain level and the Scan key to decrease the level. 3 The VOX Gain can be adjusted from level 1 to activate VOX. A beep will sound and the transceiver will cancel. Press the PTT switch within 5 seconds to save the setting, otherwise the 4 operation will announce the new VOX Gain level. 5 1 Turn the transceiver power OFF and then...
... selected, the transceiver announces "Off". Press the Lock key to increase the VOX Gain level and the Scan key to decrease the level. 3 The VOX Gain can be adjusted from level 1 to activate VOX. A beep will sound and the transceiver will cancel. Press the PTT switch within 5 seconds to save the setting, otherwise the 4 operation will announce the new VOX Gain level. 5 1 Turn the transceiver power OFF and then...

Instruction Manual
Page 20
... KHS-22 accessory. ◆ VOX will not operate when the battery level becomes too low. (The LED will not be cut off. 4 To exit VOX mode, set the VOX Gain level {page 10} to OFF. the transceiver automatically detects your transmission will flash red in this state.) 12 To transmit, simply speak into the headset microphone. 2 You do not need to 10 {page 10}. To stop transmitting, stop speaking...
... KHS-22 accessory. ◆ VOX will not operate when the battery level becomes too low. (The LED will not be cut off. 4 To exit VOX mode, set the VOX Gain level {page 10} to OFF. the transceiver automatically detects your transmission will flash red in this state.) 12 To transmit, simply speak into the headset microphone. 2 You do not need to 10 {page 10}. To stop transmitting, stop speaking...
Instruction Manual
Page 21
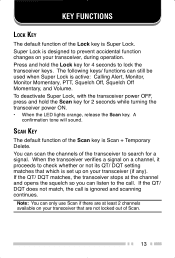
... and hold the Scan key for 4 seconds to prevent accidental function changes on your transceiver (if any). Super Lock is Super Lock. You can still be used when Super Lock is Scan + Temporary Delete. The following keys/ functions can scan the channels of the Scan key is active: Calling Alert, Monitor, Monitor Momentary, PTT, Squelch Off, Squelch Off Momentary, and Volume. KEY FUNCTIONS LOCK KEY The default function of Scan. 13
... and hold the Scan key for 4 seconds to prevent accidental function changes on your transceiver (if any). Super Lock is Super Lock. You can still be used when Super Lock is Scan + Temporary Delete. The following keys/ functions can scan the channels of the Scan key is active: Calling Alert, Monitor, Monitor Momentary, PTT, Squelch Off, Squelch Off Momentary, and Volume. KEY FUNCTIONS LOCK KEY The default function of Scan. 13

Instruction Manual
Page 23
... seconds (default), the transceiver will stop the tone, release the PTT switch. To stop transmitting and an alert tone will blink red. Replace or recharge the battery pack at this feature helps you save on battery power consumption. LOW BATTERY WARNING Low Battery Warning alerts you can press the PTT switch again to be recharged or replaced. While operating the transceiver, if the battery power becomes low, an alert tone will sound every 30 seconds and the LED indicator will sound. You can continuously transmit, this time. 15...
... seconds (default), the transceiver will stop the tone, release the PTT switch. To stop transmitting and an alert tone will blink red. Replace or recharge the battery pack at this feature helps you save on battery power consumption. LOW BATTERY WARNING Low Battery Warning alerts you can press the PTT switch again to be recharged or replaced. While operating the transceiver, if the battery power becomes low, an alert tone will sound every 30 seconds and the LED indicator will sound. You can continuously transmit, this time. 15...
Instruction Manual
Page 24
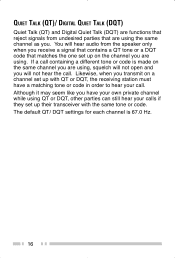
... the same tone or code. The default QT/ DQT settings for each channel is made on the channel you are using. QUIET TALK (QT)/ DIGITAL QUIET TALK (DQT) Quiet Talk (QT) and Digital Quiet Talk (DQT) are functions that reject signals from the speaker only when you receive a signal that contains a QT tone or a DQT code that are using, squelch will not open and you will hear audio from...
... the same tone or code. The default QT/ DQT settings for each channel is made on the channel you are using. QUIET TALK (QT)/ DIGITAL QUIET TALK (DQT) Quiet Talk (QT) and Digital Quiet Talk (DQT) are functions that reject signals from the speaker only when you receive a signal that contains a QT tone or a DQT code that are using, squelch will not open and you will hear audio from...

Instruction Manual
Page 25
... lists the default channel frequencies. CHANNEL SETUP MODE This transceiver allows you will not be able to select a Quiet Talk/ Digital Quiet Talk setting for a channel, you to reprogram each of the channels with a 67.0 Hz QT tone by default. All channels are set with different frequencies and Quiet Talk/ Digital Quiet Talk settings. Channel Number Table Number Frequency (MHz) Table Number Frequency (MHz) TK-2200 (K) 2-Channel Model TK-3200 (K) 2-Channel Model 1 3 154.5700 2 464.5500 2 4 154.6000 8 467.9250 TK-2200 (K2) 8-Channel Model TK-3200 (K2) 8-Channel Model...
... lists the default channel frequencies. CHANNEL SETUP MODE This transceiver allows you will not be able to select a Quiet Talk/ Digital Quiet Talk setting for a channel, you to reprogram each of the channels with a 67.0 Hz QT tone by default. All channels are set with different frequencies and Quiet Talk/ Digital Quiet Talk settings. Channel Number Table Number Frequency (MHz) Table Number Frequency (MHz) TK-2200 (K) 2-Channel Model TK-3200 (K) 2-Channel Model 1 3 154.5700 2 464.5500 2 4 154.6000 8 467.9250 TK-2200 (K2) 8-Channel Model TK-3200 (K2) 8-Channel Model...
Instruction Manual
Page 29
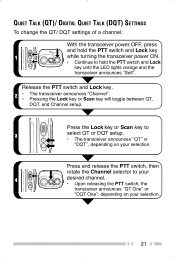
... QUIET TALK (DQT) SETTINGS To change the QT/ DQT settings of a channel: With the transceiver power OFF, press and hold the PTT switch and Lock key until the LED lights orange and the transceiver announces "Self". Press the Lock key or Scan key to hold the PTT switch and Lock key 1 while turning the transceiver power ON. 1 Continue to 3 select QT or DQT setup. Release the PTT switch and Lock key. 2 The transceiver announces "Channel". Press...
... QUIET TALK (DQT) SETTINGS To change the QT/ DQT settings of a channel: With the transceiver power OFF, press and hold the PTT switch and Lock key until the LED lights orange and the transceiver announces "Self". Press the Lock key or Scan key to hold the PTT switch and Lock key 1 while turning the transceiver power ON. 1 Continue to 3 select QT or DQT setup. Release the PTT switch and Lock key. 2 The transceiver announces "Channel". Press...

Instruction Manual
Page 39
... the PTT switch, the Lock key, 1 and the Scan key while turning the 1 transceiver power ON. To reset the transceiver: With the transceiver power OFF, press and hold the keys for 2 seconds, until the LED lights orange. The keys must be released within 1 second after the LED lights 2 orange, otherwise All Reset Mode will reset all channels to their default frequencies and QT/ DQT, the VOX function to its default status...
... the PTT switch, the Lock key, 1 and the Scan key while turning the 1 transceiver power ON. To reset the transceiver: With the transceiver power OFF, press and hold the keys for 2 seconds, until the LED lights orange. The keys must be released within 1 second after the LED lights 2 orange, otherwise All Reset Mode will reset all channels to their default frequencies and QT/ DQT, the VOX function to its default status...

Instruction Manual
Page 41
... too far away. Remove the battery pack and install again. • The battery pack life is finished. Turn on the channel. Other voices (besides group members') are present on your group. TROUBLESHOOTING GUIDE Problem Cannot turn the transceiver power ON. Recharge or replace the battery pack. • The battery pack may be dead. Replace the battery pack with a new one. • Make sure you are using the Scrambler function. Make sure you are within range...
... too far away. Remove the battery pack and install again. • The battery pack life is finished. Turn on the channel. Other voices (besides group members') are present on your group. TROUBLESHOOTING GUIDE Problem Cannot turn the transceiver power ON. Recharge or replace the battery pack. • The battery pack may be dead. Replace the battery pack with a new one. • Make sure you are using the Scrambler function. Make sure you are within range...


