

User Manual
Page 2
...connecting the power cord to your AC outlet, make sure that prevails in your home or the cable is cut off , remove the fuse and dispose of the AC voltage selector switch. AC voltage selector switch Move switch lever to reach a power point, then obtain an appropriate safety approved extension lead or adapter, or consult your line voltage. If nonetheless the mains plug... NO USER-SERVICEABLE PARTS INSIDE. U.S.A. There is no danger of products using lasers (Except for some areas) CLASS 1 LASER PRODUCT The marking is located on the rear panel is not suitable for operation as...
...connecting the power cord to your AC outlet, make sure that prevails in your home or the cable is cut off , remove the fuse and dispose of the AC voltage selector switch. AC voltage selector switch Move switch lever to reach a power point, then obtain an appropriate safety approved extension lead or adapter, or consult your line voltage. If nonetheless the mains plug... NO USER-SERVICEABLE PARTS INSIDE. U.S.A. There is no danger of products using lasers (Except for some areas) CLASS 1 LASER PRODUCT The marking is located on the rear panel is not suitable for operation as...

User Manual
Page 3
... components .......... 57 Timer operation 59 Sleep timer 59 Timer programming 60 Knowledge section Important Items 63 Setup Codes (RC-NV701 63 Setup Codes (RC-NV701E 64 Maintenance 65 Reference 65 Handling of discs and tapes 66 In case of the speaker system....... 20 Setting speaker distances and system volume levels 21 Setting the audio for connected components (NV-701 only 23 Basic section Let's have sound 24 Basic operation 24 CD Playback 26 Tape playback 28 Receiving broadcast stations 31 CHANNEL...
... components .......... 57 Timer operation 59 Sleep timer 59 Timer programming 60 Knowledge section Important Items 63 Setup Codes (RC-NV701 63 Setup Codes (RC-NV701E 64 Maintenance 65 Reference 65 Handling of discs and tapes 66 In case of the speaker system....... 20 Setting speaker distances and system volume levels 21 Setting the audio for connected components (NV-701 only 23 Basic section Let's have sound 24 Basic operation 24 CD Playback 26 Tape playback 28 Receiving broadcast stations 31 CHANNEL...

User Manual
Page 4
... operate the other components (NV-701 only) The remote control unit is also compatible with the IEC standard, for connection to a DVD player or an external decoder. Auto power save When the power is unplugged and then plugged in sequence but the sound mode does not change. True home theater sound (NV-701 only) Internal multichannel audio decoding This unit incorporates internal Dolby Digital and DTS decoding. Discreet 6-channel input capability This unit features discreet 6-channel input for example a disc...
... operate the other components (NV-701 only) The remote control unit is also compatible with the IEC standard, for connection to a DVD player or an external decoder. Auto power save When the power is unplugged and then plugged in sequence but the sound mode does not change. True home theater sound (NV-701 only) Internal multichannel audio decoding This unit incorporates internal Dolby Digital and DTS decoding. Discreet 6-channel input capability This unit features discreet 6-channel input for example a disc...

User Manual
Page 7
... speaker stabilizes the sound image and helps recreate more natural sound motion. Subwoofer: Reproduces deep bass and other object next to provide sufficient space on the left side of the main unit. • Leave a space around the unit (from the TV set up in order to insert all surround modes. If connection cords are required for surround playback. By performing the "Surround Options" setup operations...
... speaker stabilizes the sound image and helps recreate more natural sound motion. Subwoofer: Reproduces deep bass and other object next to provide sufficient space on the left side of the main unit. • Leave a space around the unit (from the TV set up in order to insert all surround modes. If connection cords are required for surround playback. By performing the "Surround Options" setup operations...

User Manual
Page 8
... recorder Audio output Digital input Optical-fiber cable Preparation section When making connections ÷ Make connections to the MD/DVD jacks using a commercially available digital optical cable to an MD recorder or other components (optional or commercially-available equipment) CAUTION Note on Connection Connect the components as well. Use a commercially-available antenna adapter (a small-sized model). SUPER WOOFER PRE OUT MD/DVD L R AM GND FM 75 When an external system component is connected, please read the instruction manual of CDs played on...
... recorder Audio output Digital input Optical-fiber cable Preparation section When making connections ÷ Make connections to the MD/DVD jacks using a commercially available digital optical cable to an MD recorder or other components (optional or commercially-available equipment) CAUTION Note on Connection Connect the components as well. Use a commercially-available antenna adapter (a small-sized model). SUPER WOOFER PRE OUT MD/DVD L R AM GND FM 75 When an external system component is connected, please read the instruction manual of CDs played on...

User Manual
Page 10
... optical-fiber cable. ÷ If digital connections are making analog connections from a DVD player that only features right and left channel stereo output, make connections to the corresponding AUDIO - DIGITAL VIDEO 1 COAX. IN VIDEO 2 OPT. VIDEO 2/6 CH INPUT jacks. OUT Cap ÷ Insert the optical-fiber cable straight into the jack. VIDEO 2/6 CH INPUT FRONT R and L jacks respectively. 10 System connection DVD player (NV-701 only) The VIDEO 2 jacks can be used . ÷ Never bend or bundle up the optical-fiber cable. (NV-701 only) When using the DIGITAL OPT. (optical) jacks...
... optical-fiber cable. ÷ If digital connections are making analog connections from a DVD player that only features right and left channel stereo output, make connections to the corresponding AUDIO - DIGITAL VIDEO 1 COAX. IN VIDEO 2 OPT. VIDEO 2/6 CH INPUT jacks. OUT Cap ÷ Insert the optical-fiber cable straight into the jack. VIDEO 2/6 CH INPUT FRONT R and L jacks respectively. 10 System connection DVD player (NV-701 only) The VIDEO 2 jacks can be used . ÷ Never bend or bundle up the optical-fiber cable. (NV-701 only) When using the DIGITAL OPT. (optical) jacks...

User Manual
Page 12
... components connected to the VIDEO 1 and VIDEO 2 related jacks on and off . ! (ON/STANDBY) key ¢ (POWER) key (For U.S.A.) Press to load or remove a tape. When the TUNER input is selected, these keys are used to rotate the disc tray when loading CDs onto the disc tray. # OPEN/CLOSE (0) key § The disc tray is set, the timer icon and the timer reservation setting mode appear in STANDBY. Press to switch the MULTI CONTROL setting mode on the rear panel. ^ Disc tray § Three discs...
... components connected to the VIDEO 1 and VIDEO 2 related jacks on and off . ! (ON/STANDBY) key ¢ (POWER) key (For U.S.A.) Press to load or remove a tape. When the TUNER input is selected, these keys are used to rotate the disc tray when loading CDs onto the disc tray. # OPEN/CLOSE (0) key § The disc tray is set, the timer icon and the timer reservation setting mode appear in STANDBY. Press to switch the MULTI CONTROL setting mode on the rear panel. ^ Disc tray § Three discs...

User Manual
Page 13
... BASS: The bass is selected. Preparation section 1 CD player indicators Indicate which disc trays contain discs, which disc is currently selected as well as play /record status, the reverse mode, the tape playback direction, and whether Dolby NR (noise reduction) is selected. A.SOUND: The audio signal format from a connected component is automatically selected. 5 Sound mode indicators The following indicators light for stereo output. PGM: Program playback is being performed. Controls and indicators 13 Display The displays...
... BASS: The bass is selected. Preparation section 1 CD player indicators Indicate which disc trays contain discs, which disc is currently selected as well as play /record status, the reverse mode, the tape playback direction, and whether Dolby NR (noise reduction) is selected. A.SOUND: The audio signal format from a connected component is automatically selected. 5 Sound mode indicators The following indicators light for stereo output. PGM: Program playback is being performed. Controls and indicators 13 Display The displays...

User Manual
Page 14
... a CD. ™ VOLUME keys ¢ Use to tune in a station. 6 TIME DISP. TEXT DISP. Preparation section DISC 1 1 4 7 0 DISC 2 2 5 8 +10 POWER DISC 3 CD 3 TUNER/BAND 6 TAPE 9 MD/DVD MENU DISC SKIP MULTI CONTROL P.CALL AUTO BACK SET ENTER TUNING TIME DISP. EX.BASS SLEEP TIMER REPEAT RANDOM MUTE VOLUME TIME DISP. When the TUNER input is selected, press to select automatic tuning. 4 BACK key * Press in a CD TEXT disc. and Europe) w The display contents are switched during audio playback. ) RANDOM key q For CD playback, switching is...
... a CD. ™ VOLUME keys ¢ Use to tune in a station. 6 TIME DISP. TEXT DISP. Preparation section DISC 1 1 4 7 0 DISC 2 2 5 8 +10 POWER DISC 3 CD 3 TUNER/BAND 6 TAPE 9 MD/DVD MENU DISC SKIP MULTI CONTROL P.CALL AUTO BACK SET ENTER TUNING TIME DISP. EX.BASS SLEEP TIMER REPEAT RANDOM MUTE VOLUME TIME DISP. When the TUNER input is selected, press to select automatic tuning. 4 BACK key * Press in a CD TEXT disc. and Europe) w The display contents are switched during audio playback. ) RANDOM key q For CD playback, switching is...

User Manual
Page 15
... on and off . Use to display the title menu when controlling a DVD player. [QUIT] Use to quit operation of your other components" Y Preparation section INPUT SEL. and Europe) e This is CD or TUNER. [Numeric keys] Use to enter numbers for a station. DISC 1 TV SEL./TITLE DISC 2 QUIT DISC 3 POWER CD 1 2 3 TUNER/BAND 4 5 6 TAPE 7 8 9 VIDEO/6chIN 0 +10 MENU POWER TV VCR CD-R DISC SKIP MULTI CONTROL P.CALL BACK CD OSD RETURN SETUP SET ENTER TUNING AUTO DVD CD-R TIME DISP. Controls and indicators 15 Remote control unit (RC-NV701 / RC...
... on and off . Use to display the title menu when controlling a DVD player. [QUIT] Use to quit operation of your other components" Y Preparation section INPUT SEL. and Europe) e This is CD or TUNER. [Numeric keys] Use to enter numbers for a station. DISC 1 TV SEL./TITLE DISC 2 QUIT DISC 3 POWER CD 1 2 3 TUNER/BAND 4 5 6 TAPE 7 8 9 VIDEO/6chIN 0 +10 MENU POWER TV VCR CD-R DISC SKIP MULTI CONTROL P.CALL BACK CD OSD RETURN SETUP SET ENTER TUNING AUTO DVD CD-R TIME DISP. Controls and indicators 15 Remote control unit (RC-NV701 / RC...

User Manual
Page 19
... 5 seconds) 8:45 AM 8:45 (For U.K. ENTER To display the time (In standby mode or when the MD/DVD (NV-301 only) or VIDEO/6ch IN (NV-701 only) input is entered and the minute display starts to set the time again. In this case, set the correct time before using the timer functions. "Sleep Timer" "Adjust Time" "Timer Play" "Auto Power Save" Example: Setting the time to blink. ÷ Press the SET key. and Europe) (Other countries) 00Ô...
... 5 seconds) 8:45 AM 8:45 (For U.K. ENTER To display the time (In standby mode or when the MD/DVD (NV-301 only) or VIDEO/6ch IN (NV-701 only) input is entered and the minute display starts to set the time again. In this case, set the correct time before using the timer functions. "Sleep Timer" "Adjust Time" "Timer Play" "Auto Power Save" Example: Setting the time to blink. ÷ Press the SET key. and Europe) (Other countries) 00Ô...
User Manual
Page 20
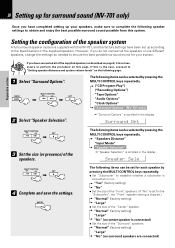
.... ("CD Program Play") ("Recording Options") "Tape Options" "Audio Options" "Clock Options" "Surround Options" (NV-701 only) 2 Select "Speaker Selection". +"Surround Options" is scrolled in the display Speaker Sele The following speaker settings to the specifications of the supplied speakers. 20 Setting up for the "Subwoofer", the "Front" speaker setting is skipped.) "Normal" (factory setting) "Large" ÷ Set the size of the "Center" speaker. Preparation section Setting the configuration of the speaker system A full surround speaker system is supplied with the NV-701, and the factory...
.... ("CD Program Play") ("Recording Options") "Tape Options" "Audio Options" "Clock Options" "Surround Options" (NV-701 only) 2 Select "Speaker Selection". +"Surround Options" is scrolled in the display Speaker Sele The following speaker settings to the specifications of the supplied speakers. 20 Setting up for the "Subwoofer", the "Front" speaker setting is skipped.) "Normal" (factory setting) "Large" ÷ Set the size of the "Center" speaker. Preparation section Setting the configuration of the speaker system A full surround speaker system is supplied with the NV-701, and the factory...
User Manual
Page 23
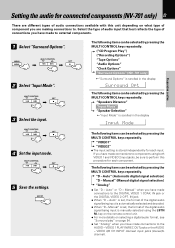
... display Surround Opt The following items can be selected by pressing the MULTI CONTROL keys repeatedly. key on the remote control unit. ÷ For more details on selecting a digital audio format, see "Surround play" on what type of connections you are different types of audio connections available with this procedure for each component. MENU DEMO MULTI CONTROL SET 2 Select "Input Mode". "VIDEO1" "VIDEO2" ÷ The input setting is manually selected using both VIDEO 1 and VIDEO 2 input jacks...
... display Surround Opt The following items can be selected by pressing the MULTI CONTROL keys repeatedly. key on the remote control unit. ÷ For more details on selecting a digital audio format, see "Surround play" on what type of connections you are different types of audio connections available with this procedure for each component. MENU DEMO MULTI CONTROL SET 2 Select "Input Mode". "VIDEO1" "VIDEO2" ÷ The input setting is manually selected using both VIDEO 1 and VIDEO 2 input jacks...

User Manual
Page 25
... the volume is switched off at factory settings. Reproducing sound with enhanced bass (Exbass) (Remote control unit only) (NV-301 only) EX.BASS Lights BASS ÷ Each press switches Exbass Mode on and off alternately. ÷ The Exbass Mode is controlled. To select another input source from the remote control unit. While the unit is in the standby mode, it can also be turned ON from VIDEO2 (digital or 2-channel analog), press and hold VIDEO/ 6ch...
... the volume is switched off at factory settings. Reproducing sound with enhanced bass (Exbass) (Remote control unit only) (NV-301 only) EX.BASS Lights BASS ÷ Each press switches Exbass Mode on and off alternately. ÷ The Exbass Mode is controlled. To select another input source from the remote control unit. While the unit is in the standby mode, it can also be turned ON from VIDEO2 (digital or 2-channel analog), press and hold VIDEO/ 6ch...

User Manual
Page 49
... Mode" manual recording is selected, the tape player starts recording when the ÷ (record) key is pressed. MENU DEMO MULTI CONTROL SET 3 Select "Digital Rec Mode". corded. MULTI CONTROL SET 4 Select the recording mode. "CD Program Play" "Recording Options" "Tape Options" "Audio Options" "Clock Options" "Surround Setup" (NV-701 only) +"Recording Options" is scrolled in the display Digital REC The following items can be selected by pressing the MULTI CONTROL keys repeatedly. "A-Rec Mode" "M-Rec Mode" +"Press "ENTER" to the sound...
... Mode" manual recording is selected, the tape player starts recording when the ÷ (record) key is pressed. MENU DEMO MULTI CONTROL SET 3 Select "Digital Rec Mode". corded. MULTI CONTROL SET 4 Select the recording mode. "CD Program Play" "Recording Options" "Tape Options" "Audio Options" "Clock Options" "Surround Setup" (NV-701 only) +"Recording Options" is scrolled in the display Digital REC The following items can be selected by pressing the MULTI CONTROL keys repeatedly. "A-Rec Mode" "M-Rec Mode" +"Press "ENTER" to the sound...
User Manual
Page 56
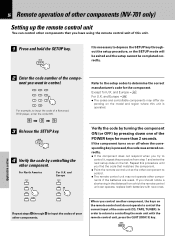
... Remote operation of other components (NV-701 only) Setting up the remote control unit You can operate, replace both batteries with the remote control unit, press the QUIT (DISC 3) key. and Europe ´ For U.K. pending on the model and region where this unit is necessary to depress the SETUP key throughout the setup procedure, or the SETUP mode will be exited and the setup cannot be completed correctly. 2 Enter the code number...
... Remote operation of other components (NV-701 only) Setting up the remote control unit You can operate, replace both batteries with the remote control unit, press the QUIT (DISC 3) key. and Europe ´ For U.K. pending on the model and region where this unit is necessary to depress the SETUP key throughout the setup procedure, or the SETUP mode will be exited and the setup cannot be completed correctly. 2 Enter the code number...

User Manual
Page 59
... steps. Timer programming Timer playback : Plays (or receives) the selected source during a set the sleep time by pressing the MULTI CONTROL keys repeatedly. Use AI timer playback to standby mode (or OFF) or select "Sleep off "Ô10Ô20... ÷ The displayed time changes in the stop mode. ( Sleep timer Set the number of minutes after a specified time period has elapsed. Check that can also set time range. MULTI CONTROL SET 3 Set the time. "Sleep Timer" Lights "Adjust Time" "Timer Play" "Auto Power Save...
... steps. Timer programming Timer playback : Plays (or receives) the selected source during a set the sleep time by pressing the MULTI CONTROL keys repeatedly. Use AI timer playback to standby mode (or OFF) or select "Sleep off "Ô10Ô20... ÷ The displayed time changes in the stop mode. ( Sleep timer Set the number of minutes after a specified time period has elapsed. Check that can also set time range. MULTI CONTROL SET 3 Set the time. "Sleep Timer" Lights "Adjust Time" "Timer Play" "Auto Power Save...

User Manual
Page 60
... Make preparations for each timer program. ing. › Application section 2 Adjust the listening volume. 3 Select the timer operation. Once the time range and content of an input source, the speakers do not output the audio even after the unit is used for timer recording of a timer program has been set either timer playback or timer recording. MULTI CONTROL SET "Sleep Timer" "Adjust Time" "Timer Play" "Auto Power Save" ÷ When the timer function is turned on by the timer. Set the clock before setting the timer...
... Make preparations for each timer program. ing. › Application section 2 Adjust the listening volume. 3 Select the timer operation. Once the time range and content of an input source, the speakers do not output the audio even after the unit is used for timer recording of a timer program has been set either timer playback or timer recording. MULTI CONTROL SET "Sleep Timer" "Adjust Time" "Timer Play" "Auto Power Save" ÷ When the timer function is turned on by the timer. Set the clock before setting the timer...

User Manual
Page 65
... power left ON, and restart the operation after power plug is unplugged from power outlet Amplifier POWER status (ON or OFF) Input selection Volume control value Balance level Surround sound settings Tuner unit Receiving band Frequency Preset stations Program timer setting contents Cassette deck unit Transport direction Dolby Noise Reduction Reverse mode WARNING NOTICE: IN MOST CASES IT IS AN INFRINGEMENT OF COPYRIGHT TO MAKE COPIES OF TAPES OR DISCS WITHOUT THE PERMISSION OF THE COPYRIGHT OWNERS...
... power left ON, and restart the operation after power plug is unplugged from power outlet Amplifier POWER status (ON or OFF) Input selection Volume control value Balance level Surround sound settings Tuner unit Receiving band Frequency Preset stations Program timer setting contents Cassette deck unit Transport direction Dolby Noise Reduction Reverse mode WARNING NOTICE: IN MOST CASES IT IS AN INFRINGEMENT OF COPYRIGHT TO MAKE COPIES OF TAPES OR DISCS WITHOUT THE PERMISSION OF THE COPYRIGHT OWNERS...

User Manual
Page 67
... station to be set condition. indicators blink alternately circuit problem and turn the power and no sound is not tuned. ÷ Connect antennas. 5 ÷ Select a band. ⁄ ÷ Tune to ( "Clock adjustment". ÷ Check the timer program and set properly. ÷ Adjust the present time referring to the frequency of your trouble. The clock display blinks. ÷ There was a power failure. ÷ Adjust the present time again. ÷ The power cord was a power failure. ÷ The timer program or the timer...
... station to be set condition. indicators blink alternately circuit problem and turn the power and no sound is not tuned. ÷ Connect antennas. 5 ÷ Select a band. ⁄ ÷ Tune to ( "Clock adjustment". ÷ Check the timer program and set properly. ÷ Adjust the present time referring to the frequency of your trouble. The clock display blinks. ÷ There was a power failure. ÷ Adjust the present time again. ÷ The power cord was a power failure. ÷ The timer program or the timer...


