
Instruction Manual
Page 1
...KENWOOD dealer for specific region areas. Refer to the model and serial numbers whenever you obtain the best performance from your new Television with DVD receiver. Model KVT-911DVD Serial number © PRINTED IN JAPAN B64-2253-00/01 (K)(DT) TELEVISION WITH DVD RECEIVER KVT-911DVD INSTRUCTION MANUAL This player... below. It cannot play back the DVD software which it has been designed. COMPACT COMPACT DIGITAL AUDIO DIGITAL VIDEO TEXT Take the time to read through this instruction manual. Familiarity with installation and operation procedures will help you call...
...KENWOOD dealer for specific region areas. Refer to the model and serial numbers whenever you obtain the best performance from your new Television with DVD receiver. Model KVT-911DVD Serial number © PRINTED IN JAPAN B64-2253-00/01 (K)(DT) TELEVISION WITH DVD RECEIVER KVT-911DVD INSTRUCTION MANUAL This player... below. It cannot play back the DVD software which it has been designed. COMPACT COMPACT DIGITAL AUDIO DIGITAL VIDEO TEXT Take the time to read through this instruction manual. Familiarity with installation and operation procedures will help you call...

Instruction Manual
Page 3
...Display for Discs •To Scroll Manually •Selecting the Time Display for CDs •Switching to the Name Set Screen •Magazine Random Play Function •...Quality Factor •Adjusting the Gain •Setting the Speaker Type •Recalling the Kenwood Preset Sound •Storing Your Sound Settings •Returning to the Sound Effect Menu...;Returning to the Source Control Screen Remote Control Function 54 Installation Accessories 56 Installation Procedure 57 Connection 58 Installation 62 Troubleshooting Guide 65 Specifications 68 The illustrations of the illustrations...
...Display for Discs •To Scroll Manually •Selecting the Time Display for CDs •Switching to the Name Set Screen •Magazine Random Play Function •...Quality Factor •Adjusting the Gain •Setting the Speaker Type •Recalling the Kenwood Preset Sound •Storing Your Sound Settings •Returning to the Sound Effect Menu...;Returning to the Source Control Screen Remote Control Function 54 Installation Accessories 56 Installation Procedure 57 Connection 58 Installation 62 Troubleshooting Guide 65 Specifications 68 The illustrations of the illustrations...

Instruction Manual
Page 4
... CFR 1040. 10, CHAPTER 1, SUBCHAPTER J. The user could lose the authority to operate this equipment may fly out of place during installation, consult your Kenwood dealer. • If the unit does not seem to be dangerous to your health or even fatal. The use a new one .... 2 WARNING To prevent injury and/or fire, take the 4 following precautions: • Ensure that does not solve the problem, consult your Kenwood dealer. Normal brightness will become darker than those specified herein may cause your unit to malfunction. • To prevent short circuits when replacing a ...
... CFR 1040. 10, CHAPTER 1, SUBCHAPTER J. The user could lose the authority to operate this equipment may fly out of place during installation, consult your Kenwood dealer. • If the unit does not seem to be dangerous to your health or even fatal. The use a new one .... 2 WARNING To prevent injury and/or fire, take the 4 following precautions: • Ensure that does not solve the problem, consult your Kenwood dealer. Normal brightness will become darker than those specified herein may cause your unit to malfunction. • To prevent short circuits when replacing a ...

Instruction Manual
Page 56
Installation Accessories A K B L C M D N E O F G H WICTAHR BDOIOVSETRESRITY O BOFF OSTON CX-AAN3T3E0NNA P WICTAHR BDOIOVSETRESRITY O BOFF OSTON CX-AAN3T3E0NNA I Q J R 2CAUTION The use the accessories shipped with the unit, as shown above. 56 Make sure only to use of any accessories except for those provided might result in damage to the unit.
Installation Accessories A K B L C M D N E O F G H WICTAHR BDOIOVSETRESRITY O BOFF OSTON CX-AAN3T3E0NNA P WICTAHR BDOIOVSETRESRITY O BOFF OSTON CX-AAN3T3E0NNA I Q J R 2CAUTION The use the accessories shipped with the unit, as shown above. 56 Make sure only to use of any accessories except for those provided might result in damage to the unit.

Instruction Manual
Page 57
...2 Cable clamp 3 1 Detection wire 4 Press down using pliers until the conductive metal is 30° or less. • Do not install the receiver unit under the carpet. Connect the wiring harness wires in your car's ignition does not come with an ACC position, connect the... may be turned on the car are working properly. • Insulate unconnected wires with the plastic surface. 5 Lock the lid. Installation Procedure 1. Please avoid installation on the car or anything else conducting electricity. If you connect the ignition wire to the unit. 5. Using the Relay Connector (...
...2 Cable clamp 3 1 Detection wire 4 Press down using pliers until the conductive metal is 30° or less. • Do not install the receiver unit under the carpet. Connect the wiring harness wires in your car's ignition does not come with an ACC position, connect the... may be turned on the car are working properly. • Insulate unconnected wires with the plastic surface. 5 Lock the lid. Installation Procedure 1. Please avoid installation on the car or anything else conducting electricity. If you connect the ignition wire to the unit. 5. Using the Relay Connector (...
Instruction Manual
Page 58
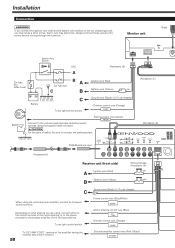
... (ground), you connect the ignition wire (red) and the battery wire (yellow) to the power terminal for the booster amplifier of the film-type antenna. Installation Connection 2WARNING If you may cause a short circuit, that in turn may start a fire. Depending on what antenna you are using the optional power amplifier...
... (ground), you connect the ignition wire (red) and the battery wire (yellow) to the power terminal for the booster amplifier of the film-type antenna. Installation Connection 2WARNING If you may cause a short circuit, that in turn may start a fire. Depending on what antenna you are using the optional power amplifier...

Instruction Manual
Page 60
... the monitor unit TO NAV.I/F TO ANTENNA TO MONITOR TO 5L I/F TO MZ-BUS To the monitor unit MZ-BUS Changer 5L Changer/Player ]"N" O - Installation Connection for AV Equipments Audio/Visual input 1 • Visual input (Yellow) • Audio left input (White) • Audio right input (Red) FM /AM TO MONITOR ...
... the monitor unit TO NAV.I/F TO ANTENNA TO MONITOR TO 5L I/F TO MZ-BUS To the monitor unit MZ-BUS Changer 5L Changer/Player ]"N" O - Installation Connection for AV Equipments Audio/Visual input 1 • Visual input (Yellow) • Audio left input (White) • Audio right input (Red) FM /AM TO MONITOR ...

Instruction Manual
Page 62
... optical cable may malfunction. Installation brackets (Accessory M) Sems bolts (M4 × 8 mm) (Accessory N 62 T N N T T/N T: Toyota cars N: Nissan cars K ø5mm 6 mm MAX. If the unit is used with excessive force during the installations. When installing the DVD player unit on the vehicle, ...ensure that the unit is not stuck between the DVD player unit and vehicle parts. ■ Installing in Japanese-Made Cars 1 Refer to the section "Removing the...
... optical cable may malfunction. Installation brackets (Accessory M) Sems bolts (M4 × 8 mm) (Accessory N 62 T N N T T/N T: Toyota cars N: Nissan cars K ø5mm 6 mm MAX. If the unit is used with excessive force during the installations. When installing the DVD player unit on the vehicle, ...ensure that the unit is not stuck between the DVD player unit and vehicle parts. ■ Installing in Japanese-Made Cars 1 Refer to the section "Removing the...

Instruction Manual
Page 64
... rear window using the supplied clampers. 4 After attaching the antenna with the clamper bar Rear window (Accessory R) Rear seat 64 Carefully check the installation location as the tape can not only weaken the adhesive strength of the double-sided tape, but may obstruct the field of the double-sided...dry. 2 CAUTION Clean the glass thoroughly as failure to clean the glass can only be attached.Clean off any grease or dirt from the installation location using the supplied glass cleaner (Accessory Q), clean the area with high humidity or when it to receiver unit. Take care not to apply...
... rear window using the supplied clampers. 4 After attaching the antenna with the clamper bar Rear window (Accessory R) Rear seat 64 Carefully check the installation location as the tape can not only weaken the adhesive strength of the double-sided tape, but may obstruct the field of the double-sided...dry. 2 CAUTION Clean the glass thoroughly as failure to clean the glass can only be attached.Clean off any grease or dirt from the installation location using the supplied glass cleaner (Accessory Q), clean the area with high humidity or when it to receiver unit. Take care not to apply...

Instruction Manual
Page 68
...RGB) Effective pixels 99.99% Pixel arrangement RGB striped arrangement Back lighting Cold cathode tube DVD Player Section D/A conversion 1 Bit Wow and flutter Below measurable limit Frequency response (Sampling frequency; ... kHz) Signal to noise ratio 115 dB Dynamic range 95 dB Playable disc DVD-VIDEO/VIDEO-CD/CD-DA Sampling frequency 8 fs(44.1, 48 kHz)/4 fs(96 kHz) Optical...Monitor unit 180(W) × 50(H) × 185(D) mm 7-1/16(W) × 1-15/16(H) × 5/16(D) inch Installation size(Monitor unit 178(W) × 50(H) × 165(D) mm 7(W) × 1-15/16(H) × 6-1/2(D) inch (...
...RGB) Effective pixels 99.99% Pixel arrangement RGB striped arrangement Back lighting Cold cathode tube DVD Player Section D/A conversion 1 Bit Wow and flutter Below measurable limit Frequency response (Sampling frequency; ... kHz) Signal to noise ratio 115 dB Dynamic range 95 dB Playable disc DVD-VIDEO/VIDEO-CD/CD-DA Sampling frequency 8 fs(44.1, 48 kHz)/4 fs(96 kHz) Optical...Monitor unit 180(W) × 50(H) × 185(D) mm 7-1/16(W) × 1-15/16(H) × 5/16(D) inch Installation size(Monitor unit 178(W) × 50(H) × 165(D) mm 7(W) × 1-15/16(H) × 6-1/2(D) inch (...


