
Instruction Manual
Page 1
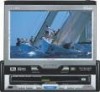
... IN JAPAN B64-2253-00/01 (K)(DT) It cannot play back the DVD software which has been encoded for which it has been designed. Refer to read through this instruction manual. For your KENWOOD dealer for information or service on the warranty card, and in the spaces... designated on the product. TELEVISION WITH DVD RECEIVER KVT-911DVD INSTRUCTION MANUAL This player has been designed to play back the DVD software encoded for other region areas...
... IN JAPAN B64-2253-00/01 (K)(DT) It cannot play back the DVD software which has been encoded for which it has been designed. Refer to read through this instruction manual. For your KENWOOD dealer for information or service on the warranty card, and in the spaces... designated on the product. TELEVISION WITH DVD RECEIVER KVT-911DVD INSTRUCTION MANUAL This player has been designed to play back the DVD software encoded for other region areas...

Instruction Manual
Page 2
...Sensor Box Screen Clock Adjustment Function 14 •Turning the Automatic Time Adjustment On/Off •Adjusting the Time Manually •Setting the Minutes to "00" DVD,VCD Setup Function 16 •Setting the Screen Mode •Setting the Priority Language for Menu •Setting ...8226;Viewing Zoom •Canceling the Menu Screen •Next Play/ Previous Play •Tracks Search •Displaying the Information DVD/VCD/CD Control Function 34 DVD(/VCD) Control Screen 34 •Forward /Reverse Search Disc Play •Chapters/Tracks Search •Slow playback •Pausing and...
...Sensor Box Screen Clock Adjustment Function 14 •Turning the Automatic Time Adjustment On/Off •Adjusting the Time Manually •Setting the Minutes to "00" DVD,VCD Setup Function 16 •Setting the Screen Mode •Setting the Priority Language for Menu •Setting ...8226;Viewing Zoom •Canceling the Menu Screen •Next Play/ Previous Play •Tracks Search •Displaying the Information DVD/VCD/CD Control Function 34 DVD(/VCD) Control Screen 34 •Forward /Reverse Search Disc Play •Chapters/Tracks Search •Slow playback •Pausing and...

Instruction Manual
Page 3
... Repeat Function •Magazine Random Play Function •Selecting the Name or Title Display for Discs •To Scroll Manually •Selecting the Time Display for CDs •Switching to the Name Set Screen •Magazine Random Play Function •Switching to the Disc List Screen ...8226;Adjusting the Center Frequency •Adjusting the Quality Factor •Adjusting the Gain •Setting the Speaker Type •Recalling the Kenwood Preset Sound •Storing Your Sound Settings •Returning to the Sound Effect Menu Screen Quick Effect Screen 53 •Adjusting the ...
... Repeat Function •Magazine Random Play Function •Selecting the Name or Title Display for Discs •To Scroll Manually •Selecting the Time Display for CDs •Switching to the Name Set Screen •Magazine Random Play Function •Switching to the Disc List Screen ...8226;Adjusting the Center Frequency •Adjusting the Quality Factor •Adjusting the Gain •Setting the Speaker Type •Recalling the Kenwood Preset Sound •Storing Your Sound Settings •Returning to the Sound Effect Menu Screen Quick Effect Screen 53 •Adjusting the ...

Instruction Manual
Page 4
...Loading and Replacing the Batteries for the Remote 2 CAUTION Do not set the remote on a circuit different from the LCD contacts your Kenwood dealer. • Do not touch the liquid crystal fluid if the LCD is not installed and used in accordance with the instructions....video pictures whilst the vehicle is moving. NOTE • The provided batteries are expressly approved in the instruction manual. KENWOOD CORPORATION 2967-3, ISHIKAWA-CHO, HACHIOJI-SHI TOKYO, JAPAN KENWOOD CORP. The liquid crystal fluid may be working right, try to correct the interference by one with the ...
...Loading and Replacing the Batteries for the Remote 2 CAUTION Do not set the remote on a circuit different from the LCD contacts your Kenwood dealer. • Do not touch the liquid crystal fluid if the LCD is not installed and used in accordance with the instructions....video pictures whilst the vehicle is moving. NOTE • The provided batteries are expressly approved in the instruction manual. KENWOOD CORPORATION 2967-3, ISHIKAWA-CHO, HACHIOJI-SHI TOKYO, JAPAN KENWOOD CORP. The liquid crystal fluid may be working right, try to correct the interference by one with the ...
Instruction Manual
Page 5
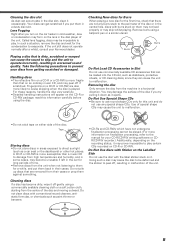
...handling instructions will appear on the CD-R or CD-RW package: read this unit and do not use commercially available CD accessories that is more information on finalization processing, refer to the manual for the first time, check that on them against something. • CD-Rs and CD-RWs which have not undergone finalization... or may form on the lens in the disc player of the disc if you turn on the Labelled Side Do not use round shape CDs only for a while, and put them in the car for the condensation to prevent your Kenwood dealer. Using such a disc may cause the unit...
...handling instructions will appear on the CD-R or CD-RW package: read this unit and do not use commercially available CD accessories that is more information on finalization processing, refer to the manual for the first time, check that on them against something. • CD-Rs and CD-RWs which have not undergone finalization... or may form on the lens in the disc player of the disc if you turn on the Labelled Side Do not use round shape CDs only for a while, and put them in the car for the condensation to prevent your Kenwood dealer. Using such a disc may cause the unit...

Instruction Manual
Page 10
...to the TV (or video) control screen. D Source Icon change When there are switched in DVD/VCD/CD player control screen. : Switching to the external CD player control screen. : Switching to the disc(CD) changer control screen. : Switching to the disc(MD) changer control screen. : Switching to... the weather band tuner control screen. : Switching to the DAB tuner control screen. (Refer to the DAB tuner's instruction manual for DAB...
...to the TV (or video) control screen. D Source Icon change When there are switched in DVD/VCD/CD player control screen. : Switching to the external CD player control screen. : Switching to the disc(CD) changer control screen. : Switching to the disc(MD) changer control screen. : Switching to... the weather band tuner control screen. : Switching to the DAB tuner control screen. (Refer to the DAB tuner's instruction manual for DAB...

Instruction Manual
Page 11
... Security Screen. D Canceling the System Setup Screen Touch this icon to return to switch the DAB Tuner Setup Screen. NOTE Cannot be operated while the DVD/VCD is not displayed. Setup Menu Function Setup Screen A B C H D E F G A Selecting to the DAB Tuner Setup Screen Touch [ DAB ] to the menu...Selecting to the Touch Panel Adjustment Screen Touch [ Touch ] to switch to the DAB tuner's instruction manual for DAB tuner controls. NOTE If there is only one setup page it from the DVD/VCD control screen (page 34) in stop state. NOTE Refer to the Touch Panel Adjustment Screen. ...
... Security Screen. D Canceling the System Setup Screen Touch this icon to return to switch the DAB Tuner Setup Screen. NOTE Cannot be operated while the DVD/VCD is not displayed. Setup Menu Function Setup Screen A B C H D E F G A Selecting to the DAB Tuner Setup Screen Touch [ DAB ] to the menu...Selecting to the Touch Panel Adjustment Screen Touch [ Touch ] to switch to the DAB tuner's instruction manual for DAB tuner controls. NOTE If there is only one setup page it from the DVD/VCD control screen (page 34) in stop state. NOTE Refer to the Touch Panel Adjustment Screen. ...
Instruction Manual
Page 13
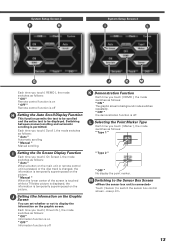
... and the entire text to switch the sensor box control screen. 13 Each time you touch [ Scroll ], the mode switches as follows: " Auto " Automatic scrolling " Manual " Manual scrolling I L G J K M Each time you touch [ Marker ], the mode switches as follows: " Type 1 " " Type 2 " " OFF " No ... Demonstration Function Each time you touch [ On Screen ], the mode switches as follows: " Auto " When a button on the picture. " Manual " When the lower center of the screen is touched whilst a TV/video picture is displayed, the information is permitted. L Selecting the Point Marker...
... and the entire text to switch the sensor box control screen. 13 Each time you touch [ Scroll ], the mode switches as follows: " Auto " Automatic scrolling " Manual " Manual scrolling I L G J K M Each time you touch [ Marker ], the mode switches as follows: " Type 1 " " Type 2 " " OFF " No ... Demonstration Function Each time you touch [ On Screen ], the mode switches as follows: " Auto " When a button on the picture. " Manual " When the lower center of the screen is touched whilst a TV/video picture is displayed, the information is permitted. L Selecting the Point Marker...

Instruction Manual
Page 14
... for 3 or 4 minutes The time adjusts automatically to the correct local time " OFF " Manual adjusting NOTE The time is not adjusted when the RDS station you can also set the time manually if the automatic time adjustment function is set the minutes to "00". Touch [ ∞ ... switch the function on and off . " ON " Tune into an RDS station for several minutes). Touch [ 5 ] to advance the hours. A Adjusting the Time Manually C Setting the Minutes to "00" Touch [ RESET ] to set to "ON". 14 Clock Adjustment Function Clock Adjustment Screen A B C B Turning the Automatic Time ...
... for 3 or 4 minutes The time adjusts automatically to the correct local time " OFF " Manual adjusting NOTE The time is not adjusted when the RDS station you can also set the time manually if the automatic time adjustment function is set the minutes to "00". Touch [ ∞ ... switch the function on and off . " ON " Tune into an RDS station for several minutes). Touch [ 5 ] to advance the hours. A Adjusting the Time Manually C Setting the Minutes to "00" Touch [ RESET ] to set to "ON". 14 Clock Adjustment Function Clock Adjustment Screen A B C B Turning the Automatic Time ...

Instruction Manual
Page 25
Manual Seek Mode (MANU) • Touch the right side part to increase the channel by one step. • Touch the left side part to display the ...
Manual Seek Mode (MANU) • Touch the right side part to increase the channel by one step. • Touch the left side part to display the ...

Instruction Manual
Page 26
...store all the channels on which you touch [ SEEK ], the mode switches as follows: ▼ AUTO 1: ▼ AUTO 2: ▼ MANU: Auto Seek Preset Station Seek Manual Seek C Selecting the Channels Auto Seek Mode (AUTO1) • Touch [ ¢ ] to seek for channels down preset channel number [ P1 ] - [ P6 ] ...seconds to switch to the last preset station . Up to 6 channels can choose from three seek modes: auto seek, preset station seek, and manual seek. When all the receivable channels in the preset memory, the auto memory entry stops. F Switching to the TV List Screen Touch [ LIST...
...store all the channels on which you touch [ SEEK ], the mode switches as follows: ▼ AUTO 1: ▼ AUTO 2: ▼ MANU: Auto Seek Preset Station Seek Manual Seek C Selecting the Channels Auto Seek Mode (AUTO1) • Touch [ ¢ ] to seek for channels down preset channel number [ P1 ] - [ P6 ] ...seconds to switch to the last preset station . Up to 6 channels can choose from three seek modes: auto seek, preset station seek, and manual seek. When all the receivable channels in the preset memory, the auto memory entry stops. F Switching to the TV List Screen Touch [ LIST...

Instruction Manual
Page 28
... being listened to switch the PTY search screen. (Page 31) NOTE This function can choose from three seek modes: auto seek, preset station seek, and manual seek. J Recalling a Preset Station Touch the preset station number [ 1 ] - [ 6 ] for two seconds or more. C Selecting the AM Band Touch [ AM ] ... ¢ ] to move to the next preset station. • Touch [ 4 ] to move to select the FM band. FM/AM Tuner Control Function AB CD FM/AM Tuner Control Screen EF G Preset Band Radio-Text/Program Service name/SNPS Preset number Frequency HI J KL E Selecting the FM Bands Touch [ FM...
... being listened to switch the PTY search screen. (Page 31) NOTE This function can choose from three seek modes: auto seek, preset station seek, and manual seek. J Recalling a Preset Station Touch the preset station number [ 1 ] - [ 6 ] for two seconds or more. C Selecting the AM Band Touch [ AM ] ... ¢ ] to move to the next preset station. • Touch [ 4 ] to move to select the FM band. FM/AM Tuner Control Function AB CD FM/AM Tuner Control Screen EF G Preset Band Radio-Text/Program Service name/SNPS Preset number Frequency HI J KL E Selecting the FM Bands Touch [ FM...

Instruction Manual
Page 29
M NO FM/AM List Screen CD E P L B Turning CRSC On/Off Temporarily have reception switched from stereo to mono to reduce multi-path noise when listening to the list switches between the ...) about switching between the FM1, FM2, FM3 and AM bands. O Switching the SNPS and PS Name Each time you touch [ ] or [ ] , the list switches between manual scrolling and automatic scrolling. P Recalling a Preset Station Touch the preset station number [ 1 ] - [ 6 ] for at least two seconds to switch to the name set . The scrolling...
M NO FM/AM List Screen CD E P L B Turning CRSC On/Off Temporarily have reception switched from stereo to mono to reduce multi-path noise when listening to the list switches between the ...) about switching between the FM1, FM2, FM3 and AM bands. O Switching the SNPS and PS Name Each time you touch [ ] or [ ] , the list switches between manual scrolling and automatic scrolling. P Recalling a Preset Station Touch the preset station number [ 1 ] - [ 6 ] for at least two seconds to switch to the name set . The scrolling...
Instruction Manual
Page 36
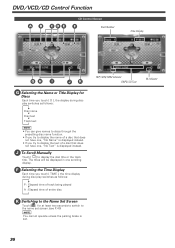
DVD/VCD/CD Control Function AB CDE CD Control Screen F Track Number Time ...Display GH I JK G Selecting the Name or Title Display for Discs Each time you touch [ D ], the display during disc play switches as follows: ▼ P : Elapsed time of track being played ▼ A : Elapsed time of a disc that does not have one scrolling display. J To Scroll Manually...switch to display the disc title or the track title. REP/ SCN/ RDM indicator DNPS/ CD Text IN indicator 36 F Selecting the Time Display Each time you touch [ TIME ], the...
DVD/VCD/CD Control Function AB CDE CD Control Screen F Track Number Time ...Display GH I JK G Selecting the Name or Title Display for Discs Each time you touch [ D ], the display during disc play switches as follows: ▼ P : Elapsed time of track being played ▼ A : Elapsed time of a disc that does not have one scrolling display. J To Scroll Manually...switch to display the disc title or the track title. REP/ SCN/ RDM indicator DNPS/ CD Text IN indicator 36 F Selecting the Time Display Each time you touch [ TIME ], the...

Instruction Manual
Page 38
... a disc changer until you reach the one that you eject the disc. •The 3+1MD changer cannot be operated when 4 discs are inserted. H To Scroll Manually Touch [ ] to display the desired disc number. Making a Forward Disc Search Touch [ D + ] to display the desired disc number. Each time [ D - ]... selected. NOTE • Random play function is turned on and off . NOTE • Repeat play switches as follows: ▼ Disc name (DNPS: CD only) ▼ Disc title/text ▼ Track title/text NOTE • You can give names to discs through the discs in random order. 1 ...
... a disc changer until you reach the one that you eject the disc. •The 3+1MD changer cannot be operated when 4 discs are inserted. H To Scroll Manually Touch [ ] to display the desired disc number. Making a Forward Disc Search Touch [ D + ] to display the desired disc number. Each time [ D - ]... selected. NOTE • Random play function is turned on and off . NOTE • Repeat play switches as follows: ▼ Disc name (DNPS: CD only) ▼ Disc title/text ▼ Track title/text NOTE • You can give names to discs through the discs in random order. 1 ...

Instruction Manual
Page 41
B Returning to the System setup Screen Touch [ RTN ] to return to decrease the channel by one step. B 41 Other Source Control Function Weather Band Tuner Control Screen Channel number A Frequency A Selecting the Channels • Touch [ ¢ ] to increase the channel by one step. • Touch [ 4 ] to the system setup screen. Sensor Box Control Screen A A Setting the Menu 1 Touch [ SET ] to switch the menu mode. 2 Touch [ % ] or [ fi ] to select the items. 3 Touch to set the function. 4 Touch [ SET ] to end menu mode.
B Returning to the System setup Screen Touch [ RTN ] to return to decrease the channel by one step. B 41 Other Source Control Function Weather Band Tuner Control Screen Channel number A Frequency A Selecting the Channels • Touch [ ¢ ] to increase the channel by one step. • Touch [ 4 ] to the system setup screen. Sensor Box Control Screen A A Setting the Menu 1 Touch [ SET ] to switch the menu mode. 2 Touch [ % ] or [ fi ] to select the items. 3 Touch to set the function. 4 Touch [ SET ] to end menu mode.

Instruction Manual
Page 44
... the Volume Offset Set the sound level of the external amplifier using the main unit. Each time you touch [ LOUD ] to the catalog or instruction manual for power amplifiers that can be controlled from this item when the DS-P900/P901 is connected. NOTE Refer to switch the function on the...
... the Volume Offset Set the sound level of the external amplifier using the main unit. Each time you touch [ LOUD ] to the catalog or instruction manual for power amplifiers that can be controlled from this item when the DS-P900/P901 is connected. NOTE Refer to switch the function on the...

Instruction Manual
Page 53
... Adjust the bass boost level of the Crossover Network/Delay time Touch [ 1 ] - [ 6 ] for the desired sound preset setting. NOTE Refer to the catalog or instruction manual for the desired parametric equalizer setting. Quick Effect Screen A B C D E F A Adjusting the Balance Levels • Each time you touch [ ], the sound in the left channel is...
... Adjust the bass boost level of the Crossover Network/Delay time Touch [ 1 ] - [ 6 ] for the desired sound preset setting. NOTE Refer to the catalog or instruction manual for the desired parametric equalizer setting. Quick Effect Screen A B C D E F A Adjusting the Balance Levels • Each time you touch [ ], the sound in the left channel is...

Instruction Manual
Page 54
... Press the [ ATT ] button to turn down . 3Selecting the Tuning Mode Each time you press the Joystick, the tuning mode switches to auto 1, auto 2 and manual. 3Switching the AV Output Mode Each time you press [ TOP MENU ] button to increase the volume. When Controlling the... DVD/VCD Switching to the TV position. Remote Control Function TV/DVD/AUD TV DVD AUD VOL STOP DIRECT ANGLE STOP DIRECT ENTER SRC RETURN ATT OPEN ANGLE MODE TOP MEMU TV/NAV MENU Joystick...
... Press the [ ATT ] button to turn down . 3Selecting the Tuning Mode Each time you press the Joystick, the tuning mode switches to auto 1, auto 2 and manual. 3Switching the AV Output Mode Each time you press [ TOP MENU ] button to increase the volume. When Controlling the... DVD/VCD Switching to the TV position. Remote Control Function TV/DVD/AUD TV DVD AUD VOL STOP DIRECT ANGLE STOP DIRECT ENTER SRC RETURN ATT OPEN ANGLE MODE TOP MEMU TV/NAV MENU Joystick...
Instruction Manual
Page 65
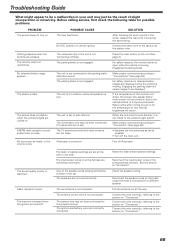
... brake is not extended. The unit is in the unit is not connected to the proper terminal. The illumination wire has not been connected. (If manual dimmer is first turned on "Connection". If the temperature of the monitor unit drops, the screen may just be the result of slight misoperation or...
... brake is not extended. The unit is in the unit is not connected to the proper terminal. The illumination wire has not been connected. (If manual dimmer is first turned on "Connection". If the temperature of the monitor unit drops, the screen may just be the result of slight misoperation or...


