Instruction Manual
Page 2
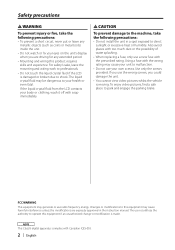
If you use the wrong screws, you are expressly approved in a spot exposed to malfunction. • Do not use radio frequency energy. FCC WARNING This equipment may cause harmful interference unless the modifications are driving for any metallic objects (such as coins or...precautions: • To prevent a short circuit, never put or leave any extended period. • Mounting and wiring this product requires skills and experience. For safety's sake, leave the mounting and wiring work to professionals. • Do not touch the liquid crystal fluid if the LCD is damaged or broken due...
If you use the wrong screws, you are expressly approved in a spot exposed to malfunction. • Do not use radio frequency energy. FCC WARNING This equipment may cause harmful interference unless the modifications are driving for any metallic objects (such as coins or...precautions: • To prevent a short circuit, never put or leave any extended period. • Mounting and wiring this product requires skills and experience. For safety's sake, leave the mounting and wiring work to professionals. • Do not touch the liquid crystal fluid if the LCD is damaged or broken due...
Instruction Manual
Page 7
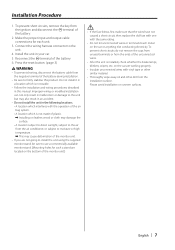
...away oil and other dirt from the ends of the battery during installation. • Be sure to firmly stabilise this manual. Connect the wiring harness connector to use a commercially available monitor stand. (Mounting holes for each unit. 3. Reconnect the · terminal of the battery....or anything else conducting electricity. Make the proper input and output cable connections for such a stand are working properly. • Insulate unconnected wires with the operation of the air bag system. • A location which is installed, check whether the brake lamps, blinkers, wipers,...
...away oil and other dirt from the ends of the battery during installation. • Be sure to firmly stabilise this manual. Connect the wiring harness connector to use a commercially available monitor stand. (Mounting holes for each unit. 3. Reconnect the · terminal of the battery....or anything else conducting electricity. Make the proper input and output cable connections for such a stand are working properly. • Insulate unconnected wires with the operation of the air bag system. • A location which is installed, check whether the brake lamps, blinkers, wipers,...
Instruction Manual
Page 8
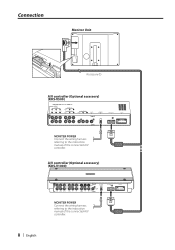
A/V controller (Optional accessory) (KOS-V1000) FM/ AM PRE OUT SUB REAR FRONT VIDEO AV IN 2 AV IN 1 VIDEO AV OUT 2 MONITOR POWER AV OUT 1 R-CAM V-IN MONITOR I/F POWER MONITER POWER Connect the wiring harness referring to the instruction manual of the connected A/V controller. 8 | English Connection Monitor Unit L ANTENNA FM/AM Accessory 1 A/V controller (Optional accessory) (KOS-V500) MONITER POWER Connect the wiring harness referring to the instruction manual of the connected A/V controller.
A/V controller (Optional accessory) (KOS-V1000) FM/ AM PRE OUT SUB REAR FRONT VIDEO AV IN 2 AV IN 1 VIDEO AV OUT 2 MONITOR POWER AV OUT 1 R-CAM V-IN MONITOR I/F POWER MONITER POWER Connect the wiring harness referring to the instruction manual of the connected A/V controller. 8 | English Connection Monitor Unit L ANTENNA FM/AM Accessory 1 A/V controller (Optional accessory) (KOS-V500) MONITER POWER Connect the wiring harness referring to the instruction manual of the connected A/V controller.
Instruction Manual
Page 10
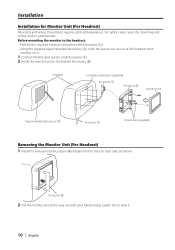
... the required external connections first (Accessory 1). • Using the supplied paper template (Accessory 7), mark the area to professionals. For safety's sake, leave the mounting and wiring work to be cut out of the headrest, then carefully cut it . 10 | English Accessory 6 2 Pull the monitor unit all the way out with your... (For Headrest) 1 Insert the removal tool (Accessory 6) deeply into the slots on each side, as shown. Installation Installation for Monitor Unit (For Headrest) Mounting and wiring this product requires skills and experience.
... the required external connections first (Accessory 1). • Using the supplied paper template (Accessory 7), mark the area to professionals. For safety's sake, leave the mounting and wiring work to be cut out of the headrest, then carefully cut it . 10 | English Accessory 6 2 Pull the monitor unit all the way out with your... (For Headrest) 1 Insert the removal tool (Accessory 6) deeply into the slots on each side, as shown. Installation Installation for Monitor Unit (For Headrest) Mounting and wiring this product requires skills and experience.


