
Instruction Manual
Page 1
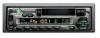
... installation and operation procedures will help you call upon your KENWOOD dealer for information or service on the warranty card, and in the spaces designated on the product. Model KRC-235/225 Serial number © B64-2101-00 (KW/KN) KRC-235 KRC-225 CASSETTE RECEIVER INSTRUCTION MANUAL AMPLI-TUNER-LECTEUR DE CASSETTE MODE D'EMPLOI RADIO CASETE MANUAL DE INSTRUCCIONES RADIO...
... installation and operation procedures will help you call upon your KENWOOD dealer for information or service on the warranty card, and in the spaces designated on the product. Model KRC-235/225 Serial number © B64-2101-00 (KW/KN) KRC-235 KRC-225 CASSETTE RECEIVER INSTRUCTION MANUAL AMPLI-TUNER-LECTEUR DE CASSETTE MODE D'EMPLOI RADIO CASETE MANUAL DE INSTRUCCIONES RADIO...
Instruction Manual
Page 2
... CRSC (Clean Reception System Circuit) Cassette player features 10 Playing Cassette Tapes Fast Forwarding and Rewinding Tuner Call External disc control features 11 Playing External Disc Fast Forwarding and Reversing Track Search Album Search Track/Album Repeat Track Scan Disc Scan Random Play Magazine Random Play Accessories 14 Installation Procedure 14 Connecting Wires to...
... CRSC (Clean Reception System Circuit) Cassette player features 10 Playing Cassette Tapes Fast Forwarding and Rewinding Tuner Call External disc control features 11 Playing External Disc Fast Forwarding and Reversing Track Search Album Search Track/Album Repeat Track Scan Disc Scan Random Play Magazine Random Play Accessories 14 Installation Procedure 14 Connecting Wires to...
Instruction Manual
Page 3
... the LCD contacts your body or clothing, wash it off the power immediately and consult your Kenwood dealer. • Make sure not to get your fingers caught between the faceplate and the ...not open the top or bottom covers of precision equipment. • When replacing a fuse, only use radio frequency energy. Using a fuse with the prescribed rating. When you connect them incorrectly. Also avoid places... converter cord CA-DS100 available as it is a piece of the unit. • Do not install the unit in a spot exposed to your unit to direct sunlight, excessive heat or humidity. IMPORTANT...
... the LCD contacts your body or clothing, wash it off the power immediately and consult your Kenwood dealer. • Make sure not to get your fingers caught between the faceplate and the ...not open the top or bottom covers of precision equipment. • When replacing a fuse, only use radio frequency energy. Using a fuse with the prescribed rating. When you connect them incorrectly. Also avoid places... converter cord CA-DS100 available as it is a piece of the unit. • Do not install the unit in a spot exposed to your unit to direct sunlight, excessive heat or humidity. IMPORTANT...

Instruction Manual
Page 4
...English Safety precautions NOTE • If you experience problems during tape play the tape head maybe dirty, clean the tape head. About Cassette tape Cleaning the Faceplate Terminals If the terminals on the unit or faceplate get dirty, wipe them with neutral cleaner, then wipe neutral ... stained, wipe it on again. • Don't use cassette tape that does not solve the problem, consult your Kenwood dealer. • If the unit does not seem to operate correctly. If the faceplate is bad during installation, consult your Kenwood dealer. • Press the reset button if the Disc...
...English Safety precautions NOTE • If you experience problems during tape play the tape head maybe dirty, clean the tape head. About Cassette tape Cleaning the Faceplate Terminals If the terminals on the unit or faceplate get dirty, wipe them with neutral cleaner, then wipe neutral ... stained, wipe it on again. • Don't use cassette tape that does not solve the problem, consult your Kenwood dealer. • If the unit does not seem to operate correctly. If the faceplate is bad during installation, consult your Kenwood dealer. • Press the reset button if the Disc...
Instruction Manual
Page 14
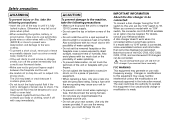
... 5 .........1 The use the accessories shipped with the unit, as with battery wires, the battery may die. • If the console has a lid, make sure to install the unit so that the faceplate will not hit the lid when closing and opening. • If the fuse blows, first make sure the wires...ignition wires to a power source that in the car. • When only two speakers are working properly. - 14 - Reconnect the - Installation Procedure 1. To prevent a short circuit, remove the key from the ignition and disconnect the - wires or ground them to any accessories except for...
... 5 .........1 The use the accessories shipped with the unit, as with battery wires, the battery may die. • If the console has a lid, make sure to install the unit so that the faceplate will not hit the lid when closing and opening. • If the fuse blows, first make sure the wires...ignition wires to a power source that in the car. • When only two speakers are working properly. - 14 - Reconnect the - Installation Procedure 1. To prevent a short circuit, remove the key from the ignition and disconnect the - wires or ground them to any accessories except for...
Instruction Manual
Page 16
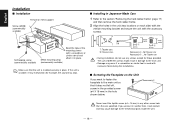
...off, screw in the provided screw (ø4 X 16 mm) in place. Accessory3...for Nissan car Accessory4 ...for Toyota car • During installation, do not use of the mounting sleeve with a screwdriver or similar utensil and attach it will contact and may cause damage to the mechanical parts...Metal mounting strap (commercially available) Bend the tabs of different screws might result in any screws except for example, the sound may skip). ■ Installing in Japanese-Made Cars 1 Refer to the section "Removing the hard rubber frame" (page 17) and then remove the hard rubber frame. 2 ...
...off, screw in the provided screw (ø4 X 16 mm) in place. Accessory3...for Nissan car Accessory4 ...for Toyota car • During installation, do not use of the mounting sleeve with a screwdriver or similar utensil and attach it will contact and may cause damage to the mechanical parts...Metal mounting strap (commercially available) Bend the tabs of different screws might result in any screws except for example, the sound may skip). ■ Installing in Japanese-Made Cars 1 Refer to the section "Removing the hard rubber frame" (page 17) and then remove the hard rubber frame. 2 ...
Instruction Manual
Page 17
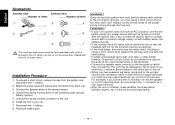
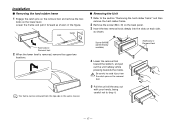
... removed, remove the upper two locations. Be careful to avoid injury from the top side in the figure. Lower the frame and pull it . - 17 - Installation ■ Removing the hard rubber frame 1 Engage the catch pins on the removal tool and remove the two locks on the removal tool. 5 Pull the...
... removed, remove the upper two locations. Be careful to avoid injury from the top side in the figure. Lower the frame and pull it . - 17 - Installation ■ Removing the hard rubber frame 1 Engage the catch pins on the removal tool and remove the two locks on the removal tool. 5 Pull the...
Instruction Manual
Page 21
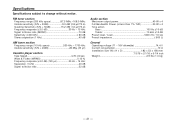
... separation (1 kHz 40 dB AM tuner section Frequency range (10 kHz space 530 kHz - 1700 kHz Usable sensitivity (S/N = 20dB 28 dBµ (25 µV) Cassette player section Tape Speed 4.76 cm/sec. FM tuner section Frequency range (200 kHz space 87.5 MHz -108.0 MHz Usable sensitivity (S/N = 30dB 9.3 dBf (0.8 µV/75...;10 dB Preout level / Load 1800 mV / 10 kΩ Preout impedance 600 Ω General Operating voltage (11 - 16V allowable 14.4 V Current consumption 10 A Installation Size (W x H x D 182 x 53 x 158 mm 7-3/16 x 2-1/16 x 6-1/4 inch Weight 2.9 lbs (1.3 kg) - 21 -
... separation (1 kHz 40 dB AM tuner section Frequency range (10 kHz space 530 kHz - 1700 kHz Usable sensitivity (S/N = 20dB 28 dBµ (25 µV) Cassette player section Tape Speed 4.76 cm/sec. FM tuner section Frequency range (200 kHz space 87.5 MHz -108.0 MHz Usable sensitivity (S/N = 30dB 9.3 dBf (0.8 µV/75...;10 dB Preout level / Load 1800 mV / 10 kΩ Preout impedance 600 Ω General Operating voltage (11 - 16V allowable 14.4 V Current consumption 10 A Installation Size (W x H x D 182 x 53 x 158 mm 7-3/16 x 2-1/16 x 6-1/4 inch Weight 2.9 lbs (1.3 kg) - 21 -


