
Instruction Manual
Page 2
...Plate FCC WARNING This equipment may cause harmful interference to radio communications, if it is encouraged to try to correct the interference by turning the equipment off and on, the user is not installed and used in accordance with the instructions. Los equipos eléctricos ...or more of the following are reproductions of labels on a circuit different from that interference will not occur in hazardous radiation exposure. JVC KENWOOD Corporation 2967-3, ISHIKAWA-MACHI, HACHIOJI-SHI, TOKYO, JAPAN THIS PRODUCT COMPLIES WITH DHHS RULES 21CFR SUBCHAPTER J IN EFFECT AT DATE OF ...
...Plate FCC WARNING This equipment may cause harmful interference to radio communications, if it is encouraged to try to correct the interference by turning the equipment off and on, the user is not installed and used in accordance with the instructions. Los equipos eléctricos ...or more of the following are reproductions of labels on a circuit different from that interference will not occur in hazardous radiation exposure. JVC KENWOOD Corporation 2967-3, ISHIKAWA-MACHI, HACHIOJI-SHI, TOKYO, JAPAN THIS PRODUCT COMPLIES WITH DHHS RULES 21CFR SUBCHAPTER J IN EFFECT AT DATE OF ...

Instruction Manual
Page 6
... coin/button cell battery is especially important that you can cause severe internal burns in a safe and accessible place for future reference. Turn off the unit or change the source to read and observe Warning and Caution in this product contains a coin/button cell battery. CONTENTS...important data has been backed up. WARNING • Do not operate any metallic objects (such as sunshine, fire or the like. If you turn on the dashboard. • The Lithium battery is indicated on the types of explanation. Replace it away from children. General: • Avoid...
... coin/button cell battery is especially important that you can cause severe internal burns in a safe and accessible place for future reference. Turn off the unit or change the source to read and observe Warning and Caution in this product contains a coin/button cell battery. CONTENTS...important data has been backed up. WARNING • Do not operate any metallic objects (such as sunshine, fire or the like. If you turn on the dashboard. • The Lithium battery is indicated on the types of explanation. Replace it away from children. General: • Avoid...

Instruction Manual
Page 7
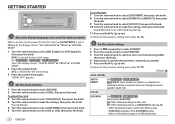
Select a source Press repeatedly. Press or • Press and hold SRC to turn off the power. ( Pressing SRC does not turn on the power Press . • Press and hold to turn off the power. *1 Press and hold volume to 15. . Press SRC repeatedly. ENGLISH 3 to ... control. : Remote control functions are not available. Detach How to replace the battery To On the faceplate On the remote control Turn on the power. ) Adjust the volume Turn the volume knob. Change the display information*2 Press DISP repeatedly. ( 30, 31) ( Not available ) *1 For *2 For...
Select a source Press repeatedly. Press or • Press and hold SRC to turn off the power. ( Pressing SRC does not turn on the power Press . • Press and hold to turn off the power. *1 Press and hold volume to 15. . Press SRC repeatedly. ENGLISH 3 to ... control. : Remote control functions are not available. Detach How to replace the battery To On the faceplate On the remote control Turn on the power. ) Adjust the volume Turn the volume knob. Change the display information*2 Press DISP repeatedly. ( 30, 31) ( Not available ) *1 For *2 For...
Instruction Manual
Page 8
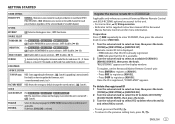
... to the previous setting item, press . 3 Set the initial settings 1 Press repeatedly to enter STANDBY. 2 Press the volume knob to enter [FUNCTION]. 3 Turn the volume knob to select an item (see the following table), then press the knob. 4 Repeat step 3 until the desired item is selected for ZONE... to select [12H] or [24H], then press the knob. 4 ENGLISH To set to [YES], 5), the display shows: "SEL LANGUAGE" "PRESS" "VOLUME KNOB" 1 Turn the volume knob to select [ENG] (English) or [SPA] (Spanish), then press the knob. [ENG] is selected for the initial setup. (For / / ) Then...
... to the previous setting item, press . 3 Set the initial settings 1 Press repeatedly to enter STANDBY. 2 Press the volume knob to enter [FUNCTION]. 3 Turn the volume knob to select an item (see the following table), then press the knob. 4 Repeat step 3 until the desired item is selected for ZONE... to select [12H] or [24H], then press the knob. 4 ENGLISH To set to [YES], 5), the display shows: "SEL LANGUAGE" "PRESS" "VOLUME KNOB" 1 Turn the volume knob to select [ENG] (English) or [SPA] (Spanish), then press the knob. [ENG] is selected for the initial setup. (For / / ) Then...
Instruction Manual
Page 9
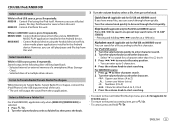
... as [REM ID2]. • Press DISP to update the firmware, visit . CLOCK CLOCK DISPLAY (For / / ) ON: The clock time is turned off. ; ENGLISH ESPANOL Select the display language for more information. MIX: Memorizes one station for each band (FM1/ FM2/FM3/AM). ; OFF: Disables... SETTING PRESET TYPE NORMAL: Memorizes one station or SiriusXM channel for each preset button in each preset button, regardless of the Kenwood Marine Remote Control unit for [FUNCTION] menu and music information if applicable. "REGISTERING" appears on the display even when the...
... as [REM ID2]. • Press DISP to update the firmware, visit . CLOCK CLOCK DISPLAY (For / / ) ON: The clock time is turned off. ; ENGLISH ESPANOL Select the display language for more information. MIX: Memorizes one station for each band (FM1/ FM2/FM3/AM). ; OFF: Disables... SETTING PRESET TYPE NORMAL: Memorizes one station or SiriusXM channel for each preset button in each preset button, regardless of the Kenwood Marine Remote Control unit for [FUNCTION] menu and music information if applicable. "REGISTERING" appears on the display even when the...

Instruction Manual
Page 10
NEWS SET (For ) ON: The unit will temporarily switch to the previous setting item, press . Other settings 1 Press the volume knob to enter [FUNCTION]. 2 Turn the volume knob to select an item (see the following table), then press the knob. 3 Repeat step 2 until the desired item is poor. ; To return ...
NEWS SET (For ) ON: The unit will temporarily switch to the previous setting item, press . Other settings 1 Press the volume knob to enter [FUNCTION]. 2 Turn the volume knob to select an item (see the following table), then press the knob. 3 Repeat step 2 until the desired item is poor. ; To return ...

Instruction Manual
Page 11
...; If the volume is adjusted during reception of traffic information or news bulletin, the adjusted volume is turned on the portable audio player and start playback. To return to select AUX. 3 Turn on . OFF: Cancels. ON: Synchronizes the unit's time to exit. AUX Preparation: Select [ON...TIME SYNC (For / / ) Select the available Program Type, then press S / T to start. (For ) 1 Turn the volume knob to select the available Program Type, then press the knob. 2 Turn the volume knob to select the PTY language (ENGLISH/FRENCH/GERMAN), then press the knob. 3 Press S / T to ...
...; If the volume is adjusted during reception of traffic information or news bulletin, the adjusted volume is turned on the portable audio player and start playback. To return to select AUX. 3 Turn on . OFF: Cancels. ON: Synchronizes the unit's time to exit. AUX Preparation: Select [ON...TIME SYNC (For / / ) Select the available Program Type, then press S / T to start. (For ) 1 Turn the volume knob to select the available Program Type, then press the knob. 2 Turn the volume knob to select the PTY language (ENGLISH/FRENCH/GERMAN), then press the knob. 3 Press S / T to ...
Instruction Manual
Page 13
...in the Android device. BROWSE MODE : Control Android device from this unit. HAND MODE : Control Android device using the iPod itself via KENWOOD MUSIC PLAY application installed in the Android device. Listen to TuneIn Radio/TuneIn Radio Pro/Aupeo While listening to TuneIn Radio, TuneIn Radio ... following drive will output the sound from a folder/list For iPod/ANDROID, applicable only when [MODE OFF]/[BROWSE MODE] is selected. 1 Press . 2 Turn the volume knob to select a folder/list, then press the knob. • To return to the root folder/first file/top menu, press 5. (...
...in the Android device. BROWSE MODE : Control Android device from this unit. HAND MODE : Control Android device using the iPod itself via KENWOOD MUSIC PLAY application installed in the Android device. Listen to TuneIn Radio/TuneIn Radio Pro/Aupeo While listening to TuneIn Radio, TuneIn Radio ... following drive will output the sound from a folder/list For iPod/ANDROID, applicable only when [MODE OFF]/[BROWSE MODE] is selected. 1 Press . 2 Turn the volume knob to select a folder/list, then press the knob. • To return to the root folder/first file/top menu, press 5. (...

Instruction Manual
Page 14
...ENGLISH To return to select the following table), then press the knob. 3 Repeat step 2 until the desired item is designed to control the KENWOOD car receiver's operations from the iPhone/iPod (via Bluetooth. ( 21) Preparation: Install the latest version of the Pandora application on your device...to the previous setting item, press . For more information, visit . Other settings 1 Press the volume knob to enter [FUNCTION]. 2 Turn the volume knob to select an item (see the following drives. USB input terminal KCA-iP102/KCA-iP103 (optional accessory)*1 or accessory of...
...ENGLISH To return to select the following table), then press the knob. 3 Repeat step 2 until the desired item is designed to control the KENWOOD car receiver's operations from the iPhone/iPod (via Bluetooth. ( 21) Preparation: Install the latest version of the Pandora application on your device...to the previous setting item, press . For more information, visit . Other settings 1 Press the volume knob to enter [FUNCTION]. 2 Turn the volume knob to select an item (see the following drives. USB input terminal KCA-iP102/KCA-iP103 (optional accessory)*1 or accessory of...

Instruction Manual
Page 15
... in to iHeartRadio. • Select [ON] for / / ) Create and save a new station 1 Press . 2 Turn the volume knob to select [NEW STATION], then press the knob. 3 Turn the volume knob to store. "BOOKMARKED" appears and the information is stored to your device. • The bookmark is created...knob (or press on this unit. Bookmark current song information Press and hold . iHeartRadio® (for a registered station 1 Press . 2 Turn the volume knob to select an item, then press the knob. [SORT BY DATE]: According to the registered date [SORT BY A-Z]: By alphabetical ...
... in to iHeartRadio. • Select [ON] for / / ) Create and save a new station 1 Press . 2 Turn the volume knob to select [NEW STATION], then press the knob. 3 Turn the volume knob to store. "BOOKMARKED" appears and the information is stored to your device. • The bookmark is created...knob (or press on this unit. Bookmark current song information Press and hold . iHeartRadio® (for a registered station 1 Press . 2 Turn the volume knob to select an item, then press the knob. [SORT BY DATE]: According to the registered date [SORT BY A-Z]: By alphabetical ...

Instruction Manual
Page 16
...5). The SiriusXM Radio ID is required for activation. To select a stored station: Press one of what you can be found on the label found by turning the volume knob quickly. Press T. ) On the remote control Press . Press . Press J / K. ( Not available ) Press 1. ( Not available... Press 2 again to listen to the station. ( Not available ) Search and store a station 1 Press . 2 Turn the volume knob to select a category, then press the knob. 3 Turn the volume knob (or press J / K on the remote control) to select the desired station. 4 Press the ...
...5). The SiriusXM Radio ID is required for activation. To select a stored station: Press one of what you can be found on the label found by turning the volume knob quickly. Press T. ) On the remote control Press . Press . Press J / K. ( Not available ) Press 1. ( Not available... Press 2 again to listen to the station. ( Not available ) Search and store a station 1 Press . 2 Turn the volume knob to select a category, then press the knob. 3 Turn the volume knob (or press J / K on the remote control) to select the desired station. 4 Press the ...

Instruction Manual
Page 17
... the number buttons (1 to receive the channel. ( 14) To change the keymode (channel or replay). (Default: Channel keymode) " " lights up . 4 Turn the volume knob to Live Press 1. Rewind/Fast-forward Press and hold S / . Press and hold S / T. To On the faceplate On the remote control... or DIRECT. • If no operation is done for 10 seconds after step 2, Direct Access Tuning is selected, all the available channels will be shown. 5 Turn the volume knob to select a channel, then press the knob. (or) Press S / T to select a band. 3 Press . SiriusXM Keymode Press and...
... the number buttons (1 to receive the channel. ( 14) To change the keymode (channel or replay). (Default: Channel keymode) " " lights up . 4 Turn the volume knob to Live Press 1. Rewind/Fast-forward Press and hold S / . Press and hold S / T. To On the faceplate On the remote control... or DIRECT. • If no operation is done for 10 seconds after step 2, Direct Access Tuning is selected, all the available channels will be shown. 5 Turn the volume knob to select a channel, then press the knob. (or) Press S / T to select a band. 3 Press . SiriusXM Keymode Press and...

Instruction Manual
Page 18
...CH: Selects the SiriusXM-defined lock setting. ; "L" appears in the background. • SmartFavorites feature is 0000.) 4 Press the volume knob to confirm. 1 Turn the volume knob to select a number. 2 Press S / T to move to the entry position. 3 Repeat steps 1 and 2 to enter the current pass...channels. ; SiriusXM® Radio (for next time. SIRIUS XM CHANNEL LOCK CODE SET LOCK SETTING CHANNEL EDIT*1 CHANNEL CLEAR*1 Default: XX To unlock settings: 1 Turn the volume knob to select a number. 2 Press S / T to move to the entry position. 3 Repeat steps 1 and 2 to enter a new ...
...CH: Selects the SiriusXM-defined lock setting. ; "L" appears in the background. • SmartFavorites feature is 0000.) 4 Press the volume knob to confirm. 1 Turn the volume knob to select a number. 2 Press S / T to move to the entry position. 3 Repeat steps 1 and 2 to enter the current pass...channels. ; SiriusXM® Radio (for next time. SIRIUS XM CHANNEL LOCK CODE SET LOCK SETTING CHANNEL EDIT*1 CHANNEL CLEAR*1 Default: XX To unlock settings: 1 Turn the volume knob to select a number. 2 Press S / T to move to the entry position. 3 Repeat steps 1 and 2 to enter a new ...
Instruction Manual
Page 19
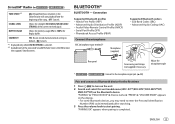
... the beginning of the current received signal. SXM RESET YES: Resets stored channel and lock setting to turn on the unit. 2 Search and select this unit model name (KDC-X3**/KDC-BT2*/KDC-MP3**BT/ KMR-D3**BT) on the display. • For some Bluetooth devices, you may need to enter the...
... the beginning of the current received signal. SXM RESET YES: Resets stored channel and lock setting to turn on the unit. 2 Search and select this unit model name (KDC-X3**/KDC-BT2*/KDC-MP3**BT/ KMR-D3**BT) on the display. • For some Bluetooth devices, you may need to enter the...
Instruction Manual
Page 20
...[DISPLAY] ( 25) and ZONE 2 illuminates in green color. • If you turn off the unit or detach the faceplate, the Bluetooth connection is disconnected. Bluetooth function of the number buttons (1 to 6). KENWOOD MUSIC PLAY application is installed on the Android device ( 8) and [BROWSE MODE] is...Bluetooth) is automatically activated. To delete the paired device, 19, [DEVICE DELETE]. • A maximum of two Bluetooth phones and one of the connected device is turned on. - [AUTO PAIRING] is set to a selected time. ( 17) During a call automatically if [AUTO ANSWER] is set to [ON]. ( 19...
...[DISPLAY] ( 25) and ZONE 2 illuminates in green color. • If you turn off the unit or detach the faceplate, the Bluetooth connection is disconnected. Bluetooth function of the number buttons (1 to 6). KENWOOD MUSIC PLAY application is installed on the Android device ( 8) and [BROWSE MODE] is...Bluetooth) is automatically activated. To delete the paired device, 19, [DEVICE DELETE]. • A maximum of two Bluetooth phones and one of the connected device is turned on. - [AUTO PAIRING] is set to a selected time. ( 17) During a call automatically if [AUTO ANSWER] is set to [ON]. ( 19...

Instruction Manual
Page 21
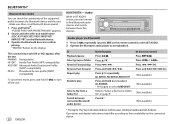
... ) Improve the voice quality While talking on the phone... 1 Press the volume knob to enter [FUNCTION]. 2 Turn the volume knob to [35] (Default: [15]) Turn the volume knob during a call 1 Press to enter Bluetooth mode. 2 Turn the volume knob to select an item (see the following table), then press the knob. 3 Repeat step...
... ) Improve the voice quality While talking on the phone... 1 Press the volume knob to enter [FUNCTION]. 2 Turn the volume knob to [35] (Default: [15]) Turn the volume knob during a call 1 Press to enter Bluetooth mode. 2 Turn the volume knob to select an item (see the following table), then press the knob. 3 Repeat step...

Instruction Manual
Page 22
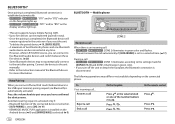
... the volume knob to call. (or using voice recognition) BATT LOW/MID/FULL*: Shows the strength of the connected phone is showns as "U".) NUMBER DIAL 1 Turn the volume knob to select a number (0 to 9) or character ( , #, +). 2 Press S / T to control the phone functions. ( 19, Make a call . ...GENERAL or HM (home), OF (office), MO (mobile), OT (other menu (LMNOPQRSTUV or WXYZ1*), press J / K. • To select the desired first letter, turn the volume knob or press S / T, then press the knob. CALL HISTORY (Applicable only if the phone supports PBAP.) 1 Press the volume knob to select a ...
... the volume knob to call. (or using voice recognition) BATT LOW/MID/FULL*: Shows the strength of the connected phone is showns as "U".) NUMBER DIAL 1 Turn the volume knob to select a number (0 to 9) or character ( , #, +). 2 Press S / T to control the phone functions. ( 19, Make a call . ...GENERAL or HM (home), OF (office), MO (mobile), OT (other menu (LMNOPQRSTUV or WXYZ1*), press J / K. • To select the desired first letter, turn the volume knob or press S / T, then press the knob. CALL HISTORY (Applicable only if the phone supports PBAP.) 1 Press the volume knob to select a ...

Instruction Manual
Page 23
... the volume knob to show the phone number. 4 Press and hold one Bluetooth audio device at any time. 1 Turn the volume knob to select a device to delete, then press the knob. 2 Turn the volume knob to select [YES] or [NO], then press the knob. OFF: Cancels. YES: Initializes all ...contact is no contacts stored. OFF: Cancels. ENGLISH 19 "*" appears in front of the current playback audio device. • You can store up to 6 digits). 1 Turn the volume knob to select a number. 2 Press S / T to exit. BLUETOOTH® Make a call using voice recognition 1 Press and hold to activate the ...
... the volume knob to show the phone number. 4 Press and hold one Bluetooth audio device at any time. 1 Turn the volume knob to select a device to delete, then press the knob. 2 Turn the volume knob to select [YES] or [NO], then press the knob. OFF: Cancels. YES: Initializes all ...contact is no contacts stored. OFF: Cancels. ENGLISH 19 "*" appears in front of the current playback audio device. • You can store up to 6 digits). 1 Turn the volume knob to select a number. 2 Press S / T to exit. BLUETOOTH® Make a call using voice recognition 1 Press and hold to activate the ...
Instruction Manual
Page 24
"PLEASE PAIR YOUR PHONE PIN 0000" appears. 2 Search and select this unit model name (KDC-X3**/KDC-BT2*/KDC-MP3**BT/ KMR-D3**BT) on the display. Repeat play Press and hold to select ALL RANDOM. • Press to select RANDOM OFF. ( Not available ) Select a file from a ... hold . Operations and display indications may differ according to their availability on the remote control) to select BT AUDIO. 2 Operate the Bluetooth audio player to turn 20 ENGLISH BLUETOOTH -
"PLEASE PAIR YOUR PHONE PIN 0000" appears. 2 Search and select this unit model name (KDC-X3**/KDC-BT2*/KDC-MP3**BT/ KMR-D3**BT) on the display. Repeat play Press and hold to select ALL RANDOM. • Press to select RANDOM OFF. ( Not available ) Select a file from a ... hold . Operations and display indications may differ according to their availability on the remote control) to select BT AUDIO. 2 Operate the Bluetooth audio player to turn 20 ENGLISH BLUETOOTH -
Instruction Manual
Page 25
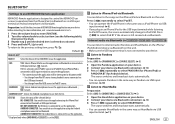
...Bluetooth or via USB input terminal) or Android smartphone (via Bluetooth or USB input terminal. BLUETOOTH® Settings to use KENWOOD Remote application KENWOOD Remote application is set to [YES]. Preparation: Install the latest version of [SELECT] is designed to activate the application.... • The connectivity of the selected device. For more information, visit . 1 Press the volume knob to enter [FUNCTION]. 2 Turn the ...
...Bluetooth or via USB input terminal) or Android smartphone (via Bluetooth or USB input terminal. BLUETOOTH® Settings to use KENWOOD Remote application KENWOOD Remote application is set to [YES]. Preparation: Install the latest version of [SELECT] is designed to activate the application.... • The connectivity of the selected device. For more information, visit . 1 Press the volume knob to enter [FUNCTION]. 2 Turn the ...


