Owner's Manual (pdf)
Page 2
...trademark of KCA-RC60MR (Optional accessory) 12 4 Appendix 13 Accessories/Installation Procedure 15 6 Connecting Wires to Terminals 16 Installation 17 Troubleshooting Guide 18 8 Specifications 19 9 2 | KMR-330 Playing AAC, MP3, and WMA data This document refers to control these data. Contents Before... Track Select Menu Operation Menu System Activating Security Code Deactivating Security Code Manual Clock Adjustment Auxiliary Input Display Setting Receive mode Setting Demonstration mode Setting 3 Basic Operations of Dolby Laboratories. Refer to the section on "Audio Files"...
...trademark of KCA-RC60MR (Optional accessory) 12 4 Appendix 13 Accessories/Installation Procedure 15 6 Connecting Wires to Terminals 16 Installation 17 Troubleshooting Guide 18 8 Specifications 19 9 2 | KMR-330 Playing AAC, MP3, and WMA data This document refers to control these data. Contents Before... Track Select Menu Operation Menu System Activating Security Code Deactivating Security Code Manual Clock Adjustment Auxiliary Input Display Setting Receive mode Setting Demonstration mode Setting 3 Basic Operations of Dolby Laboratories. Refer to the section on "Audio Files"...
Owner's Manual (pdf)
Page 15
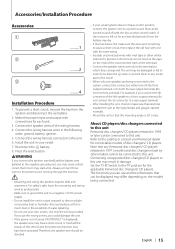
...the fuse box. ¤ • Mounting and wiring this unit may have an ACC position, connect the ignition wire to a power source that the mounting angle is 30° or less. If the receiver is displayed), the speaker wire may result in a spot exposed to a front output...battery. 2. Make the proper input and output wire connections for the applicable Kenwood disc changers/ CD players. Connect the wiring harness wires in turn may differ depending on the ends of the unconnected wires or the terminals. • Connect the speaker wires correctly to the terminals to the catalog or ...
...the fuse box. ¤ • Mounting and wiring this unit may have an ACC position, connect the ignition wire to a power source that the mounting angle is 30° or less. If the receiver is displayed), the speaker wire may result in a spot exposed to a front output...battery. 2. Make the proper input and output wire connections for the applicable Kenwood disc changers/ CD players. Connect the wiring harness wires in turn may differ depending on the ends of the unconnected wires or the terminals. • Connect the speaker wires correctly to the terminals to the catalog or ...
Owner's Manual (pdf)
Page 16
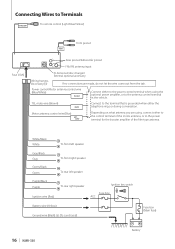
... from the tab. Battery 16 | KMR-330 Connecting Wires to the power terminal for the booster amplifier of the motor antenna, or to Terminals REMO.CONT To remote control (Light Blue/Yellow) Front preout FRONT Fuse (10A) L Rear preout/Subwoofer preout R FM/AM antenna input Wiring harness (Accessory1) To Kenwood disc changer/ External optional accessory...
... from the tab. Battery 16 | KMR-330 Connecting Wires to the power terminal for the booster amplifier of the motor antenna, or to Terminals REMO.CONT To remote control (Light Blue/Yellow) Front preout FRONT Fuse (10A) L Rear preout/Subwoofer preout R FM/AM antenna input Wiring harness (Accessory1) To Kenwood disc changer/ External optional accessory...
Owner's Manual (pdf)
Page 18
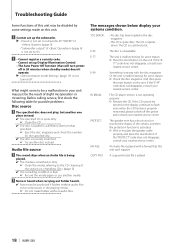
...another media. ? Or the unit is not operating properly. ➪ Reinsert the CD. IN (Blink): The CD player section is malfunctioning for possible problems. Disc source ? E-05: The disc is played. 18 | KMR-330 COPY PRO: A copy-protected file is unreadable. If the "E- 77" code... ☞ "SWPRE" of (page 9) • "Subwoofer output" of the vehicle, and then the protection function is activated. ➪ Wire or insulate the speaker cable properly and press the reset button. If the "E-99" code does not disappear, consult your nearest service center. ...
...another media. ? Or the unit is not operating properly. ➪ Reinsert the CD. IN (Blink): The CD player section is malfunctioning for possible problems. Disc source ? E-05: The disc is played. 18 | KMR-330 COPY PRO: A copy-protected file is unreadable. If the "E- 77" code... ☞ "SWPRE" of (page 9) • "Subwoofer output" of the vehicle, and then the protection function is activated. ➪ Wire or insulate the speaker cable properly and press the reset button. If the "E-99" code does not disappear, consult your nearest service center. ...


