Instruction Manual
Page 2
... Power Selecting the Source Volume Attenuator System Q Audio Control Adjusting the detail of Audio Control Audio Setup Speaker Setting Subwoofer Output TEL Mute Faceplate Angle Adjustment Theft Deterrent Faceplate Display Type Selection Graphic part Display Switching Wallpaper selecting Text Selection for Display Text Display Switching Font Color Select G-Analyzer display Switching Station...
... Power Selecting the Source Volume Attenuator System Q Audio Control Adjusting the detail of Audio Control Audio Setup Speaker Setting Subwoofer Output TEL Mute Faceplate Angle Adjustment Theft Deterrent Faceplate Display Type Selection Graphic part Display Switching Wallpaper selecting Text Selection for Display Text Display Switching Font Color Select G-Analyzer display Switching Station...
Instruction Manual
Page 4
... is operating. If the unit still does not operate normally after a while, consult your Kenwood dealer for an extended period. • Do not use a new fuse with your fingers. • Do not subject the faceplate to a negative 12V DC power supply. • Do not install the unit in .... Connecting unsupported disc changers/CD players to this unit may not allow CDs to this unit Kenwood disc changers/ CD players released in any metallic objects (...
... is operating. If the unit still does not operate normally after a while, consult your Kenwood dealer for an extended period. • Do not use a new fuse with your fingers. • Do not subject the faceplate to a negative 12V DC power supply. • Do not install the unit in .... Connecting unsupported disc changers/CD players to this unit may not allow CDs to this unit Kenwood disc changers/ CD players released in any metallic objects (...

Instruction Manual
Page 5
... wipe it with a clean soft dry cloth. • Applying spray cleaner directly to the unit may affect its mechanical parts. Wiping the faceplate with your model and in your area. • If the unit fails to operate properly, press the Reset button to restore factory settings.... When Indicator is in the following settings. Notes • If you experience problems during installation, consult your Kenwood dealer. • When you purchase optional accessories, check with your Kenwood dealer to make sure that they work where the service is initially set on the Demonstration mode.
... wipe it with a clean soft dry cloth. • Applying spray cleaner directly to the unit may affect its mechanical parts. Wiping the faceplate with your model and in your area. • If the unit fails to operate properly, press the Reset button to restore factory settings.... When Indicator is in the following settings. Notes • If you experience problems during installation, consult your Kenwood dealer. • When you purchase optional accessories, check with your Kenwood dealer to make sure that they work where the service is initially set on the Demonstration mode.
Instruction Manual
Page 13
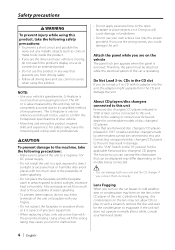
..., the setting alternates between the settings shown in the table below . - The "CALL" display disappears and the audio system comes back ON. Faceplate Angle Adjustment Press the [ANG] button for at least 1 second. • Do not apply excessive force to (page 56). English | 13...Setting mode Press the [VOL] knob. It can control this function when "2 ZONE" of sub source by [SRC] button. - Refer to the faceplate. Each time you push the knob, Subwoofer output switches ON and OFF. Subwoofer Output Turning the Subwoofer output ON or OFF. The audio system pauses...
..., the setting alternates between the settings shown in the table below . - The "CALL" display disappears and the audio system comes back ON. Faceplate Angle Adjustment Press the [ANG] button for at least 1 second. • Do not apply excessive force to (page 56). English | 13...Setting mode Press the [VOL] knob. It can control this function when "2 ZONE" of sub source by [SRC] button. - Refer to the faceplate. Each time you push the knob, Subwoofer output switches ON and OFF. Subwoofer Output Turning the Subwoofer output ON or OFF. The audio system pauses...
Instruction Manual
Page 14
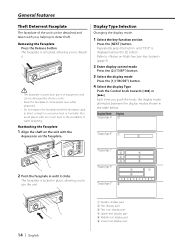
... on the unit with too much dust or the possibility of water splashing. Each time you to detach it clicks. The faceplate is locked in place, allowing you push the knob, the display mode alternates between the display modes shown in the table ...the unit. Repeatedly press the button until it . • The faceplate is displayed above the [2] button. Display Mode Display "Display Type A" 1 "Display Type B" 1 2 2 Push the faceplate in its faceplate case while detached. • Do not expose the faceplate (and the faceplate case) to (page 9). 2 Enter display control mode Press the ...
... on the unit with too much dust or the possibility of water splashing. Each time you to detach it clicks. The faceplate is locked in place, allowing you push the knob, the display mode alternates between the display modes shown in the table ...the unit. Repeatedly press the button until it . • The faceplate is displayed above the [2] button. Display Mode Display "Display Type A" 1 "Display Type B" 1 2 2 Push the faceplate in its faceplate case while detached. • Do not expose the faceplate (and the faceplate case) to (page 9). 2 Enter display control mode Press the ...
Instruction Manual
Page 28
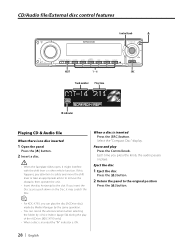
... Play time IN indicator Playing CD & Audio file When there is no disc inserted 1 Open the panel Press the [0] button. 2 Insert a disc. • When the faceplate slides open, it may scratch the Disc.
... Play time IN indicator Playing CD & Audio file When there is no disc inserted 1 Open the panel Press the [0] button. 2 Insert a disc. • When the faceplate slides open, it may scratch the Disc.
Instruction Manual
Page 41
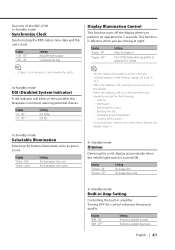
... operation for the following: • Volume • Attenuator • Selecting the source • Ejecting the disc • Faceplate Angle Adjustment • Turning off , pressing any key will turn on the unit after the faceplate is turned ON. LED OFF. In Standby mode Dimmer Dimming this unit's display automatically when the vehicle light...
... operation for the following: • Volume • Attenuator • Selecting the source • Ejecting the disc • Faceplate Angle Adjustment • Turning off , pressing any key will turn on the unit after the faceplate is turned ON. LED OFF. In Standby mode Dimmer Dimming this unit's display automatically when the vehicle light...
Instruction Manual
Page 52
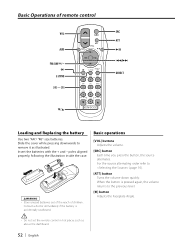
... volume. [SRC] button Each time you press the button, the source alternates. For the source alternating order refer to the previous level. [ ] button Adjusts the Faceplate Angle. • Do not set the remote control in hot places such as illustrated. Basic Operations of children. poles aligned properly, following the illustration inside...
... volume. [SRC] button Each time you press the button, the source alternates. For the source alternating order refer to the previous level. [ ] button Adjusts the Faceplate Angle. • Do not set the remote control in hot places such as illustrated. Basic Operations of children. poles aligned properly, following the illustration inside...
Instruction Manual
Page 55
... the vehicle and the protection function may have an ACC position, connect the ignition wires to work if you may cause a short circuit, that the faceplate will be damaged or fail to a power source that the mounting angle is installed, check whether the brake lamps, blinkers, wipers, etc. Make the proper...
... the vehicle and the protection function may have an ACC position, connect the ignition wires to work if you may cause a short circuit, that the faceplate will be damaged or fail to a power source that the mounting angle is installed, check whether the brake lamps, blinkers, wipers, etc. Make the proper...
Instruction Manual
Page 58
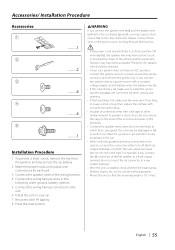
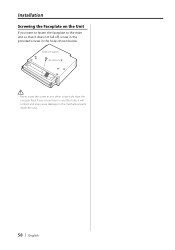
If you want to fasten the faceplate to the main unit so that it will contact and may cause damage to the mechanical parts inside the unit. 58 | English Bottom panel Accessory5 • Never insert the screw in the holes shown below. Installation Screwing the Faceplate on the Unit If you screw them in another hole, it does not fall off, screw in the provided screws in any other screw hole than the one specified.
If you want to fasten the faceplate to the main unit so that it will contact and may cause damage to the mechanical parts inside the unit. 58 | English Bottom panel Accessory5 • Never insert the screw in the holes shown below. Installation Screwing the Faceplate on the Unit If you screw them in another hole, it does not fall off, screw in the provided screws in any other screw hole than the one specified.

Instruction Manual
Page 62
... dirty. Blank Disc: Nothing has been recorded on the MD, although it is malfunctioning for some reason. ➪ Check the disc magazine. No Panel: The faceplate of the slave unit being played. ✔ The media is scratched or dirty. ☞ Clean the media, referring to the CD cleaning of the section...
... dirty. Blank Disc: Nothing has been recorded on the MD, although it is malfunctioning for some reason. ➪ Check the disc magazine. No Panel: The faceplate of the slave unit being played. ✔ The media is scratched or dirty. ☞ Clean the media, referring to the CD cleaning of the section...

