
Instruction Manual
Page 1
...MP532U Serial number US Residence Only Register Online Register your Kenwood dealer for information or service on the warranty card, and in the spaces designated on the product. KDC-X590 KDC-MP632U KDC-MP532U CD-RECEIVER INSTRUCTION MANUAL AMPLI-TUNER LECTEUR DE CD MODE D'EMPLOI REPRODUCTOR DE DISCOS... COMPACTOS RECEPTOR DE FM/AM MANUAL DE INSTRUCCIONES Take the time to the model and serial numbers whenever you obtain the best...
...MP532U Serial number US Residence Only Register Online Register your Kenwood dealer for information or service on the warranty card, and in the spaces designated on the product. KDC-X590 KDC-MP632U KDC-MP532U CD-RECEIVER INSTRUCTION MANUAL AMPLI-TUNER LECTEUR DE CD MODE D'EMPLOI REPRODUCTOR DE DISCOS... COMPACTOS RECEPTOR DE FM/AM MANUAL DE INSTRUCCIONES Take the time to the model and serial numbers whenever you obtain the best...

Instruction Manual
Page 2
.../Title Scroll HD Radio control features 26 About HD Radio Tuning Menu system 27 Menu System Activating Security Code Deactivating Security Code Touch Sensor Tone Manual Clock Adjustment DSI (Disabled System Indicator) Display Illumination Control Dimmer Switching preout Built-in Amp Setting Dual Zone System Setting B.M.S. (Bass Management System) B.M.S. Contents Safety...
.../Title Scroll HD Radio control features 26 About HD Radio Tuning Menu system 27 Menu System Activating Security Code Deactivating Security Code Touch Sensor Tone Manual Clock Adjustment DSI (Disabled System Indicator) Display Illumination Control Dimmer Switching preout Built-in Amp Setting Dual Zone System Setting B.M.S. (Bass Management System) B.M.S. Contents Safety...

Instruction Manual
Page 3
2CAUTION Use of controls or adjustments or performance of the FCC Rules. These limits are expressly approved in the instruction manual. However, there is no guarantee that to laser product safety. CERTIFIES THIS EQUIPMENT CONFORMS TO DHHS REGULATIONS N0.21 CFR ... unless the modifications are designed to operate this equipment may generate or use radio frequency energy. English | 3 Kenwood Corporation 2967-3, ISHIKAWA-MACHI, HACHIOJI-SHI TOKYO, JAPAN KENWOOD CORP. This equipment may result in a residential installation. In compliance with the instructions. The user could lose...
2CAUTION Use of controls or adjustments or performance of the FCC Rules. These limits are expressly approved in the instruction manual. However, there is no guarantee that to laser product safety. CERTIFIES THIS EQUIPMENT CONFORMS TO DHHS REGULATIONS N0.21 CFR ... unless the modifications are designed to operate this equipment may generate or use radio frequency energy. English | 3 Kenwood Corporation 2967-3, ISHIKAWA-MACHI, HACHIOJI-SHI TOKYO, JAPAN KENWOOD CORP. This equipment may result in a residential installation. In compliance with the instructions. The user could lose...

Instruction Manual
Page 5
... operation of the display and the panel appearing in the USB device. Normal operation should be inapplicable. English | 5 Before using this manual are examples used to the unit may scratch the surface or erase characters. How to reset your area. • We recommend the ... manual recorded in your unit • If the unit fails to the following site for the operation method of "Media Manager". When using a volatile liquid such as a silicon cloth. Pressing the Reset button with a clean soft dry cloth. http://www.kenwood.mediamanager.jp • Contact Kenwood for...
... operation of the display and the panel appearing in the USB device. Normal operation should be inapplicable. English | 5 Before using this manual are examples used to the unit may scratch the surface or erase characters. How to reset your area. • We recommend the ... manual recorded in your unit • If the unit fails to the following site for the operation method of "Media Manager". When using a volatile liquid such as a silicon cloth. Pressing the Reset button with a clean soft dry cloth. http://www.kenwood.mediamanager.jp • Contact Kenwood for...

Instruction Manual
Page 6
... band for the control method of DAB Tuner function. Press the [AME] button for operations. Notes About SIRIUS Satellite radio tuner Refer to the instruction manual of SIRIUS Satellite radio tuner KTC-SR901/SR902/SR903 (optional accessory), when connected, for the operation method. • Refer to the sections of A models ... 6 | English Open Auto Ensemble Memory Entry. and in the memory finishes, the number of the function for this unit may be different from the Instruction manual; FM/ 4 SCRL AUTO ¢ 1-6 AM SRC DISP/C.S. However, the following supplemental instruction. 1.
... band for the control method of DAB Tuner function. Press the [AME] button for operations. Notes About SIRIUS Satellite radio tuner Refer to the instruction manual of SIRIUS Satellite radio tuner KTC-SR901/SR902/SR903 (optional accessory), when connected, for the operation method. • Refer to the sections of A models ... 6 | English Open Auto Ensemble Memory Entry. and in the memory finishes, the number of the function for this unit may be different from the Instruction manual; FM/ 4 SCRL AUTO ¢ 1-6 AM SRC DISP/C.S. However, the following supplemental instruction. 1.

Instruction Manual
Page 7
... unit can only play a CD-R or CD-RW that are easier to your CD-R/CD-RW writing software, and your CDR/CD-RW recorder instruction manual.) Burrs CD storage • Do not place CDs in direct sunlight (On the seat or dashboard etc.) or where the temperature is high. • Store...
... unit can only play a CD-R or CD-RW that are easier to your CD-R/CD-RW writing software, and your CDR/CD-RW recorder instruction manual.) Burrs CD storage • Do not place CDs in direct sunlight (On the seat or dashboard etc.) or where the temperature is high. • Store...

Instruction Manual
Page 17
... Preset station number Tuning Selecting the station. 1 Select tuner source Press the [SRC] button. Tuning mode Auto seek Preset station seek Manual Display "AUTO 1" "AUTO 2" "MANUAL" Operation Automatic search for a station. Normal manual tuning control. • During reception of the stations in the Preset memory. Search in the table below. English | 17 Each...
... Preset station number Tuning Selecting the station. 1 Select tuner source Press the [SRC] button. Tuning mode Auto seek Preset station seek Manual Display "AUTO 1" "AUTO 2" "MANUAL" Operation Automatic search for a station. Normal manual tuning control. • During reception of the stations in the Preset memory. Search in the table below. English | 17 Each...

Instruction Manual
Page 27
Select 1 of the chart is displayed. 2 Select the menu item Push the Control knob towards [4] or [¢]. English | 27 Example: When you select "BEEP", each time you want to the basic operation method above are entered step by step. You can continue by returning to step 2 and setting other items. 4 Exit Menu mode Press the [MENU] button. • When other items those applicable to set the beep sound, select the "BEEP" display. 3 Set the menu item Push the Control knob towards [FM] or [AM]. Menu system MENU Control knob SRC Menu display Menu System Setting beep sound ...
Select 1 of the chart is displayed. 2 Select the menu item Push the Control knob towards [4] or [¢]. English | 27 Example: When you select "BEEP", each time you want to the basic operation method above are entered step by step. You can continue by returning to step 2 and setting other items. 4 Exit Menu mode Press the [MENU] button. • When other items those applicable to set the beep sound, select the "BEEP" display. 3 Set the menu item Push the Control knob towards [FM] or [AM]. Menu system MENU Control knob SRC Menu display Menu System Setting beep sound ...
Instruction Manual
Page 29
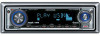
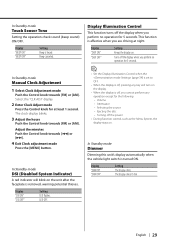
... OFF. • When the display is off the power • During function control, such as the Menu System, the display stays on. In Standby mode Manual Clock Adjustment 1 Select Clock Adjustment mode Push the Control knob towards [FM] or [AM]. Select the "CLK ADJ" display. 2 Enter Clock Adjust mode Press the...
... OFF. • When the display is off the power • During function control, such as the Menu System, the display stays on. In Standby mode Manual Clock Adjustment 1 Select Clock Adjustment mode Push the Control knob towards [FM] or [AM]. Select the "CLK ADJ" display. 2 Enter Clock Adjust mode Press the...

Instruction Manual
Page 30
... connected to the unit, "BMS +18" will not work correctly even if it is to be front channel. • Refer to the catalog or instruction manual for power amplifiers that can set from Flat to +12 dB. Display "BMS FLT" "BMS +6" "BMS +12" "BMS +18" Setting Bass boost level is mid...
... connected to the unit, "BMS +18" will not work correctly even if it is to be front channel. • Refer to the catalog or instruction manual for power amplifiers that can set from Flat to +12 dB. Display "BMS FLT" "BMS +6" "BMS +12" "BMS +18" Setting Bass boost level is mid...

Instruction Manual
Page 31
... AMP Control item for adjustment Push the Control knob towards [FM] or [AM]. • For the details on the AMP Control item, see the Instruction manual attached to the unit. 1 Select AMP Control mode Push the Control knob towards [FM] or [AM]. Display "CRSC ON" "CRSC OFF" Setting The CRSC is...
... AMP Control item for adjustment Push the Control knob towards [FM] or [AM]. • For the details on the AMP Control item, see the Instruction manual attached to the unit. 1 Select AMP Control mode Push the Control knob towards [FM] or [AM]. Display "CRSC ON" "CRSC OFF" Setting The CRSC is...

Instruction Manual
Page 39
...you are made, do not use the steering wheel remote control feature, you do not let the wire come off. To connect the Kenwood navigation system, consult your car is grounded when either to the control terminal of the motor antenna, or to the power terminal for ...(Yellow) Ground wire (Black) - (To car chassis) English | 39 Fuse (10A) To Kenwood disc changer/ External optional accessory If no connections are using the optional power amplifier, connect to the relevant instruction manuals. Connecting Wires to Terminals (KDC-X590) To use the USB cable. CONT To front left speaker...
...you are made, do not use the steering wheel remote control feature, you do not let the wire come off. To connect the Kenwood navigation system, consult your car is grounded when either to the control terminal of the motor antenna, or to the power terminal for ...(Yellow) Ground wire (Black) - (To car chassis) English | 39 Fuse (10A) To Kenwood disc changer/ External optional accessory If no connections are using the optional power amplifier, connect to the relevant instruction manuals. Connecting Wires to Terminals (KDC-X590) To use the USB cable. CONT To front left speaker...

Instruction Manual
Page 40
... of the film-type antenna. Connect to the terminal that the cable will not come out from the tab. Fuse (10A) To Kenwood disc changer/ External optional accessory If no connections are using the optional power amplifier, connect to its power control terminal. Depending on what... switch Car fuse box ACC Ignition wire (Red) Car fuse box (Main fuse) Battery + 40 | English - To connect the Kenwood navigation system, consult your navigation manual. CONT MUTE To car light control switch ILLUMI To front left speaker White/Black White To front right speaker Gray/Black Gray To...
... of the film-type antenna. Connect to the terminal that the cable will not come out from the tab. Fuse (10A) To Kenwood disc changer/ External optional accessory If no connections are using the optional power amplifier, connect to its power control terminal. Depending on what... switch Car fuse box ACC Ignition wire (Red) Car fuse box (Main fuse) Battery + 40 | English - To connect the Kenwood navigation system, consult your navigation manual. CONT MUTE To car light control switch ILLUMI To front left speaker White/Black White To front right speaker Gray/Black Gray To...

Instruction Manual
Page 41
Wiring harness (Accessory1) When using , connect either the telephone rings or during conversation. To connect the Kenwood navigation system, consult your navigation manual. CONT MUTE ILLUMI White/Black White Power control wire (Blue/White) Motor antenna control wire (Blue) TEL mute wire (Brown) Dimmer control wire (Orange /...) Rear right output (Red) • Do not remove the cap when you are made, do not use the USB cable. Fuse (10A) To Kenwood disc changer/ External optional accessory If no connections are using the optional power amplifier, connect to the relevant instruction...
Wiring harness (Accessory1) When using , connect either the telephone rings or during conversation. To connect the Kenwood navigation system, consult your navigation manual. CONT MUTE ILLUMI White/Black White Power control wire (Blue/White) Motor antenna control wire (Blue) TEL mute wire (Brown) Dimmer control wire (Orange /...) Rear right output (Red) • Do not remove the cap when you are made, do not use the USB cable. Fuse (10A) To Kenwood disc changer/ External optional accessory If no connections are using the optional power amplifier, connect to the relevant instruction...


