
Instruction Manual
Page 2
...settings (KDC-X998, KDC- Speaker setting 5-5. Channel level fine adjustments 5-9. Music search 6-4. Listening to the radio 11-2. Station search 7-5. Deletion of DTA Settings 5-10. Pandora source control 8. Basic operations 8-4. Skip search 10-4. Playback mode 10-6. About "KENWOOD Music Editor Light" and "KENWOOD Music Control" 10-11. Auto memory 11-4. Direct access tuning 11-7. PTY (Program Type) 2 | KDC-X998/ KDC-BT958HD/ KDC-X898/ KDC-BT858U Audio adjustments (KDC-X898, KDC- Audio control 4-2. Models of iPods/iPhones that can be connected to this unit...
...settings (KDC-X998, KDC- Speaker setting 5-5. Channel level fine adjustments 5-9. Music search 6-4. Listening to the radio 11-2. Station search 7-5. Deletion of DTA Settings 5-10. Pandora source control 8. Basic operations 8-4. Skip search 10-4. Playback mode 10-6. About "KENWOOD Music Editor Light" and "KENWOOD Music Control" 10-11. Auto memory 11-4. Direct access tuning 11-7. PTY (Program Type) 2 | KDC-X998/ KDC-BT958HD/ KDC-X898/ KDC-BT858U Audio adjustments (KDC-X898, KDC- Audio control 4-2. Models of iPods/iPhones that can be connected to this unit...

Instruction Manual
Page 3
... Selecting a display type 13-2. Auxiliary input display setting 14-4. About the Bluetooth module 15-2. Dialing a number 16-4. SiriusXM® Satellite Radio (optional tuner and service required) 84 19-1. Before use 17-2. Channel preset memory 19-5. Parental Lock pass code setting 19-13. Clearing the channel skip setting 19-20. Information display setting 13-3. Adjusting the Illumination color 13-5. Display & Illumination setting 14. Playback mode 18. Downloading the phone book 18-3. Parental Lock setting 19-10. SiriusXM tuner setting 20. Station preset...
... Selecting a display type 13-2. Auxiliary input display setting 14-4. About the Bluetooth module 15-2. Dialing a number 16-4. SiriusXM® Satellite Radio (optional tuner and service required) 84 19-1. Before use 17-2. Channel preset memory 19-5. Parental Lock pass code setting 19-13. Clearing the channel skip setting 19-20. Information display setting 13-3. Adjusting the Illumination color 13-5. Display & Illumination setting 14. Playback mode 18. Downloading the phone book 18-3. Parental Lock setting 19-10. SiriusXM tuner setting 20. Station preset...

Instruction Manual
Page 4
... the panel with the volume too high may result in the Demonstration mode initially. Condensation When the car is pressed. Therefore, what appears on the display on the actual 4 | KDC-X998/ KDC-BT958HD/ KDC-X898/ KDC-BT858U CAUTION • Adjust the volume so that they can hear the sound outside the car. Important information Before using this case, remove the disc and wait for the first time, cancel...
... the panel with the volume too high may result in the Demonstration mode initially. Condensation When the car is pressed. Therefore, what appears on the display on the actual 4 | KDC-X998/ KDC-BT958HD/ KDC-X898/ KDC-BT858U CAUTION • Adjust the volume so that they can hear the sound outside the car. Important information Before using this case, remove the disc and wait for the first time, cancel...
Instruction Manual
Page 6
...-BTR601 6 | KDC-X998/ KDC-BT958HD/ KDC-X898/ KDC-BT858U Before use radio frequency energy. Connect the equipment into an outlet on a circuit different from person's body (excluding extremities: hands, wrists, feet and ankles). Under Industry Canada regulations, this equipment may cause undesired operation of labels on , the user is not installed and used in a particular installation. In compliance with the instructions. If this device must accept...
...-BTR601 6 | KDC-X998/ KDC-BT958HD/ KDC-X898/ KDC-BT858U Before use radio frequency energy. Connect the equipment into an outlet on a circuit different from person's body (excluding extremities: hands, wrists, feet and ankles). Under Industry Canada regulations, this equipment may cause undesired operation of labels on , the user is not installed and used in a particular installation. In compliance with the instructions. If this device must accept...

Instruction Manual
Page 14
... to rear USB "iHeartRADIO (REAR)" terminal [1] iHeartRadio of device connected via Bluetooth[1] "aha" Bluetooth audio "BT AUDIO" CD[1] "CD" Auxiliary Input "AUX" [1] This source can be selected only when it can not be set so that "Pandora", "iHeartRADIO", "aha", and "AUX" sources can be played. [2] Function of KDC-X998/ KDC-BT958HD. [3] Function of iPod connected to (page 66). 14 | KDC-X998/ KDC-BT958HD/ KDC-X898/ KDC-BT858U For how to turn the power ON. The currently selected source is displayed and enters the Source selection mode. 2 Select a source using [Control...
... to rear USB "iHeartRADIO (REAR)" terminal [1] iHeartRadio of device connected via Bluetooth[1] "aha" Bluetooth audio "BT AUDIO" CD[1] "CD" Auxiliary Input "AUX" [1] This source can be selected only when it can not be set so that "Pandora", "iHeartRADIO", "aha", and "AUX" sources can be played. [2] Function of KDC-X998/ KDC-BT958HD. [3] Function of iPod connected to (page 66). 14 | KDC-X998/ KDC-BT958HD/ KDC-X898/ KDC-BT858U For how to turn the power ON. The currently selected source is displayed and enters the Source selection mode. 2 Select a source using [Control...

Instruction Manual
Page 16
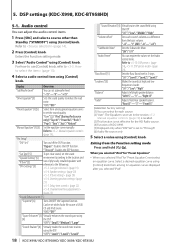
...[3] "User": The customized Bass, Middle, and Treble settings are effective. [4] Displayed only when "LPF SubWoofer" is set Bass, Middle, and Treble levels for each source. 16 | KDC-X998/ KDC-BT958HD/ KDC-X898/ KDC-BT858U Right 15 "Fader" Fader Rear 15 - 4. Adjusting Bass, Middle, and Treble levels • You can adjust the audio control items. 1 Press [SRC] and select a source other than Standby ("STANDBY") using [Control] knob. Audio control You can set to (page 13). 4 Select a audio control item using [Control] knob. Enters the Function setting mode. 3 Select "Audio...
...[3] "User": The customized Bass, Middle, and Treble settings are effective. [4] Displayed only when "LPF SubWoofer" is set Bass, Middle, and Treble levels for each source. 16 | KDC-X998/ KDC-BT958HD/ KDC-X898/ KDC-BT858U Right 15 "Fader" Fader Rear 15 - 4. Adjusting Bass, Middle, and Treble levels • You can adjust the audio control items. 1 Press [SRC] and select a source other than Standby ("STANDBY") using [Control] knob. Audio control You can set to (page 13). 4 Select a audio control item using [Control] knob. Enters the Function setting mode. 3 Select "Audio...
Instruction Manual
Page 18
... the Function setting mode. 3 Select "Audio Control" using [Control] knob. "ON"/ "OFF" "Preset Equalizer"[1][5] Select from among preset equalizer curves to (page 13). 4 Select a audio control item using [Control] knob. "Bypass": Disables the DSP function. For how to use [Control] knob, refer to set the sound quality. "User"[2]/ "iPod"(During iPod source only)/ "Top 40"/ "Powerful"/ "Rock"/ "Pops"/ "Easy"/ "Jazz"/ "Natural" "Manual Equalizer"[1][5] Set the equalizer curve manually. DSP settings (KDC-X998, KDC-BT958HD) 5-1. "+15" "Drive Equalizer"[5] Sets the sound...
... the Function setting mode. 3 Select "Audio Control" using [Control] knob. "ON"/ "OFF" "Preset Equalizer"[1][5] Select from among preset equalizer curves to (page 13). 4 Select a audio control item using [Control] knob. "Bypass": Disables the DSP function. For how to use [Control] knob, refer to set the sound quality. "User"[2]/ "iPod"(During iPod source only)/ "Top 40"/ "Powerful"/ "Rock"/ "Pops"/ "Easy"/ "Jazz"/ "Natural" "Manual Equalizer"[1][5] Set the equalizer curve manually. DSP settings (KDC-X998, KDC-BT958HD) 5-1. "+15" "Drive Equalizer"[5] Sets the sound...

Instruction Manual
Page 19
... "Q Factor"[1] Adjust Q of KDC-X998. "OFF"/ "ON" (Colored text: Factory setting) [1] Function of each band. 1.35/ 1.50/ 2.00 "Bass EXT" - When "Bass EXT" and "Q Factor" are selected, skip step 5. 5 Select a Band using [Control] knob. Enters the Function setting mode. 3 Select "Audio Control" > "Pro Setup" > "Car Type" using [Control] knob. To set the delay time finely • You can compensate the distances in more details by selecting your environment from the Function setting mode Press and hold [1/6]. English | 19 5-2. Manual equalizer control You...
... "Q Factor"[1] Adjust Q of KDC-X998. "OFF"/ "ON" (Colored text: Factory setting) [1] Function of each band. 1.35/ 1.50/ 2.00 "Bass EXT" - When "Bass EXT" and "Q Factor" are selected, skip step 5. 5 Select a Band using [Control] knob. Enters the Function setting mode. 3 Select "Audio Control" > "Pro Setup" > "Car Type" using [Control] knob. To set the delay time finely • You can compensate the distances in more details by selecting your environment from the Function setting mode Press and hold [1/6]. English | 19 5-2. Manual equalizer control You...

Instruction Manual
Page 20
.../Oct "GAIN" Subwoofer gain -8 ,-7, -6, -5, -4, -3, -2, -1, 0 dB "PHASE" Subwoofer phase "REV" (180°)/ "NML" (0°) 20 | KDC-X998/ KDC-BT958HD/ KDC-X898/ KDC-BT858U Refer to (page 14). 2 Press [Control] knob. X'Over setting Fine adjusting the following items. 1 Press [SRC] and select a source other than Standby ("STANDBY") using [Control] knob. Enters the Function setting mode. 3 Select "Audio Control" > "Pro Setup" > "X'Over" using [Control] knob. For how to use [Control] knob, refer to (page 13). 4 Select a speaker type using [Control] knob. Exiting...
.../Oct "GAIN" Subwoofer gain -8 ,-7, -6, -5, -4, -3, -2, -1, 0 dB "PHASE" Subwoofer phase "REV" (180°)/ "NML" (0°) 20 | KDC-X998/ KDC-BT958HD/ KDC-X898/ KDC-BT858U Refer to (page 14). 2 Press [Control] knob. X'Over setting Fine adjusting the following items. 1 Press [SRC] and select a source other than Standby ("STANDBY") using [Control] knob. Enters the Function setting mode. 3 Select "Audio Control" > "Pro Setup" > "X'Over" using [Control] knob. For how to use [Control] knob, refer to (page 13). 4 Select a speaker type using [Control] knob. Exiting...
Instruction Manual
Page 26
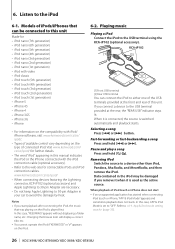
... cannot operate the iPod if "KENWOOD" or "ä" appears on the iPod is set to either one of the USB terminals provided at the rear, the "REAR USB" indicator stays lit. Selecting a song Press [E] or [F] button. Models of this case, "RESUMING" appears without displaying a folder name, etc. Notes • If you remove it when it is connected, the source is used as the active source. In this unit. In this unit...
... cannot operate the iPod if "KENWOOD" or "ä" appears on the iPod is set to either one of the USB terminals provided at the rear, the "REAR USB" indicator stays lit. Selecting a song Press [E] or [F] button. Models of this case, "RESUMING" appears without displaying a folder name, etc. Notes • If you remove it when it is connected, the source is used as the active source. In this unit. In this unit...
Instruction Manual
Page 66
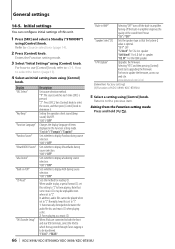
... during source selection. Turning off the built-in amplifier improves the quality of KDC-X898/ KDC-BT858U. 5 Select a setting using [Control] knob. www.kenwood.com/cs/ce/ (Colored text: Factory setting) [1] Function of the sound from the Function setting mode Press and hold [1/6]. 66 | KDC-X998/ KDC-BT958HD/ KDC-X898/ KDC-BT858U Returns to determine it. Initial settings You can configure initial settings of items displayed in . Enters the Function setting mode. 3 Select "Initial Settings" using [Control] knob. "2": Press [SRC], Turn [Control] knob to select the source, and...
... during source selection. Turning off the built-in amplifier improves the quality of KDC-X898/ KDC-BT858U. 5 Select a setting using [Control] knob. www.kenwood.com/cs/ce/ (Colored text: Factory setting) [1] Function of the sound from the Function setting mode Press and hold [1/6]. 66 | KDC-X998/ KDC-BT958HD/ KDC-X898/ KDC-BT858U Returns to determine it. Initial settings You can configure initial settings of items displayed in . Enters the Function setting mode. 3 Select "Initial Settings" using [Control] knob. "2": Press [SRC], Turn [Control] knob to select the source, and...
Instruction Manual
Page 68
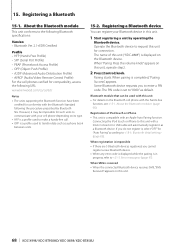
... (Audio/Video Remote Control Profile) For the cell phones verified for compatibility, access the following URL: www.kenwood.com/cs/ce/bt/ Notes • The units supporting the Bluetooth function have been certified for connection. If you to request this unit. 68 | KDC-X998/ KDC-BT958HD/ KDC-X898/ KDC-BT858U However, it as default. The name of IPod touch or iPhone • This unit is completed, "Pairing Success" appears. Operate the Bluetooth device to enter a PIN code...
... (Audio/Video Remote Control Profile) For the cell phones verified for compatibility, access the following URL: www.kenwood.com/cs/ce/bt/ Notes • The units supporting the Bluetooth function have been certified for connection. If you to request this unit. 68 | KDC-X998/ KDC-BT958HD/ KDC-X898/ KDC-BT858U However, it as default. The name of IPod touch or iPhone • This unit is completed, "Pairing Success" appears. Operate the Bluetooth device to enter a PIN code...

Instruction Manual
Page 69
... phone Book and log are also deleted. When no device can delete a registered Bluetooth device. 1 Press [Ú]. When a registered device is deleted • When a registered cell phone is on standby. "(name)" appears. 3 Select a Bluetooth device using [Control] knob. '*(name)' or '-(name)' is deselected. " " (blank): The Bluetooth device is displayed. Exiting from the Bluetooth mode Press [Ú]. "Completed" appears. "BT MODE" appears and enter the Bluetooth mode. 2 Select "Settings" > "Pairing" > "Phone Selection" (to select the cell phone) or "Audio Selection...
... phone Book and log are also deleted. When no device can delete a registered Bluetooth device. 1 Press [Ú]. When a registered device is deleted • When a registered cell phone is on standby. "(name)" appears. 3 Select a Bluetooth device using [Control] knob. '*(name)' or '-(name)' is deselected. " " (blank): The Bluetooth device is displayed. Exiting from the Bluetooth mode Press [Ú]. "Completed" appears. "BT MODE" appears and enter the Bluetooth mode. 2 Select "Settings" > "Pairing" > "Phone Selection" (to select the cell phone) or "Audio Selection...

Instruction Manual
Page 83
... rear speakers. Refer to this unit. "+8" "Echo Cancel Level" Sets the echo cancellation level. "Call Beep" Sets whether to "ON", starts re-pairing with the Bluetooth device. "0" - "99SEC": Automatically answers the phone call automatically. "Auto Reconnect" When set to "ON", the Apple Auto Pairing function is turned on to automatically register the iPod touch or iPhone connected to (page 82). "Front" : Outputs sound from the Bluetooth mode Press [Ú]. "1" - English | 83 Display Description "PIN Edit" Sets the PIN code...
... rear speakers. Refer to this unit. "+8" "Echo Cancel Level" Sets the echo cancellation level. "Call Beep" Sets whether to "ON", starts re-pairing with the Bluetooth device. "0" - "99SEC": Automatically answers the phone call automatically. "Auto Reconnect" When set to "ON", the Apple Auto Pairing function is turned on to automatically register the iPod touch or iPhone connected to (page 82). "Front" : Outputs sound from the Bluetooth mode Press [Ú]. "1" - English | 83 Display Description "PIN Edit" Sets the PIN code...

Instruction Manual
Page 90
..., a content name is displayed. Exiting from the Function setting mode Press and hold [Control] knob. 3 Select a content type using [Control] knob. The current source switches to the desired channel, even though the receiving source is other than SiriusXM Satellite Radio. When the Song or Artist is not displayed • The Content Alert message is being displayed. 2 Press [Control] knob. 3 Select the content using [Control] knob. Song or Artist setting You can be...
..., a content name is displayed. Exiting from the Function setting mode Press and hold [Control] knob. 3 Select a content type using [Control] knob. The current source switches to the desired channel, even though the receiving source is other than SiriusXM Satellite Radio. When the Song or Artist is not displayed • The Content Alert message is being displayed. 2 Press [Control] knob. 3 Select the content using [Control] knob. Song or Artist setting You can be...

Instruction Manual
Page 96
.... Operation/wiring error What might seem to (page 49). Í The recording condition is bad. ò Play the media again or use . ò The key beep cannot be output from the Preout jack. ö Sound cannot be disabled by some settings made on the display is disabled. ò "DSP Set" of iHeartRadio, some stations become unavailable. 96 | KDC-X998/ KDC-BT958HD/ KDC-X898/ KDC-BT858U Disc source ö...
.... Operation/wiring error What might seem to (page 49). Í The recording condition is bad. ò Play the media again or use . ò The key beep cannot be output from the Preout jack. ö Sound cannot be disabled by some settings made on the display is disabled. ò "DSP Set" of iHeartRadio, some stations become unavailable. 96 | KDC-X998/ KDC-BT958HD/ KDC-X898/ KDC-BT858U Disc source ö...

Instruction Manual
Page 97
... memory of the vehicle, and then the protection function has been activated. ò Lay or insulate the speaker cable properly and press the Reset button. No more Bluetooth devices are registered. ö "Pairing Failed" Í Pairing error. ö "N/A Voice Tag" Í No voice tags are registered in your nearest service center. ö "NA File" Í An Audio file is played in the phone book. ö "No Support" Í The connected Bluetooth device...
... memory of the vehicle, and then the protection function has been activated. ò Lay or insulate the speaker cable properly and press the Reset button. No more Bluetooth devices are registered. ö "Pairing Failed" Í Pairing error. ö "N/A Voice Tag" Í No voice tags are registered in your nearest service center. ö "NA File" Í An Audio file is played in the phone book. ö "No Support" Í The connected Bluetooth device...

Quick Start Guide
Page 2
... use 3 Preparations 4 General operations 6 Playing music (CD/USB/iPod 7 Listening to the radio/HD Radio™ tuner/ SiriusXM® Satellite Radio 8 Hands-free phoning 9 Before installation 10 Connecting wires to explain more clearly how the controls are used batteries promptly. Dispose of this manual are examples used to terminals 12 Installing/Removing the unit 14 Installing the Microphone unit 15 Appendix 15 About the Quick Start Guide This Quick Start Guide describes basic functions of used . The illustrations of the display...
... use 3 Preparations 4 General operations 6 Playing music (CD/USB/iPod 7 Listening to the radio/HD Radio™ tuner/ SiriusXM® Satellite Radio 8 Hands-free phoning 9 Before installation 10 Connecting wires to explain more clearly how the controls are used batteries promptly. Dispose of this manual are examples used to terminals 12 Installing/Removing the unit 14 Installing the Microphone unit 15 Appendix 15 About the Quick Start Guide This Quick Start Guide describes basic functions of used . The illustrations of the display...

Quick Start Guide
Page 4
... unit for the first time after installation. 1 Press [Control] knob to cancel the Demonstration mode when the message "To cancel DEMO Press the volume knob" appears (approx. 15 seconds). 2 Turn [Control] knob to select "YES", and then press [Control] knob. The item can also be selected and determined as follows. The Demonstration mode can be canceled in Instruction manual Adjusting the clock 1 Press [Control] knob to exits the Function setting mode...
... unit for the first time after installation. 1 Press [Control] knob to cancel the Demonstration mode when the message "To cancel DEMO Press the volume knob" appears (approx. 15 seconds). 2 Turn [Control] knob to select "YES", and then press [Control] knob. The item can also be selected and determined as follows. The Demonstration mode can be canceled in Instruction manual Adjusting the clock 1 Press [Control] knob to exits the Function setting mode...

Quick Start Guide
Page 10
... unit during installation, consult your vehicle. • Do not touch the metal parts of the rear output terminals (do not mix front and rear terminals). connector to a rear output terminal. • Connect the speaker wires correctly to the power source running through the fuse box. ! Metal parts such as with battery wires, the battery may die. • If the console has a lid, make sure the wires are metal objects near the Bluetooth antenna...
... unit during installation, consult your vehicle. • Do not touch the metal parts of the rear output terminals (do not mix front and rear terminals). connector to a rear output terminal. • Connect the speaker wires correctly to the power source running through the fuse box. ! Metal parts such as with battery wires, the battery may die. • If the console has a lid, make sure the wires are metal objects near the Bluetooth antenna...


