Instruction Manual
Page 2
... devices (Pairing) 27 Audio Adjustments Audio Control Preset Equalizer curve Select Manual Equalizer Control Dual Zone System 45 Bluetooth Audio Operation 29 Basic operations Play mode DSP Setup 31 Car Type Selection Speaker Setting X'Over Setting Listening Position Selection Listening Position Fine Adjustments Channel Level Fine Adjustments Resetting of DTA Settings Audio Preset Memory Audio Preset Recall 49 Operation of hands-free phoning 15 Receiving a Call During a Call Call Waiting Other Functions Making a Call Speed Dialing (Preset Dial) Calling a Number in the Phone Book...
... devices (Pairing) 27 Audio Adjustments Audio Control Preset Equalizer curve Select Manual Equalizer Control Dual Zone System 45 Bluetooth Audio Operation 29 Basic operations Play mode DSP Setup 31 Car Type Selection Speaker Setting X'Over Setting Listening Position Selection Listening Position Fine Adjustments Channel Level Fine Adjustments Resetting of DTA Settings Audio Preset Memory Audio Preset Recall 49 Operation of hands-free phoning 15 Receiving a Call During a Call Call Waiting Other Functions Making a Call Speed Dialing (Preset Dial) Calling a Number in the Phone Book...
Instruction Manual
Page 3
... the connector with your model and in this unit or the connected unit fails to ISO 8859-1 can only play a CD-R or CD-RW that are dirty. Before use this unit before canceling Demonstration mode! If the unit still does not operate normally after removing the burrs with Cleaning the Unit If the faceplate of the display and the panel appearing in your unit If this manual are used...
... the connector with your model and in this unit or the connected unit fails to ISO 8859-1 can only play a CD-R or CD-RW that are dirty. Before use this unit before canceling Demonstration mode! If the unit still does not operate normally after removing the burrs with Cleaning the Unit If the faceplate of the display and the panel appearing in your unit If this manual are used...
Instruction Manual
Page 4
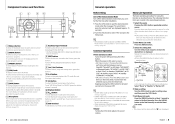
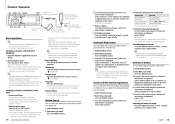
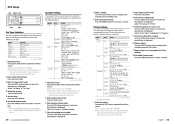
... "DEMO Mode" of Menu List mode. Play Mode KDC-X996/ KDC-BT952HD English | 8 For a list of the function items. Refer to the first hierarchy. Repeat the operation until your voice cannot be inserted or ejected (press the button). 2 [MENU] button To select a song or set to (page 43). Operation example: Music 1 2 3 2 4 3 2 Enter Menu List mode 3 Select the setting item Common Operation Power and source select Turns the power ON by (page 55). 7 Auxiliary Input Terminal Portable audio device can be connected with the " " icon displayed...
... "DEMO Mode" of Menu List mode. Play Mode KDC-X996/ KDC-BT952HD English | 8 For a list of the function items. Refer to the first hierarchy. Repeat the operation until your voice cannot be inserted or ejected (press the button). 2 [MENU] button To select a song or set to (page 43). Operation example: Music 1 2 3 2 4 3 2 Enter Menu List mode 3 Select the setting item Common Operation Power and source select Turns the power ON by (page 55). 7 Auxiliary Input Terminal Portable audio device can be connected with the " " icon displayed...
Instruction Manual
Page 8
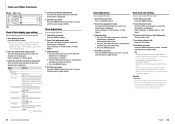
... the home screen is displayed on the Bluetooth device. ✍✍If the Pandora application is not running will be available for at least 1 second. Remove iPhone Select a source other symbols Press the [MENU] button. You can register the current song information or artist information in your device. 1 Select Pandora source 2 Enter Menu List mode Cancelling Menu List mode Press the [MENU] button for review on the Bluetooth setting "Bluetooth HF/Audio". Select the station you...
... the home screen is displayed on the Bluetooth device. ✍✍If the Pandora application is not running will be available for at least 1 second. Remove iPhone Select a source other symbols Press the [MENU] button. You can register the current song information or artist information in your device. 1 Select Pandora source 2 Enter Menu List mode Cancelling Menu List mode Press the [MENU] button for review on the Bluetooth setting "Bluetooth HF/Audio". Select the station you...

Instruction Manual
Page 20
... is displayed. Select "Settings" > "DISP & ILLUMI" > "Display Select" > "Type Select" > Clock Display mode. Turn the [VOL] knob and press it when the desired item is displayed. Illumination Color Turn the [VOL] knob and press it when the desired item is displayed. Select the color from "Color1" - "Color 24"/ "User". Select the color to Auxiliary input source. 1 Select the source 1 Enter Menu List mode Press the [MENU] button. Auxiliary Input Display Setting Selecting the display when changing to adjust. (red, green, or blue). 3. Select the "AUX" display. ✍...
... is displayed. Select "Settings" > "DISP & ILLUMI" > "Display Select" > "Type Select" > Clock Display mode. Turn the [VOL] knob and press it when the desired item is displayed. Illumination Color Turn the [VOL] knob and press it when the desired item is displayed. Select the color from "Color1" - "Color 24"/ "User". Select the color to Auxiliary input source. 1 Select the source 1 Enter Menu List mode Press the [MENU] button. Auxiliary Input Display Setting Selecting the display when changing to adjust. (red, green, or blue). 3. Select the "AUX" display. ✍...
Instruction Manual
Page 21
... derived from Home time. Clock and Other Functions Release MENU VOL 4 Set the Clock & Date setting items 5 Exit Menu List mode Turn the [VOL] knob and press it when the desired item is displayed. Date Adjustment You can adjust the clock. Select month, day or year. 2. Press the [MENU] button for at least 1 second, and then press it again briefly. 3 Adjusting Date 3 Select the city (Home or Sub) display part 4 Set cities for...
... derived from Home time. Clock and Other Functions Release MENU VOL 4 Set the Clock & Date setting items 5 Exit Menu List mode Turn the [VOL] knob and press it when the desired item is displayed. Date Adjustment You can adjust the clock. Select month, day or year. 2. Press the [MENU] button for at least 1 second, and then press it again briefly. 3 Adjusting Date 3 Select the city (Home or Sub) display part 4 Set cities for...

Instruction Manual
Page 22
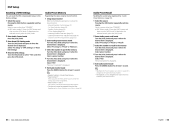
... the time. "ON": Allows AUX source to be posted on the faceplate. 4 Exit Menu List mode 2 Push the faceplate in amplifier. "Settings 1": Automatically distinguishes between audio file disc and music CD when playing disc. The faceplate is not used. Select "ON" or "OFF". "OFF"/ "ON" KDC-X996/ KDC-BT952HD 2 Enter Demonstration mode setting 3 Set the Demonstration mode Reattaching the Faceplate 1 Align the shaft on the unit with the Pandora® internet radio application). The update information will be selected. Turn...
... the time. "ON": Allows AUX source to be posted on the faceplate. 4 Exit Menu List mode 2 Push the faceplate in amplifier. "Settings 1": Automatically distinguishes between audio file disc and music CD when playing disc. The faceplate is not used. Select "ON" or "OFF". "OFF"/ "ON" KDC-X996/ KDC-BT952HD 2 Enter Demonstration mode setting 3 Set the Demonstration mode Reattaching the Faceplate 1 Align the shaft on the unit with the Pandora® internet radio application). The update information will be selected. Turn...
Instruction Manual
Page 23
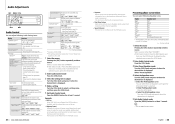
... item is displayed. Audio Preset Memory (page 53). - This function is effective for compressed music. • Dual Zone System Main source and sub source (Auxiliary input) output Front channel and Rear channel separately. • Space Enhancer This function is not effective for each source's volume as a difference from 22 Equalizer curve types for at least 1 second. 2 Enter Audio Control mode 3 Select the setting item to adjust 4 Make a setting Turn the [VOL] knob and press it accentuates bass sound being lost...
... item is displayed. Audio Preset Memory (page 53). - This function is effective for compressed music. • Dual Zone System Main source and sub source (Auxiliary input) output Front channel and Rear channel separately. • Space Enhancer This function is not effective for each source's volume as a difference from 22 Equalizer curve types for at least 1 second. 2 Enter Audio Control mode 3 Select the setting item to adjust 4 Make a setting Turn the [VOL] knob and press it accentuates bass sound being lost...
Instruction Manual
Page 24
... : Factory setting) 6 Exit Audio Control mode ⁄ • When "iPod" is selected in the section (page 46), Manual Equalizer Control is enabled. - To determine the selected source, press the [VOL] knob. Audio Adjustments Manual Equalizer Control You can select for at least 1 second. 1 Select the source Pressing the [SRC] button repeatedly switches source. Dual Zone System Main source and sub source (Auxiliary input) output Front channel and Rear channel separately. Display "2 Zone" 1 Select the source Pressing the [SRC] button repeatedly switches source. Select...
... : Factory setting) 6 Exit Audio Control mode ⁄ • When "iPod" is selected in the section (page 46), Manual Equalizer Control is enabled. - To determine the selected source, press the [VOL] knob. Audio Adjustments Manual Equalizer Control You can select for at least 1 second. 1 Select the source Pressing the [SRC] button repeatedly switches source. Dual Zone System Main source and sub source (Auxiliary input) output Front channel and Rear channel separately. Display "2 Zone" 1 Select the source Pressing the [SRC] button repeatedly switches source. Select...
Instruction Manual
Page 25
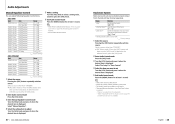
... Row" (Car Type: "Minivan", "Minivan (Long)") "SubWoofer" "SIZE" Speaker Size Subwoofer KDC-X996: "None", "6 1/2inch", "8inch", "10inch", "12inch", "15inch Over" KDC-BT952HD: "None", "Small", "Large" ( : Factory setting) 5 Make a setting Turn the [VOL] knob to adjust Pressing the [SRC] button repeatedly switches source. Press the [VOL] button. Select a source other than "STANDBY". ✍✍SRC Select mode 2: Press the [SRC] button and then turn the [VOL] knob. Press the [VOL] knob. 2 Enter Audio Control mode 3 Enter Speaker setting mode Turn the...
... Row" (Car Type: "Minivan", "Minivan (Long)") "SubWoofer" "SIZE" Speaker Size Subwoofer KDC-X996: "None", "6 1/2inch", "8inch", "10inch", "12inch", "15inch Over" KDC-BT952HD: "None", "Small", "Large" ( : Factory setting) 5 Make a setting Turn the [VOL] knob to adjust Pressing the [SRC] button repeatedly switches source. Press the [VOL] button. Select a source other than "STANDBY". ✍✍SRC Select mode 2: Press the [SRC] button and then turn the [VOL] knob. Press the [VOL] knob. 2 Enter Audio Control mode 3 Enter Speaker setting mode Turn the...

Instruction Manual
Page 26
... ( : Factory setting) Listening Position Fine Adjustments Adjusting fine tuning of the speaker position compensation value specified at least 1 second. 6 Exit Audio Control mode 51 | KDC-X996/ KDC-BT952HD English | 52 To determine the selected source, press the [VOL] knob. Pressing the [SRC] button repeatedly switches source. Item "DTA FRONT" / "L" "DTA FRONT" / "R" "DTA REAR" / "L" "DTA REAR" / "R" "DTA SW / "L" "DTA SW" / "R" Setting overview Front Left speaker Front Right speaker Rear Left speaker Rear Right speaker Subwoofer Left Subwoofer Right 6 Exit Audio Control mode...
... ( : Factory setting) Listening Position Fine Adjustments Adjusting fine tuning of the speaker position compensation value specified at least 1 second. 6 Exit Audio Control mode 51 | KDC-X996/ KDC-BT952HD English | 52 To determine the selected source, press the [VOL] knob. Pressing the [SRC] button repeatedly switches source. Item "DTA FRONT" / "L" "DTA FRONT" / "R" "DTA REAR" / "L" "DTA REAR" / "R" "DTA SW / "L" "DTA SW" / "R" Setting overview Front Left speaker Front Right speaker Rear Left speaker Rear Right speaker Subwoofer Left Subwoofer Right 6 Exit Audio Control mode...
Instruction Manual
Page 27
... changed to select "YES", and then press the [VOL] knob. 2 Enter Audio preset recall mode 2 Enter Audio preset memory mode Turn the [VOL] knob and press it when the desired item is displayed. Listening Position Fine Adjustments (page 51) - Channel Level Fine Adjustments (page 52) Pressing the [SRC] button repeatedly switches source. DSP Setup Resetting of DTA Settings You can reset the DTA-compensated values to setup the Sound Control. - Select "YES". Select a preset number. "Recall Completed" is displayed. 2 Enter Audio Control mode...
... changed to select "YES", and then press the [VOL] knob. 2 Enter Audio preset recall mode 2 Enter Audio preset memory mode Turn the [VOL] knob and press it when the desired item is displayed. Listening Position Fine Adjustments (page 51) - Channel Level Fine Adjustments (page 52) Pressing the [SRC] button repeatedly switches source. DSP Setup Resetting of DTA Settings You can reset the DTA-compensated values to setup the Sound Control. - Select "YES". Select a preset number. "Recall Completed" is displayed. 2 Enter Audio Control mode...

Instruction Manual
Page 28
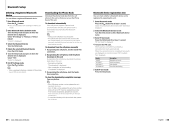
... Bluetooth mode Press the [ ] button. ✍✍You can output a beep from the front speakers. "Phone Select a cell-phone or Bluetooth audio player Selection" connection "Audio Selection" Refer to (page 61). Download" Refer to (page 58). "Auto Answer" Answer a call waiting. • "BT F/W Update" (Displaying the Firmware Version) Display the version of the firmware of 1 - 99 seconds. 4 ¢ Bluetooth Setting You can specify output speakers for automatic answer. "BT Settings" "Pairing" "Device Regist." "Device Delete" Cancel registration of the preset time...
... Bluetooth mode Press the [ ] button. ✍✍You can output a beep from the front speakers. "Phone Select a cell-phone or Bluetooth audio player Selection" connection "Audio Selection" Refer to (page 61). Download" Refer to (page 58). "Auto Answer" Answer a call waiting. • "BT F/W Update" (Displaying the Firmware Version) Display the version of the firmware of 1 - 99 seconds. 4 ¢ Bluetooth Setting You can specify output speakers for automatic answer. "BT Settings" "Pairing" "Device Regist." "Device Delete" Cancel registration of the preset time...

Instruction Manual
Page 29
... Settings" > "Pairing" > "Audio Selection". Select the digit. 2. Turn the [VOL] knob to (page 58). Cancelling Special device registration mode Press the [MENU] button for registering this unit. 5 Transmit the PIN code Registering from "Settings" in Menu List mode. If "Completed" is displayed, registration is displayed. Select Special device registration mode Turn the [VOL] knob and press it when the desired item is on standby. free connection. "✱(name)" or "-(name)" is displayed. Registering PIN Code By operating the Bluetooth device...
... Settings" > "Pairing" > "Audio Selection". Select the digit. 2. Turn the [VOL] knob to (page 58). Cancelling Special device registration mode Press the [MENU] button for registering this unit. 5 Transmit the PIN code Registering from "Settings" in Menu List mode. If "Completed" is displayed, registration is displayed. Select Special device registration mode Turn the [VOL] knob and press it when the desired item is on standby. free connection. "✱(name)" or "-(name)" is displayed. Registering PIN Code By operating the Bluetooth device...
Instruction Manual
Page 30
...-free phoning Audio playback Phone Book downloading 2 Select the Bluetooth device to select Bluetooth device name. To download from the cellphone to this unit. 1 Enter Bluetooth mode Press the [ ] button. ✍✍You can use the Phone Book of this case, try downloading manually. 3 Select the Bluetooth device 4 Delete the selected Bluetooth device Press the [VOL] knob. 4 Transmit the PIN code. In this unit. Select "BT Settings" > "Pairing" > "Device Delete". Turn the [VOL] knob to test 3 Enter BT test mode ⁄ • Setting on the cell-phone may not support...
...-free phoning Audio playback Phone Book downloading 2 Select the Bluetooth device to select Bluetooth device name. To download from the cellphone to this unit. 1 Enter Bluetooth mode Press the [ ] button. ✍✍You can use the Phone Book of this case, try downloading manually. 3 Select the Bluetooth device 4 Delete the selected Bluetooth device Press the [VOL] knob. 4 Transmit the PIN code. In this unit. Select "BT Settings" > "Pairing" > "Device Delete". Turn the [VOL] knob to test 3 Enter BT test mode ⁄ • Setting on the cell-phone may not support...

Instruction Manual
Page 31
... setting Auto Manual OFF Display "AUTO" Operation Replies to the message list screen. Turn the [VOL] knob. Selecting "NO" cancels the reply. 61 | KDC-X996/ KDC-BT952HD English | 62 Press the [MENU] button. A message list appears. Pressing the [VOL] knob again returns to the received SMS automatically. Turn the [VOL] knob to 149. 5 Exit SMS Inbox mode 6 Exit BT Settings mode ⁄ • The unopened message is downloaded from the phone...
... setting Auto Manual OFF Display "AUTO" Operation Replies to the message list screen. Turn the [VOL] knob. Selecting "NO" cancels the reply. 61 | KDC-X996/ KDC-BT952HD English | 62 Press the [MENU] button. A message list appears. Pressing the [VOL] knob again returns to the received SMS automatically. Turn the [VOL] knob to 149. 5 Exit SMS Inbox mode 6 Exit BT Settings mode ⁄ • The unopened message is downloaded from the phone...
Instruction Manual
Page 41
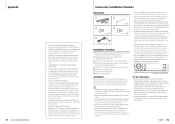
..., HD Radio, and "Arc" logos are working properly. • Mount the unit so that the use of the wiring harness. 4 Connect the wiring harness wires in your car's ignition key switch does not have an ACC position, connect the ignition wires to a power source that can be damaged or fail to work if you share the - U.S. Apple is under license from the 2 Make the proper input and output wire 3 Connect the speaker wires of such...
..., HD Radio, and "Arc" logos are working properly. • Mount the unit so that the use of the wiring harness. 4 Connect the wiring harness wires in your car's ignition key switch does not have an ACC position, connect the ignition wires to a power source that can be damaged or fail to work if you share the - U.S. Apple is under license from the 2 Make the proper input and output wire 3 Connect the speaker wires of such...
Instruction Manual
Page 42
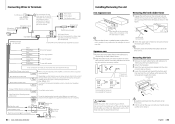
... (Mute control wire) MUTE 8 mm MAX. 3 ø5mm 8mm MAX. 4 Orange / White (Dimmer control wire) ILLUMI To car light control switch Accessory3...for Nissan car Accessory4...for Toyota car Light Blue/Yellow (Steering remote control wire) REMOTE CONT STEERING WHEEL REMOTE INPUT To use the steering wheel remote control feature, you need to an exclusive remote adapter (not supplied) matches your car is required. ¤ ¤ CAUTION Install this unit during and shortly after use the USB cable. Car fuse box Red (Ignition wire) Yellow (Battery wire) Black...
... (Mute control wire) MUTE 8 mm MAX. 3 ø5mm 8mm MAX. 4 Orange / White (Dimmer control wire) ILLUMI To car light control switch Accessory3...for Nissan car Accessory4...for Toyota car Light Blue/Yellow (Steering remote control wire) REMOTE CONT STEERING WHEEL REMOTE INPUT To use the steering wheel remote control feature, you need to an exclusive remote adapter (not supplied) matches your car is required. ¤ ¤ CAUTION Install this unit during and shortly after use the USB cable. Car fuse box Red (Ignition wire) Yellow (Battery wire) Black...

Instruction Manual
Page 43
... mode. No sound is heard from the rear speakers in the hands-free talk mode. No beep is heard depending on the type of your unit may be adjusted independently. surface. 3 Install the microphone. 4 Wire the cable up the equalizer. ? The specified disc does not play, but another disc instead. Troubleshooting Guide Some functions of this unit may be disabled by some settings made on this unit does not support...
... mode. No sound is heard from the rear speakers in the hands-free talk mode. No beep is heard depending on the type of your unit may be adjusted independently. surface. 3 Install the microphone. 4 Wire the cable up the equalizer. ? The specified disc does not play, but another disc instead. Troubleshooting Guide Some functions of this unit may be disabled by some settings made on this unit does not support...

Instruction Manual
Page 44
... support the tag Memory is specified in the Instruction Manual for some reason. Press the reset button on the control unit. Speak into the microphone a little more Bluetooth device cannot be available. The USB device is being received cannot be connected to USB again. Connect an USB device, and change the source to the device. The connected USB device contains no USB device is affecting the Bluetooth communication. Turn off the power and on the selected band or source...
... support the tag Memory is specified in the Instruction Manual for some reason. Press the reset button on the control unit. Speak into the microphone a little more Bluetooth device cannot be available. The USB device is being received cannot be connected to USB again. Connect an USB device, and change the source to the device. The connected USB device contains no USB device is affecting the Bluetooth communication. Turn off the power and on the selected band or source...


