

Instruction Manual
Page 2
... Indicator) 10 Selectable Illumination Dimmer System Q Setting Switching preout Built-in Auxiliary input Setting CD Read Setting AMP Control Receive mode Setting Basic Operations of remote 30 Accessories/ 18 Installation Procedure 32 Connecting Wires to Terminals 33 Installation 34 Removing the Unit 36 Troubleshooting Guide 37 20 Specifications 40 Frequency Offset...
... Indicator) 10 Selectable Illumination Dimmer System Q Setting Switching preout Built-in Auxiliary input Setting CD Read Setting AMP Control Receive mode Setting Basic Operations of remote 30 Accessories/ 18 Installation Procedure 32 Connecting Wires to Terminals 33 Installation 34 Removing the Unit 36 Troubleshooting Guide 37 20 Specifications 40 Frequency Offset...

Instruction Manual
Page 15
... CD changer/ player manual. • The title of station/CD can be attached to the source if "DNPS" or "SNPS" cannot be changed by using a remote with a number buttons.
... CD changer/ player manual. • The title of station/CD can be attached to the source if "DNPS" or "SNPS" cannot be changed by using a remote with a number buttons.

Instruction Manual
Page 18
... and tuning. 1 Select the band Press the [FM] or [AM] button. 2 Enter Direct Access Tuning mode Press the [DIRECT] button on the remote. Each time the button is pressed it switches 18 | English between the FM1, FM2, and FM3 bands. 3 Tune up or down band Press the .... • During reception of the stations in order of stereo stations the "ST" indicator is displayed. 3 Enter the frequency Press the number buttons on the remote. "- - - -" is ON. Manual "Manual" Normal manual tuning control. Select the "TUNER" display. 2 Select the band Press the [FM] or [AM] button. Press...
... and tuning. 1 Select the band Press the [FM] or [AM] button. 2 Enter Direct Access Tuning mode Press the [DIRECT] button on the remote. Each time the button is pressed it switches 18 | English between the FM1, FM2, and FM3 bands. 3 Tune up or down band Press the .... • During reception of the stations in order of stereo stations the "ST" indicator is displayed. 3 Enter the frequency Press the number buttons on the remote. "- - - -" is ON. Manual "Manual" Normal manual tuning control. Select the "TUNER" display. 2 Select the band Press the [FM] or [AM] button. Press...

Instruction Manual
Page 19
English | 19 The preset number display blinks 1 time. Preset Tuning Calling up the stations in the memory on the remote. Auto Memory Entry Putting stations with good reception in the memory automatically. 1 Select the band for Auto Memory Entry Press the [FM] or [AM] button. 2 ...
English | 19 The preset number display blinks 1 time. Preset Tuning Calling up the stations in the memory on the remote. Auto Memory Entry Putting stations with good reception in the memory automatically. 1 Select the band for Auto Memory Entry Press the [FM] or [AM] button. 2 ...

Instruction Manual
Page 21
... on the MP3/WMA media. Select the display for a song on the disc or in the MP3/ WMA folder. Function of disc changers with remote Direct Disc Search Doing Disc Search by entering the track/file number. 1 Enter the track/file number Press the number buttons on the [4] button.... player CD player CD changer MD changer Pause and play the disc at that point. Press the [4] or [¢] button. English | 21 Function of remote Direct Track/File Search Doing Track/File Search by entering the disc number. 1 Enter the disc number Press the number buttons on the [¢] button...
... on the MP3/WMA media. Select the display for a song on the disc or in the MP3/ WMA folder. Function of disc changers with remote Direct Disc Search Doing Disc Search by entering the track/file number. 1 Enter the track/file number Press the number buttons on the [4] button.... player CD player CD changer MD changer Pause and play the disc at that point. Press the [4] or [¢] button. English | 21 Function of remote Direct Track/File Search Doing Track/File Search by entering the disc number. 1 Enter the disc number Press the number buttons on the [¢] button...

Instruction Manual
Page 23
...for details. Forward / Reverse display Press the [DISC-] or [DISC+] button. 2 When the disc you want is displayed Press the [OK] button on the remote. Text/Title Scroll Scrolling the displayed CD text or MD title. English | 23 When "DNPP" is played. Canceling the Folder Select mode Press the [F.SEL...] button. Canceling the DNPP mode Press the [DNPP] button on the remote. • The methods for at least 1 second. See 'Notes on the remote. Function of disc changers with remote DNPP (Disc Name Preset Play) Selecting the CD displayed in the DNPS of the CDs set...
...for details. Forward / Reverse display Press the [DISC-] or [DISC+] button. 2 When the disc you want is displayed Press the [OK] button on the remote. Text/Title Scroll Scrolling the displayed CD text or MD title. English | 23 When "DNPP" is played. Canceling the Folder Select mode Press the [F.SEL...] button. Canceling the DNPP mode Press the [DNPP] button on the remote. • The methods for at least 1 second. See 'Notes on the remote. Function of disc changers with remote DNPP (Disc Name Preset Play) Selecting the CD displayed in the DNPS of the CDs set...
Instruction Manual
Page 30
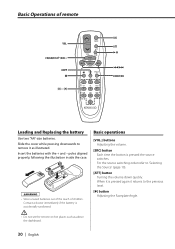
... button is accidentally swallowed. Slide the cover while pressing downwards to the previous level. [✱] button Adjusting the Faceplate Angle. • Do not set the remote on hot places such as illustrated. Insert the batteries with the + and - When it is pressed again it returns to remove it as above the...] button Turning the volume down quickly. poles aligned properly, following the illustration inside the case. 2WARNING • Store unused batteries out of the reach of remote VOL. Basic Operations of children. FM/AM/DISC+/DISC-
... button is accidentally swallowed. Slide the cover while pressing downwards to the previous level. [✱] button Adjusting the Faceplate Angle. • Do not set the remote on hot places such as illustrated. Insert the batteries with the + and - When it is pressed again it returns to remove it as above the...] button Turning the volume down quickly. poles aligned properly, following the illustration inside the case. 2WARNING • Store unused batteries out of the reach of remote VOL. Basic Operations of children. FM/AM/DISC+/DISC-


