Instruction Manual
Page 2
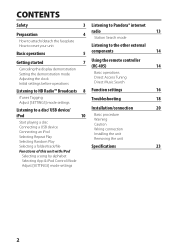
... Direct Music Search Listening to HD Radio™ Broadcasts 8 Function settings 16 iTunes Tagging Troubleshooting 18 Adjust [SETTINGS] mode settings Listening to a disc/ USB device/ Installation/connection 20 iPod Start playing a disc Connecting a USB device Connecting an iPod Selecting Repeat Play Selecting Random Play 10 Basic procedure Warning Caution Wiring connection Installing the unit Removing the unit Selecting a folder/track/file Specifications 23 Functions of this unit with iPod Selecting a song by alphabet Selecting App & iPod Control Mode Adjust [SETTINGS] mode...
... Direct Music Search Listening to HD Radio™ Broadcasts 8 Function settings 16 iTunes Tagging Troubleshooting 18 Adjust [SETTINGS] mode settings Listening to a disc/ USB device/ Installation/connection 20 iPod Start playing a disc Connecting a USB device Connecting an iPod Selecting Repeat Play Selecting Random Play 10 Basic procedure Warning Caution Wiring connection Installing the unit Removing the unit Selecting a folder/track/file Specifications 23 Functions of this unit with iPod Selecting a song by alphabet Selecting App & iPod Control Mode Adjust [SETTINGS] mode...

Instruction Manual
Page 3
... tools) inside the unit. Driving with a connection cable, KCA-iP102 (optional accessory). This unit can only play the CDs with this feature, connect the MUTE lead to the audio system during installation, consult your Kenwood dealer. You can hear sounds outside the car. A USB connection cable, CA-U1EX (max.: 500 mA) (optional accessory) is airconditioned, moisture may cause disc read errors. If you can connect an Apple iPod/iPhone with : The...
... tools) inside the unit. Driving with a connection cable, KCA-iP102 (optional accessory). This unit can only play the CDs with this feature, connect the MUTE lead to the audio system during installation, consult your Kenwood dealer. You can hear sounds outside the car. A USB connection cable, CA-U1EX (max.: 500 mA) (optional accessory) is airconditioned, moisture may cause disc read errors. If you can connect an Apple iPod/iPhone with : The...

Instruction Manual
Page 6
Enters HD Radio tagging mode if pressed and held while in clock display screen. 5 (iPod) Switches the controlling mode (MODE ON/ MODE OFF) for radio station. Scrolls the display information if pressed and held . 6 Exit from setting mode if pressed and held . Turns off if pressed and held . ¢ Skips a song (for Pandora). Volume knob Adjusts the volume level. (turn) Selects items. Volume knob Confirms selection. (press) Enters [FUNCTION] settings. Enters clock adjustment mode directly (page 7) if pressed and held . (page 8) Selects the...
Enters HD Radio tagging mode if pressed and held while in clock display screen. 5 (iPod) Switches the controlling mode (MODE ON/ MODE OFF) for radio station. Scrolls the display information if pressed and held . 6 Exit from setting mode if pressed and held . Turns off if pressed and held . ¢ Skips a song (for Pandora). Volume knob Adjusts the volume level. (turn) Selects items. Volume knob Confirms selection. (press) Enters [FUNCTION] settings. Enters clock adjustment mode directly (page 7) if pressed and held . (page 8) Selects the...

Instruction Manual
Page 7
... to select [CLOCK ADJUST]. Adjusting the clock 1 Press the volume knob to enter [FUNCTION] mode. 2 Turn the volume knob to select [SETTINGS], then press to enter. 3 Turn the volume knob to select [CLOCK], then press to enter. 4 Press the volume knob to enter minute adjustment. Continued... 7 Clock hour flashes on page 8 for selection. 5 Hold to confirm. Clock minutes flashes on the power (or after you reset the unit), the display shows: [CANCEL DEMO] \ [PRESS] \ [VOLUME KNOB] 1 Press the volume knob...
... to select [CLOCK ADJUST]. Adjusting the clock 1 Press the volume knob to enter [FUNCTION] mode. 2 Turn the volume knob to select [SETTINGS], then press to enter. 3 Turn the volume knob to select [CLOCK], then press to enter. 4 Press the volume knob to enter minute adjustment. Continued... 7 Clock hour flashes on page 8 for selection. 5 Hold to confirm. Clock minutes flashes on the power (or after you reset the unit), the display shows: [CANCEL DEMO] \ [PRESS] \ [VOLUME KNOB] 1 Press the volume knob...

Instruction Manual
Page 8
...-IN AUX ON*: Enables "AUX" in source selection. For details on the display when the song information can be heard if an audio file disc is played. MIX: Memorizes one station for each preset button in source selection. No sound can be registered to memorize the current station. OFF: Disables "AUX" in each preset button regardless of the connected external component is not activated). Hold to a multicast channel. Item Selectable setting (Preset: *) PRESET TYPE NORMAL...
...-IN AUX ON*: Enables "AUX" in source selection. For details on the display when the song information can be heard if an audio file disc is played. MIX: Memorizes one station for each preset button in source selection. No sound can be registered to memorize the current station. OFF: Disables "AUX" in each preset button regardless of the connected external component is not activated). Hold to a multicast channel. Item Selectable setting (Preset: *) PRESET TYPE NORMAL...

Instruction Manual
Page 9
... Foreign Patents. Adjust [SETTINGS] mode settings While listening to the radio... 1 Press the volume knob to enter [FUNCTION] mode. 2 Turn the volume knob to select [SETTINGS], then press to enter. 3 Turn the volume knob to make a selection, then press to analog broadcast when there is no digital broadcast. ; AUTO2: Search in the order of HD Radio Technology. AUTO*: Automatically tunes to confirm. Program Service Data: Contributes to the superior user experience of...
... Foreign Patents. Adjust [SETTINGS] mode settings While listening to the radio... 1 Press the volume knob to enter [FUNCTION] mode. 2 Turn the volume knob to select [SETTINGS], then press to enter. 3 Turn the volume knob to make a selection, then press to analog broadcast when there is no digital broadcast. ; AUTO2: Search in the order of HD Radio Technology. AUTO*: Automatically tunes to confirm. Program Service Data: Contributes to the superior user experience of...

Instruction Manual
Page 10
..., then make the following connection. Attempt to select track/file. Listening to a disc/ USB device/ iPod Loading slot Ejects the disc. ("NO DISC" appears and "IN" indicator goes off.) Press to insert using an adapter can cause malfunction. The source automatically switches, and playback starts. Start playing a disc 1 Press SRC to resume/pause playback (if necessary). Discs with coloring on the power. 2 Insert a disc into the loading slot. Connecting a USB device CA-U1EX...
..., then make the following connection. Attempt to select track/file. Listening to a disc/ USB device/ iPod Loading slot Ejects the disc. ("NO DISC" appears and "IN" indicator goes off.) Press to insert using an adapter can cause malfunction. The source automatically switches, and playback starts. Start playing a disc 1 Press SRC to resume/pause playback (if necessary). Discs with coloring on the power. 2 Insert a disc into the loading slot. Connecting a USB device CA-U1EX...

Instruction Manual
Page 11
... application help. 11 About "KENWOOD Music Editor" This unit supports the PC application "KENWOOD Music Editor Light ver1.1" or later. To cancel the Music Search mode, press and hold number button 3 (RDM) to avoid losing the data. Make sure all important data has been backed up to select "ALL RANDOM." - When you use the audio file with KENWOOD Music Editor. Audio CD : DISC RANDOM, RANDOM OFF AAC/MP3/WMA/iPod : FOLDER...
... application help. 11 About "KENWOOD Music Editor" This unit supports the PC application "KENWOOD Music Editor Light ver1.1" or later. To cancel the Music Search mode, press and hold number button 3 (RDM) to avoid losing the data. Make sure all important data has been backed up to select "ALL RANDOM." - When you use the audio file with KENWOOD Music Editor. Audio CD : DISC RANDOM, RANDOM OFF AAC/MP3/WMA/iPod : FOLDER...
Instruction Manual
Page 12
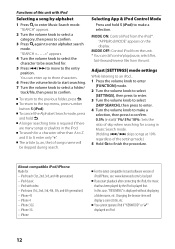
... setting made.) 5 Hold to make a selection. To search for a song in the iPod. iPod with iPod Selecting a song by the iPod is played first. iPhone 4S - The article (a, an, the) of songs name will display a correct title, etc. MODE OFF: Control iPod from the iPod*. iPod touch (1st, 2nd, 3rd, and 4th generation) - iPhone 4 - Changing the browse item will be searched for - To return to the top menu, press number button 5 (iPod...
... setting made.) 5 Hold to make a selection. To search for a song in the iPod. iPod with iPod Selecting a song by the iPod is played first. iPhone 4S - The article (a, an, the) of songs name will display a correct title, etc. MODE OFF: Control iPod from the iPod*. iPod touch (1st, 2nd, 3rd, and 4th generation) - iPhone 4 - Changing the browse item will be searched for - To return to the top menu, press number button 5 (iPod...

Instruction Manual
Page 13
... mode. 2 Turn the volume knob to select [A-Z] (stations are displayed in alphabetical order) or [BY DATE] (stations are subject to change without prior notice. Some functions of Pandora® cannot be operated from your current station. If no station has been selected, broadcasting does not start. To select thumbs down/up, press number button 1 ( - )/ 2 ( + ). Search for [PANDORA SRC]. (page 7, 8) 1 Open the Pandora® application on your device. 2 Connect...
... mode. 2 Turn the volume knob to select [A-Z] (stations are displayed in alphabetical order) or [BY DATE] (stations are subject to change without prior notice. Some functions of Pandora® cannot be operated from your current station. If no station has been selected, broadcasting does not start. To select thumbs down/up, press number button 1 ( - )/ 2 ( + ). Search for [PANDORA SRC]. (page 7, 8) 1 Open the Pandora® application on your device. 2 Connect...

Instruction Manual
Page 15
... : Adjusts the volume level. 5 / ∞ : Enters Music Search mode or Station Search mode (for radio station. Confirms selection (in hot places such as sunshine, fire or the like. ATT : Attenuates the sound. (To return to the previous level, press the button again.) : Returns to the entered frequency or channel. Tuning item: Frequency "- - - -", Channel "HD -", or Cancelling Direct Access Tuning 4 Press the number buttons to excessive heat such as on the display. 3 Press DIRECT repeatedly to use...
... : Adjusts the volume level. 5 / ∞ : Enters Music Search mode or Station Search mode (for radio station. Confirms selection (in hot places such as sunshine, fire or the like. ATT : Attenuates the sound. (To return to the previous level, press the button again.) : Returns to the entered frequency or channel. Tuning item: Frequency "- - - -", Channel "HD -", or Cancelling Direct Access Tuning 4 Press the number buttons to excessive heat such as on the display. 3 Press DIRECT repeatedly to use...

Instruction Manual
Page 16
.... Function settings 1 Press the volume knob to enter [FUNCTION] mode. 2 Turn the volume knob to select [AUDIO CONTROL] or [SETTINGS], then press to enter. 3 Turn the volume knob to make a selection, then press to search for selection. Repeat step 3 until the desired item is selected. • Not applicable for iPod and Kenwood Music Editor. 1 Press DIRECT to "PANDORA" source...) 5 Selects [A-Z] or [BY DATE]. • Selects item. Item Selectable setting (Preset: *) SUB-W LEVEL -15 - +15 (Preset: 0): Adjusts the subwoofer output level. "- - -" appears. 2 Press the number buttons...
.... Function settings 1 Press the volume knob to enter [FUNCTION] mode. 2 Turn the volume knob to select [AUDIO CONTROL] or [SETTINGS], then press to enter. 3 Turn the volume knob to make a selection, then press to search for selection. Repeat step 3 until the desired item is selected. • Not applicable for iPod and Kenwood Music Editor. 1 Press DIRECT to "PANDORA" source...) 5 Selects [A-Z] or [BY DATE]. • Selects item. Item Selectable setting (Preset: *) SUB-W LEVEL -15 - +15 (Preset: 0): Adjusts the subwoofer output level. "- - -" appears. 2 Press the number buttons...

Instruction Manual
Page 17
... frequency. PRESET EQ NATURAL*/ USER/ ROCK/ POPS/ EASY/ TOP40/ JAZZ/ POWERFUL: Selects a preset sound mode suitable to the music genre. (Selects [USER] to use the customized bass, middle, and treble settings.) BASS BOOST B.BOOST LV1/ B.BOOST LV2/ B.BOOST LV3: Selects your preferred low and high frequencies boost to produce a well-balanced sound at a low volume level. ; OFF: Cancels. SUB-W PHASE REVERSE (180°)/ NORMAL (0°)*: Selects the phase angle of each (Preset: 0) source. Continued... 17 TRE LEVEL -8 - +8 (Preset: 0): Adjusts...
... frequency. PRESET EQ NATURAL*/ USER/ ROCK/ POPS/ EASY/ TOP40/ JAZZ/ POWERFUL: Selects a preset sound mode suitable to the music genre. (Selects [USER] to use the customized bass, middle, and treble settings.) BASS BOOST B.BOOST LV1/ B.BOOST LV2/ B.BOOST LV3: Selects your preferred low and high frequencies boost to produce a well-balanced sound at a low volume level. ; OFF: Cancels. SUB-W PHASE REVERSE (180°)/ NORMAL (0°)*: Selects the phase angle of each (Preset: 0) source. Continued... 17 TRE LEVEL -8 - +8 (Preset: 0): Adjusts...

Instruction Manual
Page 18
... color (R/ G/ B) to scroll the display information automatically, or scroll only once. ; OFF*: Cancels. TEXT SCROLL AUTO*/ ONCE: Selects to adjust. Remedy/Cause Adjust the volume to enter the detail color adjustment mode. 2. Clean the connectors. (page 4) Reset the unit. (page 4) Connect the antenna firmly. / Pull the antenna out all . Hold the volume knob to the optimum level. / Check the cords and connections. OFF*: Cancels. The connected iPod does not support iTunes tagging function. COLOR 24/ USER: Selects...
... color (R/ G/ B) to scroll the display information automatically, or scroll only once. ; OFF*: Cancels. TEXT SCROLL AUTO*/ ONCE: Selects to adjust. Remedy/Cause Adjust the volume to enter the detail color adjustment mode. 2. Clean the connectors. (page 4) Reset the unit. (page 4) Connect the antenna firmly. / Pull the antenna out all . Hold the volume knob to the optimum level. / Check the cords and connections. OFF*: Cancels. The connected iPod does not support iTunes tagging function. COLOR 24/ USER: Selects...

Instruction Manual
Page 19
..." flashes. Stop playback while driving on again. Connect a supported USB device, and check the connections. Remove the USB device, turn it on rough roads. / Change the disc. / Check the cords and connections. If the unit still showing the same display, try to USB again. "READING" keeps flashing. Pandora "NO STATIONS" appears. contained in "SONGS" Podcast files are not displayed (e.g. "READ ERROR" appears. No station is not correct. "NO DISC" appears. "TOC ERROR" appears. Longer readout time...
..." flashes. Stop playback while driving on again. Connect a supported USB device, and check the connections. Remove the USB device, turn it on rough roads. / Change the disc. / Check the cords and connections. If the unit still showing the same display, try to USB again. "READING" keeps flashing. Pandora "NO STATIONS" appears. contained in "SONGS" Podcast files are not displayed (e.g. "READ ERROR" appears. No station is not correct. "NO DISC" appears. "TOC ERROR" appears. Longer readout time...
Instruction Manual
Page 20
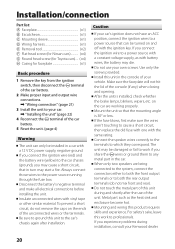
...the terminals. Installation/connection Part list: A Faceplate 1) B Escutcheon 1) C Mounting sleeve 1) D Wiring harness 1) E Removal tool 2) F Flat head screw (for Nissan cars 4) G Round head screw (for Toyota cars).... (×4) H Casing for faceplate 1) Basic procedure 1 Remove the key from the ignition switch, then disconnect the · terminal of the car battery. 2 Make proper input and output wire connections. \ "Wiring connection" (page 21) 3 Install the unit to your car. \ "Installing the unit" (page 22) 4 Reconnect the · terminal of the car battery. 5 Reset the unit. (page...
...the terminals. Installation/connection Part list: A Faceplate 1) B Escutcheon 1) C Mounting sleeve 1) D Wiring harness 1) E Removal tool 2) F Flat head screw (for Nissan cars 4) G Round head screw (for Toyota cars).... (×4) H Casing for faceplate 1) Basic procedure 1 Remove the key from the ignition switch, then disconnect the · terminal of the car battery. 2 Make proper input and output wire connections. \ "Wiring connection" (page 21) 3 Install the unit to your car. \ "Installing the unit" (page 22) 4 Reconnect the · terminal of the car battery. 5 Reset the unit. (page...
Instruction Manual
Page 21
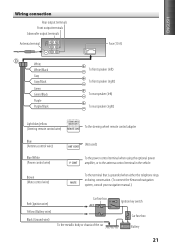
... rear speaker (left) To rear speaker (right) Light blue/yellow (Steering remote control wire) STEERING WHEEL REMOTE INPUT REMOTE CONT To the steering wheel remote control adapter Blue (Antenna control wire) Blue/White (Power control wire) ANT CONT (Not used) To the power control terminal when using the optional power P. Brown (Mute control wire) To the terminal that is grounded when either the telephone rings or during conversation. (To connect the Kenwood navigation MUTE system, consult your navigation manual.) Red (Ignition wire) Yellow (Battery wire) Black (Ground wire) Car fuse box...
... rear speaker (left) To rear speaker (right) Light blue/yellow (Steering remote control wire) STEERING WHEEL REMOTE INPUT REMOTE CONT To the steering wheel remote control adapter Blue (Antenna control wire) Blue/White (Power control wire) ANT CONT (Not used) To the power control terminal when using the optional power P. Brown (Mute control wire) To the terminal that is grounded when either the telephone rings or during conversation. (To connect the Kenwood navigation MUTE system, consult your navigation manual.) Red (Ignition wire) Yellow (Battery wire) Black (Ground wire) Car fuse box...
Instruction Manual
Page 22
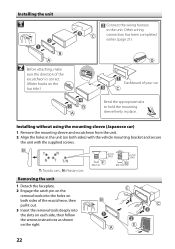
... supplied screws. T: Toyota cars ; Installing the unit 1 Connect the wiring harness to hold the mounting sleeve firmly in the unit (on both sides of your car Bend the appropriate tabs to the unit. Installing without using the mounting sleeve (Japanese car) 1 Remove the mounting sleeve and escutcheon from the unit. 2 Align the holes in place. N: Nissan cars Removing the unit 1 Detach the faceplate. 2 Engage the catch pin on the removal tools into the...
... supplied screws. T: Toyota cars ; Installing the unit 1 Connect the wiring harness to hold the mounting sleeve firmly in the unit (on both sides of your car Bend the appropriate tabs to the unit. Installing without using the mounting sleeve (Japanese car) 1 Remove the mounting sleeve and escutcheon from the unit. 2 Align the holes in place. N: Nissan cars Removing the unit 1 Detach the faceplate. 2 Engage the catch pin on the removal tools into the...

Instruction Manual
Page 23
... Media Audio Audio section Maximum output power: 50 W × 4 Full bandwidth power (at less than 1 % THD): 22 W × 4 Speaker impedance: 4 Ω - 8 Ω Tone action: Bass: 100 Hz ±8 dB Middle: 1 kHz ±8 dB Treble: 12.5 kHz ±8 dB Preout level / load (CD): For : 4 000 mV/10 kΩ For : 2 500 mV/10 kΩ Preout impedance: ≤ 600 Ω Auxiliary input section Frequency response...
... Media Audio Audio section Maximum output power: 50 W × 4 Full bandwidth power (at less than 1 % THD): 22 W × 4 Speaker impedance: 4 Ω - 8 Ω Tone action: Bass: 100 Hz ±8 dB Middle: 1 kHz ±8 dB Treble: 12.5 kHz ±8 dB Preout level / load (CD): For : 4 000 mV/10 kΩ For : 2 500 mV/10 kΩ Preout impedance: ≤ 600 Ω Auxiliary input section Frequency response...

Instruction Manual
Page 68
... connect specifically to iPod, or iPhone, respectively, and has been certified by one or more of the following measures: Reorient or relocate the receiving antenna. HD Radio™ and the HD, HD Radio, and "Arc" logos are designed to provide reasonable protection against harmful interference in a residential installation. Please note that interference will not occur in a particular installation. CAUTION Use of controls or adjustments...
... connect specifically to iPod, or iPhone, respectively, and has been certified by one or more of the following measures: Reorient or relocate the receiving antenna. HD Radio™ and the HD, HD Radio, and "Arc" logos are designed to provide reasonable protection against harmful interference in a residential installation. Please note that interference will not occur in a particular installation. CAUTION Use of controls or adjustments...


