Instruction Manual
Page 2
... Listening to the other external Basic operations 5 components 14 Getting started 7 Using the remote controller (RC-405) 14 Canceling the display demonstration Setting the demonstration mode Basic operations Adjusting the clock Direct Access Tuning Initial settings before operations Direct Music Search Listening to HD Radio™ Broadcasts 8 Function settings 16 iTunes Tagging...
... Listening to the other external Basic operations 5 components 14 Getting started 7 Using the remote controller (RC-405) 14 Canceling the display demonstration Setting the demonstration mode Basic operations Adjusting the clock Direct Access Tuning Initial settings before operations Direct Music Search Listening to HD Radio™ Broadcasts 8 Function settings 16 iTunes Tagging...

Instruction Manual
Page 6
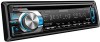
...Radio tagging mode if pressed and held . ¢ Skips a song (for radio station. Exit from setting mode if pressed and held while in clock display screen. 5 (iPod) Switches the controlling mode (MODE ON/ MODE OFF) for iPod playback. (page 12) Returns to the previous item. Volume ..."iPod" or "CD" is selectable only when an iPod is connected or a disc is selected for Pandora). Enters clock adjustment mode directly (page 7) if pressed and held . 6 SCRL DISP Changes the display information. Selects the FM bands (FM1/ FM2/ FM3) or AM when "HD RADIO" is turned on . Turns...
...Radio tagging mode if pressed and held . ¢ Skips a song (for radio station. Exit from setting mode if pressed and held while in clock display screen. 5 (iPod) Switches the controlling mode (MODE ON/ MODE OFF) for iPod playback. (page 12) Returns to the previous item. Volume ..."iPod" or "CD" is selectable only when an iPod is connected or a disc is selected for Pandora). Enters clock adjustment mode directly (page 7) if pressed and held . 6 SCRL DISP Changes the display information. Selects the FM bands (FM1/ FM2/ FM3) or AM when "HD RADIO" is turned on . Turns...

Instruction Manual
Page 7
...the hour and minute adjustment. 7 Hold to select [ON] or [OFF]. See table on the display. 5 Turn the volume knob to adjust the hour, then press to finish the procedure. Clock hour flashes on page 8 for about 15 seconds or if you turn on the power (or after... When you turn the volume knob to finish the procedure. ENGLISH Getting started Canceling the display demonstration The display demonstration is selected as the initial setup. 2 Press the volume knob again to select [CLOCK ADJUST]. Adjusting the clock 1 Press the volume knob to enter [FUNCTION] mode. 2 Turn the volume knob...
...the hour and minute adjustment. 7 Hold to select [ON] or [OFF]. See table on the display. 5 Turn the volume knob to adjust the hour, then press to finish the procedure. Clock hour flashes on page 8 for about 15 seconds or if you turn on the power (or after... When you turn the volume knob to finish the procedure. ENGLISH Getting started Canceling the display demonstration The display demonstration is selected as the initial setup. 2 Press the volume knob again to select [CLOCK ADJUST]. Adjusting the clock 1 Press the volume knob to enter [FUNCTION] mode. 2 Turn the volume knob...

Instruction Manual
Page 18
... confirm and exit. OFF: Cancels. Sound cannot be done. The color you select [USER]. 1. Turn the volume knob to scroll the display information automatically, or scroll only once. ; KEY DIMMER DIMMER LV1: Dims the key illumination constantly. ; OFF*: Cancels. The connectors are... no operations can be selected when you created can be heard. / The unit does not turn on. / Information shown on the display is selected as the source.) CLOCK CLOCK ADJUST: (For details, see page 7.) DISP & KEY (for ) COLOR SELECT VARIABLE SCAN*/ COLOR 01 - "MEMORY FULL" appears...
... confirm and exit. OFF: Cancels. Sound cannot be done. The color you select [USER]. 1. Turn the volume knob to scroll the display information automatically, or scroll only once. ; KEY DIMMER DIMMER LV1: Dims the key illumination constantly. ; OFF*: Cancels. The connectors are... no operations can be selected when you created can be heard. / The unit does not turn on. / Information shown on the display is selected as the source.) CLOCK CLOCK ADJUST: (For details, see page 7.) DISP & KEY (for ) COLOR SELECT VARIABLE SCAN*/ COLOR 01 - "MEMORY FULL" appears...


