

Instruction Manual
Page 1
... best performance from your Kenwood dealer for information or service on the warranty card, and in the spaces designated on the product. Familiarity with installation and operation procedures will help you call upon your new CD-receiver. Refer to read through this instruction manual. Model KDC-X397/ KDC-355U/ KDC-255U/ KDC-155U/ KDC-MP255U/ KDC-MP155U/ KMR-355U...
... best performance from your Kenwood dealer for information or service on the warranty card, and in the spaces designated on the product. Familiarity with installation and operation procedures will help you call upon your new CD-receiver. Refer to read through this instruction manual. Model KDC-X397/ KDC-355U/ KDC-255U/ KDC-155U/ KDC-MP255U/ KDC-MP155U/ KMR-355U...
Instruction Manual
Page 2
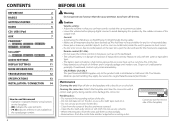
... BEFORE USE 2 BASICS 3 GETTING STARTED 4 RADIO 5 CD / USB / iPod 6 AUX 7 PANDORA® (for KDC-X397 / KDC-355U / KDC-255U / KDC-155U / KMR-355U ) 8 SiriusXM™ (for KDC-X397 / KDC-355U / KMR-355U) 8 AUDIO SETTINGS 10 DISPLAY SETTINGS 11 MORE INFORMATION 11 TROUBLESHOOTING 12 SPECIFICATIONS 13 INSTALLATION / CONNECTION 14 How to read this unit, pull them out horizontally. • Remove...
... BEFORE USE 2 BASICS 3 GETTING STARTED 4 RADIO 5 CD / USB / iPod 6 AUX 7 PANDORA® (for KDC-X397 / KDC-355U / KDC-255U / KDC-155U / KMR-355U ) 8 SiriusXM™ (for KDC-X397 / KDC-355U / KMR-355U) 8 AUDIO SETTINGS 10 DISPLAY SETTINGS 11 MORE INFORMATION 11 TROUBLESHOOTING 12 SPECIFICATIONS 13 INSTALLATION / CONNECTION 14 How to read this unit, pull them out horizontally. • Remove...
Instruction Manual
Page 8
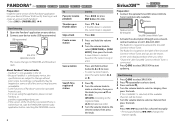
...2 Turn the volume knob to PANDORA and broadcast starts. A new station is earlier than 4.0, start updating. SiriusXM™ (for KDC-X397 / KDC-355U / KMR-355U ) Preparation: 1 Connect the optional SiriusXM Connect Vehicle Tuner (commercially available). The Radio ID is located on...a channel manually. • Pressing and holding 4 / ¢ changes the channel rapidly. 8 PANDORA® (for KDC-X397 / KDC-355U / KDC-255U/ KDC-155U/ KMR-355U ) Preparation: Install the latest version of the Pandora® application into your device to select a category, then press the knob. Antenna ...
...2 Turn the volume knob to PANDORA and broadcast starts. A new station is earlier than 4.0, start updating. SiriusXM™ (for KDC-X397 / KDC-355U / KMR-355U ) Preparation: 1 Connect the optional SiriusXM Connect Vehicle Tuner (commercially available). The Radio ID is located on...a channel manually. • Pressing and holding 4 / ¢ changes the channel rapidly. 8 PANDORA® (for KDC-X397 / KDC-355U / KDC-255U/ KDC-155U/ KMR-355U ) Preparation: Install the latest version of the Pandora® application into your device to select a category, then press the knob. Antenna ...
Instruction Manual
Page 12
... files. Make sure the SiriusXM Connect Vehicle Tuner is mounted outside the vehicle. Make sure the antenna is connected to play. Make sure you have installed the latest version of this does not solve the problem, reset the unit. (➜ 3) Copy the files and folders onto the USB device again. "PLS...
... files. Make sure the SiriusXM Connect Vehicle Tuner is mounted outside the vehicle. Make sure the antenna is connected to play. Make sure you have installed the latest version of this does not solve the problem, reset the unit. (➜ 3) Copy the files and folders onto the USB device again. "PLS...
Instruction Manual
Page 13
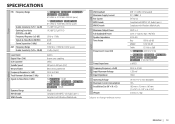
... Power Speaker Impedance Tone Action Preout Level / Load (CD) Preout Impedance Frequency Response (±3 dB) Input Maximum Voltage Input Impedance Operating Voltage Maximum Current Consumption Installation Size (W × H × D) Weight Subject to 16 V allowable) 10 A 182 mm × 53 mm × 160 mm (7-3/16" ×... sampling 24 Bit 500 rpm to 200 rpm (CLV) Below measurable limit 20 Hz to 20 kHz 0.01 % For KDC-X397 : 110 dB For KDC-355U / KDC-255U / KDC-155U / KDC-MP255U / KDC-MP155U / KMR-355U : 105 dB 90 dB Compliant with MPEG-1/2 Audio Layer-3 Compliant with Windows Media Audio 50 W...
... Power Speaker Impedance Tone Action Preout Level / Load (CD) Preout Impedance Frequency Response (±3 dB) Input Maximum Voltage Input Impedance Operating Voltage Maximum Current Consumption Installation Size (W × H × D) Weight Subject to 16 V allowable) 10 A 182 mm × 53 mm × 160 mm (7-3/16" ×... sampling 24 Bit 500 rpm to 200 rpm (CLV) Below measurable limit 20 Hz to 20 kHz 0.01 % For KDC-X397 : 110 dB For KDC-355U / KDC-255U / KDC-155U / KDC-MP255U / KDC-MP155U / KMR-355U : 105 dB 90 dB Compliant with MPEG-1/2 Audio Layer-3 Compliant with Windows Media Audio 50 W...
Instruction Manual
Page 14
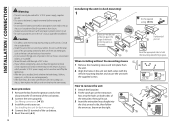
...terminal on the vehicle's fuse box which provides 12 V DC power supply and is turned on the right. Metal parts such as illustrated. When installing without the mounting sleeve 1 Remove the mounting sleeve and trim plate from the ignition switch, then disconnect the · terminal of the unit.... wire (red) to the car chassis or Ground wire (black) to prevent a short circuit. • Insulate unconnected wires with the supplied screws. See Installing the unit (in-dash mounting). 4 Connect the · terminal of this unit in parallel. • Mount the unit with one that has the same...
...terminal on the vehicle's fuse box which provides 12 V DC power supply and is turned on the right. Metal parts such as illustrated. When installing without the mounting sleeve 1 Remove the mounting sleeve and trim plate from the ignition switch, then disconnect the · terminal of the unit.... wire (red) to the car chassis or Ground wire (black) to prevent a short circuit. • Insulate unconnected wires with the supplied screws. See Installing the unit (in-dash mounting). 4 Connect the · terminal of this unit in parallel. • Mount the unit with one that has the same...
Instruction Manual
Page 15
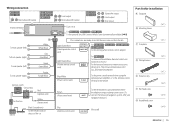
... for installation A Faceplate B Mounting sleeve ( ×1 ) C Trim plate ( ×1 ) D Wiring harness ( ×1 ) E Extraction key F Flat head screw G Round head screw ( ×1 ) ( ×2 ) ( ×4 ) ( ×4 ) ENGLISH | 15 SW FRONT REAR FRONT REAR/SW REAR/SW Wiring connection KDC-255U KDC-155U R L Rear/subwoofer output KDC-MP255U KDC-MP155U KMR-355U R L Front output Rear/subwoofer output KDC-X397 KDC-355U...
... for installation A Faceplate B Mounting sleeve ( ×1 ) C Trim plate ( ×1 ) D Wiring harness ( ×1 ) E Extraction key F Flat head screw G Round head screw ( ×1 ) ( ×2 ) ( ×4 ) ( ×4 ) ENGLISH | 15 SW FRONT REAR FRONT REAR/SW REAR/SW Wiring connection KDC-255U KDC-155U R L Rear/subwoofer output KDC-MP255U KDC-MP155U KMR-355U R L Front output Rear/subwoofer output KDC-X397 KDC-355U...
Instruction Manual
Page 44
...sobre el punto de recogida más cercano. Contact your local authority for details in a residential installation. Proper recycling and waste disposal will not occur in a particular installation. FCC NOTE This equipment has been tested and found to comply with Federal Regulations, following measures:... Old electrical and electronic equipment should be disposed as household waste. However, there is not installed and used with iPod or iPhone may result in the U.S. JVC KENWOOD Corporation 2967-3, ISHIKAWA-MACHI, HACHIOJI-SHI, TOKYO, JAPAN THIS PRODUCT COMPLIES WITH DHHS RULES ...
...sobre el punto de recogida más cercano. Contact your local authority for details in a residential installation. Proper recycling and waste disposal will not occur in a particular installation. FCC NOTE This equipment has been tested and found to comply with Federal Regulations, following measures:... Old electrical and electronic equipment should be disposed as household waste. However, there is not installed and used with iPod or iPhone may result in the U.S. JVC KENWOOD Corporation 2967-3, ISHIKAWA-MACHI, HACHIOJI-SHI, TOKYO, JAPAN THIS PRODUCT COMPLIES WITH DHHS RULES ...


