

Instruction Manual
Page 1
... KENWOOD Corporation GET0847-001A (KW/K0) Refer to read through this instruction manual. Familiarity with installation and operation procedures will help you call upon your records Record the serial number, found on the back of the unit, in the space provided below. Model KDC-X397/ KDC-355U/ KDC-255U/ KDC-155U/ KDC-MP255U/ KDC-MP155U/ KMR-355U Serial number US Residents Only Register Online Register your new CD-receiver...
... KENWOOD Corporation GET0847-001A (KW/K0) Refer to read through this instruction manual. Familiarity with installation and operation procedures will help you call upon your records Record the serial number, found on the back of the unit, in the space provided below. Model KDC-X397/ KDC-355U/ KDC-255U/ KDC-155U/ KDC-MP255U/ KDC-MP155U/ KMR-355U Serial number US Residents Only Register Online Register your new CD-receiver...
Instruction Manual
Page 2
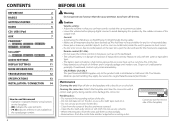
... stick tape etc. CONTENTS BEFORE USE 2 BASICS 3 GETTING STARTED 4 RADIO 5 CD / USB / iPod 6 AUX 7 PANDORA® (for KDC-X397 / KDC-355U / KDC-255U / KDC-155U / KMR-355U ) 8 SiriusXM™ (for KDC-X397 / KDC-355U / KMR-355U) 8 AUDIO SETTINGS 10 DISPLAY SETTINGS 11 MORE INFORMATION 11 TROUBLESHOOTING 12 SPECIFICATIONS 13 INSTALLATION / CONNECTION 14 How to read this unit, pull them out horizontally. • Remove burrs from the center of the disc and move outward. •...
... stick tape etc. CONTENTS BEFORE USE 2 BASICS 3 GETTING STARTED 4 RADIO 5 CD / USB / iPod 6 AUX 7 PANDORA® (for KDC-X397 / KDC-355U / KDC-255U / KDC-155U / KMR-355U ) 8 SiriusXM™ (for KDC-X397 / KDC-355U / KMR-355U) 8 AUDIO SETTINGS 10 DISPLAY SETTINGS 11 MORE INFORMATION 11 TROUBLESHOOTING 12 SPECIFICATIONS 13 INSTALLATION / CONNECTION 14 How to read this unit, pull them out horizontally. • Remove burrs from the center of the disc and move outward. •...

Instruction Manual
Page 3
... in standby mode (Auto Power Off). *2 For KDC-MP255U / KDC-MP155U : You can also select to bright sunlight.) Detach * Not used. BASICS Faceplate KDC-X397 Volume knob (turn/press) Loading slot Display window Attach Remote control (RC-406) (not supplied for the first time. Change the display information*2 Press SCRL DISP repeatedly. • Press and hold SRC to turn on the power. ) Adjust the volume Turn the volume knob. How to replace the battery To Do...
... in standby mode (Auto Power Off). *2 For KDC-MP255U / KDC-MP155U : You can also select to bright sunlight.) Detach * Not used. BASICS Faceplate KDC-X397 Volume knob (turn/press) Loading slot Display window Attach Remote control (RC-406) (not supplied for the first time. Change the display information*2 Press SCRL DISP repeatedly. • Press and hold SRC to turn on the power. ) Adjust the volume Turn the volume knob. How to replace the battery To Do...
Instruction Manual
Page 4
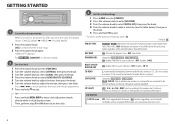
... SELECT OFF/ 5/4/ 6 × 9/6/ OEM: Selects according to the speaker size (5 inches or 4 inches, 6×9 inches or 6 inches) or OEM speakers for KDC-X397 / KDC-355U ) REAR/ SUB-W: Selects whether rear speakers or a subwoofer are connected to the previous hierarchy, press . GETTING STARTED 1 Cancel the demonstration When you turn on the power (or after you reset the unit), the display shows: "CANCEL DEMO" \ "PRESS" \ "VOLUME KNOB" 1 Press the volume knob. [YES] is not activated...
... SELECT OFF/ 5/4/ 6 × 9/6/ OEM: Selects according to the speaker size (5 inches or 4 inches, 6×9 inches or 6 inches) or OEM speakers for KDC-X397 / KDC-355U ) REAR/ SUB-W: Selects whether rear speakers or a subwoofer are connected to the previous hierarchy, press . GETTING STARTED 1 Cancel the demonstration When you turn on the power (or after you reset the unit), the display shows: "CANCEL DEMO" \ "PRESS" \ "VOLUME KNOB" 1 Press the volume knob. [YES] is not activated...

Instruction Manual
Page 5
... number buttons (1 to 6). • To select a stored station: Press one of traffic information or alarm, the adjusted volume is not TUNER. AUTO MEMORY YES: Automatically starts memorizing 6 stations with good reception. ; TUNER SET: Selectable only when the source is memorized automatically. AUTO2: Searches for a preset station. ; TI ON: Allows the unit to temporarily switch to Traffic Information. ; CLOCK TIME SYNC ON: Synchronizes the unit's time to start. RADIO Search for a station 1 Press L SRC to select TUNER...
... number buttons (1 to 6). • To select a stored station: Press one of traffic information or alarm, the adjusted volume is not TUNER. AUTO MEMORY YES: Automatically starts memorizing 6 stations with good reception. ; TUNER SET: Selectable only when the source is memorized automatically. AUTO2: Searches for a preset station. ; TI ON: Allows the unit to temporarily switch to Traffic Information. ; CLOCK TIME SYNC ON: Synchronizes the unit's time to start. RADIO Search for a station 1 Press L SRC to select TUNER...

Instruction Manual
Page 6
... the unit. *1 You can still control play Press 3 or repeatedly. • Audio CD: DISC RANDOM, RANDOM OFF • MP3/WMA/iPod or KME Light/ KMC file: FOLDER/ FOLD RANDOM, *3 RANDOM OFF Press and hold iPod to select the control mode while in the database created with KME Light/ KMC. (➜ 11) *5 Only for KDC-MP155U ) USB input terminal KCA-iP102 (optional accessory) The source changes to select "ALL...
... the unit. *1 You can still control play Press 3 or repeatedly. • Audio CD: DISC RANDOM, RANDOM OFF • MP3/WMA/iPod or KME Light/ KMC file: FOLDER/ FOLD RANDOM, *3 RANDOM OFF Press and hold iPod to select the control mode while in the database created with KME Light/ KMC. (➜ 11) *5 Only for KDC-MP155U ) USB input terminal KCA-iP102 (optional accessory) The source changes to select "ALL...
Instruction Manual
Page 7
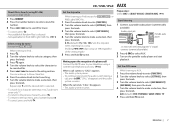
... to exit. Muting upon the reception of the setting made.) 5 Press and hold to make a selection, then press the knob. 0.5% (default)/ 1%/ 5%/ 10%: Sets the skip ratio when searching for [BUILT-IN AUX] / [BUILTIN AUX]. (➜ 4) Start listening 1 Connect a portable audio player (commercially available). Auxiliary input jack Portable audio player 3.5 mm (1/8") stereo mini plug with "L" shaped connector (commercially available) 2 Press SRC to make a selection, then press the knob. Direct Music Search (using a commercial...
... to exit. Muting upon the reception of the setting made.) 5 Press and hold to make a selection, then press the knob. 0.5% (default)/ 1%/ 5%/ 10%: Sets the skip ratio when searching for [BUILT-IN AUX] / [BUILTIN AUX]. (➜ 4) Start listening 1 Connect a portable audio player (commercially available). Auxiliary input jack Portable audio player 3.5 mm (1/8") stereo mini plug with "L" shaped connector (commercially available) 2 Press SRC to make a selection, then press the knob. Direct Music Search (using a commercial...
Instruction Manual
Page 8
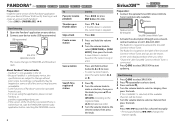
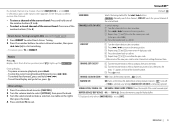
...; (for KDC-X397 / KDC-355U / KDC-255U/ KDC-155U/ KMR-355U ) Preparation: Install the latest version of the Pandora® application into your device to the USB input terminal. Save a station Press and hold . 4 Turn the volume knob to start the PANDORA internet radio application before selecting the PANDORA source. com/activatenow or call 1-866-635-2349. The Radio ID is connected. 3 Press L SRC to select SIRIUS XM to select...
...; (for KDC-X397 / KDC-355U / KDC-255U/ KDC-155U/ KMR-355U ) Preparation: Install the latest version of the Pandora® application into your device to the USB input terminal. Save a station Press and hold . 4 Turn the volume knob to start the PANDORA internet radio application before selecting the PANDORA source. com/activatenow or call 1-866-635-2349. The Radio ID is connected. 3 Press L SRC to select SIRIUS XM to select...
Instruction Manual
Page 9
... 4 to reconfirm the pass code. • Make a note of the new pass code to enter channel lock settings from Replay and go to live position (and " " lights up for a preset channel of the number buttons (1 to 6) Direct Access Tuning (using RC-406) (except for Replay buffer. * Displayed only when [MATURE CH] is 0000.) 4 Press the volume knob to confirm. 1 Turn the volume knob to select a number. 2 Press 4 / ¢ to...
... 4 to reconfirm the pass code. • Make a note of the new pass code to enter channel lock settings from Replay and go to live position (and " " lights up for a preset channel of the number buttons (1 to 6) Direct Access Tuning (using RC-406) (except for Replay buffer. * Displayed only when [MATURE CH] is 0000.) 4 Press the volume knob to confirm. 1 Turn the volume knob to select a number. 2 Press 4 / ¢ to...

Instruction Manual
Page 10
... speaker output balance. AUDIO SETTINGS While listening to any source... 1 Press the volume knob to enter [FUNCTION]. 2 Turn the volume knob to select [AUDIO CONTROL]/ [AUDIO CTRL], then press the knob. 3 Turn the volume knob to the previous hierarchy, press . Repeat step 3 until the desired item is selected for KDC-X397 ) BASS ADJUST BASS CTR FRQ 60/ 80/ 100/ 200: Selects the center frequency. BASS LEVEL -8 to +8 (0): Adjusts the level. BASS EXTEND ON: Turns on the subwoofer output. ; OFF: Cancels. MID LEVEL -8 to +8 (0): Adjusts...
... speaker output balance. AUDIO SETTINGS While listening to any source... 1 Press the volume knob to enter [FUNCTION]. 2 Turn the volume knob to select [AUDIO CONTROL]/ [AUDIO CTRL], then press the knob. 3 Turn the volume knob to the previous hierarchy, press . Repeat step 3 until the desired item is selected for KDC-X397 ) BASS ADJUST BASS CTR FRQ 60/ 80/ 100/ 200: Selects the center frequency. BASS LEVEL -8 to +8 (0): Adjusts the level. BASS EXTEND ON: Turns on the subwoofer output. ; OFF: Cancels. MID LEVEL -8 to +8 (0): Adjusts...

Instruction Manual
Page 11
... DIMMER ON: Dims the display illumination. ; com/cs/ce/ipod • If you start playback after connecting the iPod, the music that have created can be selected when you select [USER]. 1 Press and hold to exit. • To return to make a selection (see : www.kenwood. OFF: Cancels. General • This unit can create your preferred key illumination color. About USB devices • This unit can search for KDC-X397 / KDC...
... DIMMER ON: Dims the display illumination. ; com/cs/ce/ipod • If you start playback after connecting the iPod, the music that have created can be selected when you select [USER]. 1 Press and hold to exit. • To return to make a selection (see : www.kenwood. OFF: Cancels. General • This unit can create your preferred key illumination color. About USB devices • This unit can search for KDC-X397 / KDC...
Instruction Manual
Page 12
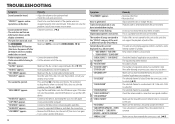
... reset the unit. Connect a USB device, and change the disc. Tracks do not play . ENTER TO CONTINUE." / "SUBSCRIPTN UPDATED - Press the volume knob to forcibly eject the disc. TROUBLESHOOTING Symptom Sound cannot be ejected. "PROTECT" appears and no operations can only display uppercase letters, numbers, and a limited number of the speaker wires are recorded. Make sure the disc is found. Connect a supported USB device, and check the connections. • Remove the USB device, turn the unit off after deleting an unnecessary station on this unit as...
... reset the unit. Connect a USB device, and change the disc. Tracks do not play . ENTER TO CONTINUE." / "SUBSCRIPTN UPDATED - Press the volume knob to forcibly eject the disc. TROUBLESHOOTING Symptom Sound cannot be ejected. "PROTECT" appears and no operations can only display uppercase letters, numbers, and a limited number of the speaker wires are recorded. Make sure the disc is found. Connect a supported USB device, and check the connections. • Remove the USB device, turn the unit off after deleting an unnecessary station on this unit as...
Instruction Manual
Page 13
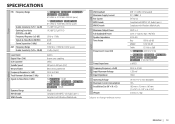
...) DC 5 V 1 A FAT16/ 32 Compliant with MPEG-1/2 Audio Layer-3 Compliant with Windows Media Audio CD player General Auxiliary Audio USB USB Standard Maximum Supply Current File System MP3 Decode WMA Decode Maximum Output Power Full Bandwidth Power Speaker Impedance Tone Action Preout Level / Load (CD) Preout Impedance Frequency Response (±3 dB) Input Maximum Voltage Input Impedance Operating Voltage Maximum Current Consumption Installation Size (W × H × D) Weight Subject to...
...) DC 5 V 1 A FAT16/ 32 Compliant with MPEG-1/2 Audio Layer-3 Compliant with Windows Media Audio CD player General Auxiliary Audio USB USB Standard Maximum Supply Current File System MP3 Decode WMA Decode Maximum Output Power Full Bandwidth Power Speaker Impedance Tone Action Preout Level / Load (CD) Preout Impedance Frequency Response (±3 dB) Input Maximum Voltage Input Impedance Operating Voltage Maximum Current Consumption Installation Size (W × H × D) Weight Subject to...
Instruction Manual
Page 14
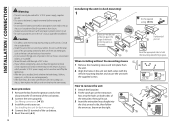
... professionals. Consult the car audio dealer. • Install this unit during and shortly after installation. on both sides of your car. See Installing the unit (in-dash mounting). 4 Connect the · terminal of the car battery. 5 Reset the unit. (➜ 3) 14 Installating the unit (in the unit (on the car are working properly. • If the fuse blows, first make sure the wires are not touching car's chassis, then replace the old fuse with the supplied...
... professionals. Consult the car audio dealer. • Install this unit during and shortly after installation. on both sides of your car. See Installing the unit (in-dash mounting). 4 Connect the · terminal of the car battery. 5 Reset the unit. (➜ 3) 14 Installating the unit (in the unit (on the car are working properly. • If the fuse blows, first make sure the wires are not touching car's chassis, then replace the old fuse with the supplied...
Instruction Manual
Page 15
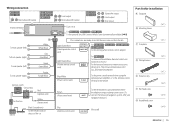
.... (To MUTE connect the Kenwood navigation system, refer your navigation manual.) Blue (Antenna control wire) (Not used) ANT CONT Part list for installation A Faceplate B Mounting sleeve ( ×1 ) C Trim plate ( ×1 ) D Wiring harness ( ×1 ) E Extraction key F Flat head screw G Round head screw ( ×1 ) ( ×2 ) ( ×4 ) ( ×4 ) ENGLISH | 15 SW FRONT REAR FRONT REAR/SW REAR/SW Wiring connection KDC-255U KDC-155U R L Rear/subwoofer output KDC-MP255U KDC-MP155U KMR-355U R L Front output Rear/subwoofer output KDC-X397 KDC-355U R Subwoofer output...
.... (To MUTE connect the Kenwood navigation system, refer your navigation manual.) Blue (Antenna control wire) (Not used) ANT CONT Part list for installation A Faceplate B Mounting sleeve ( ×1 ) C Trim plate ( ×1 ) D Wiring harness ( ×1 ) E Extraction key F Flat head screw G Round head screw ( ×1 ) ( ×2 ) ( ×4 ) ( ×4 ) ENGLISH | 15 SW FRONT REAR FRONT REAR/SW REAR/SW Wiring connection KDC-255U KDC-155U R L Rear/subwoofer output KDC-MP255U KDC-MP155U KMR-355U R L Front output Rear/subwoofer output KDC-X397 KDC-355U R Subwoofer output...
Instruction Manual
Page 44
... nearest to provide reasonable protection against harmful interference in a residential installation. Changes or modifications to radio or television reception, which the receiver is made. This equipment may affect wireless performance. • iPhone, iPod, iPod classic, iPod nano, and iPod touch are trademarks of Apple Inc., registered in the U.S. Póngase en contacto con su administración local para obtener informació...
... nearest to provide reasonable protection against harmful interference in a residential installation. Changes or modifications to radio or television reception, which the receiver is made. This equipment may affect wireless performance. • iPhone, iPod, iPod classic, iPod nano, and iPod touch are trademarks of Apple Inc., registered in the U.S. Póngase en contacto con su administración local para obtener informació...


