
Instruction Manual
Page 2
... Tuning Channel Scan Text Scroll for Satellite Radio source HD Radio control features 31 About HD Radio Tuning Menu system 32 Menu System Activating Security Code Deactivating Security Code Source Select Mode iPod Mode Setting Touch Sensor Tone Manual Clock Adjustment Date Adjustment Date Mode DSI (Disabled System Indicator) Display Illumination Control...
... Tuning Channel Scan Text Scroll for Satellite Radio source HD Radio control features 31 About HD Radio Tuning Menu system 32 Menu System Activating Security Code Deactivating Security Code Source Select Mode iPod Mode Setting Touch Sensor Tone Manual Clock Adjustment Date Adjustment Date Mode DSI (Disabled System Indicator) Display Illumination Control...

Instruction Manual
Page 4
...set can be displayed. • There are places in this manual where lit indicators are used to this unit is put on the site, www.kenwood.com. Cleaning the Faceplate Terminals If the terminals on the Demonstration mode. The unit returns to factory settings when the Reset button is recorded in... settings. For how to remove the USB device, refer to (page 24). • Press the reset button if the disc auto changer fails to KDC-X791/MP735U • "Music Editor" is pressed. • Remove the USB device before pressing the Reset button. Normal operation should be inapplicable. About...
...set can be displayed. • There are places in this manual where lit indicators are used to this unit is put on the site, www.kenwood.com. Cleaning the Faceplate Terminals If the terminals on the Demonstration mode. The unit returns to factory settings when the Reset button is recorded in... settings. For how to remove the USB device, refer to (page 24). • Press the reset button if the disc auto changer fails to KDC-X791/MP735U • "Music Editor" is pressed. • Remove the USB device before pressing the Reset button. Normal operation should be inapplicable. About...
Instruction Manual
Page 33
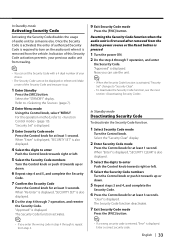
.... Refer to (page 10). When "Re-Enter" is displayed, "SECURITY SET" is also displayed. 8 Do the step 4 through 7 operation, and enter the Security Code. "Approved" is displayed. Enter a correct security code. Once the Security Code is activated, the entry of your precious audio unit from stealing....or down . 5 Repeat steps 3 and 4, and complete the Security Code. 6 Press the Control knob for at least 3 seconds. In Standby mode Activating Security Code Activating the Security Code disables the usage of the Security Code and treasure it is removed from the vehicle. For the...
.... Refer to (page 10). When "Re-Enter" is displayed, "SECURITY SET" is also displayed. 8 Do the step 4 through 7 operation, and enter the Security Code. "Approved" is displayed. Enter a correct security code. Once the Security Code is activated, the entry of your precious audio unit from stealing....or down . 5 Repeat steps 3 and 4, and complete the Security Code. 6 Press the Control knob for at least 3 seconds. In Standby mode Activating Security Code Activating the Security Code disables the usage of the Security Code and treasure it is removed from the vehicle. For the...
Instruction Manual
Page 45
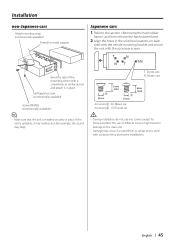
Self-tapping screw (commercially available) Screw (M4X8) (commercially available) ⁄ • Make sure that the unit is installed securely in damage to the section and then remove the hard rubber frame. 2 Align the holes in place. The use any screws except for example, ... sound may occur if a screwdriver or similar tool is unstable, it in the unit (two locations on each side) with the vehicle mounting bracket and secure the unit with the accessory screws. If the unit is used with excessive force during the installations. T N T/N NT T: Toyota cars N: Nissan cars 3 ø5mm 8...
Self-tapping screw (commercially available) Screw (M4X8) (commercially available) ⁄ • Make sure that the unit is installed securely in damage to the section and then remove the hard rubber frame. 2 Align the holes in place. The use any screws except for example, ... sound may occur if a screwdriver or similar tool is unstable, it in the unit (two locations on each side) with the vehicle mounting bracket and secure the unit with the accessory screws. If the unit is used with excessive force during the installations. T N T/N NT T: Toyota cars N: Nissan cars 3 ø5mm 8...
Instruction Manual
Page 47
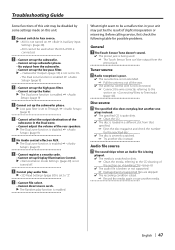
... the volume of slight misoperation or miswiring. No Audio control effect on AUX. ▲ The Dual zone function is enabled. ☞ (page 9) ! • Cannot register a security code. • Cannot set to Aux source. ▲ • AUX is not turned on this unit may just be output from that specified. ☞ Eject...
... the volume of slight misoperation or miswiring. No Audio control effect on AUX. ▲ The Dual zone function is enabled. ☞ (page 9) ! • Cannot register a security code. • Cannot set to Aux source. ▲ • AUX is not turned on this unit may just be output from that specified. ☞ Eject...


