

Instruction Manual
Page 35
... Built-in Amp Setting Controlling the built-in amplifier deactivates. The built-in amplifier. Turns off the display when you cannot perform any key will blink on the unit after the faceplate is effective when you perform no operation for 5 seconds. ⁄ • Set the... any operation except for at night. In Standby mode Date Mode Setting the date format. 1 Select Date Mode Turn the Control knob. This function is removed, warning potential thieves. Display "Display : ON" "Display : OFF" Setting Keeps the display on . Display "AMP : ON" "AMP : OFF" Setting ...
... Built-in Amp Setting Controlling the built-in amplifier deactivates. The built-in amplifier. Turns off the display when you cannot perform any key will blink on the unit after the faceplate is effective when you perform no operation for 5 seconds. ⁄ • Set the... any operation except for at night. In Standby mode Date Mode Setting the date format. 1 Select Date Mode Turn the Control knob. This function is removed, warning potential thieves. Display "Display : ON" "Display : OFF" Setting Keeps the display on . Display "AMP : ON" "AMP : OFF" Setting ...
Instruction Manual
Page 43
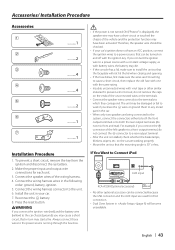
To prevent a short circuit, remove the key from the ignition and disconnect the - If You Want to both the...connector to work if you connect the ignition wire to a power source with a constant voltage supply, as with the ignition key. Reconnect the - If you share the - battery. 2. Make the proper input and output wire connections for iPod connection....are being connected to the system, connect the connectors either to both the rear output terminals (do not remove the caps on the ends of the unconnected wires or the terminals. • Connect the speaker wires correctly...
To prevent a short circuit, remove the key from the ignition and disconnect the - If You Want to both the...connector to work if you connect the ignition wire to a power source with a constant voltage supply, as with the ignition key. Reconnect the - If you share the - battery. 2. Make the proper input and output wire connections for iPod connection....are being connected to the system, connect the connectors either to both the rear output terminals (do not remove the caps on the ends of the unconnected wires or the terminals. • Connect the speaker wires correctly...
Instruction Manual
Page 44
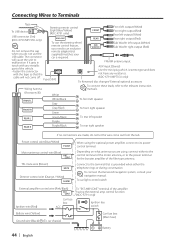
... and does not have any metallic part of the amplifier having the external amp control function. (KDC-X791 only) Ignition key switch Battery wire (Yellow) Ground wire (Black) · (To car chassis) Car fuse ...light control switch External amplifier control wire (Pink/Black) EXT. Fuse (10A) (KDC-X791/MP735U only) To Kenwood disc changer/ External optional accessory Wiring harness (Accessory1) White To connect these leads,..., you need to an exclusive SUB WOOFER Sub Woofer right output (Red) Do not remove the cap remote adapter (not when you are made, do not let the wire come...
... and does not have any metallic part of the amplifier having the external amp control function. (KDC-X791 only) Ignition key switch Battery wire (Yellow) Ground wire (Black) · (To car chassis) Car fuse ...light control switch External amplifier control wire (Pink/Black) EXT. Fuse (10A) (KDC-X791/MP735U only) To Kenwood disc changer/ External optional accessory Wiring harness (Accessory1) White To connect these leads,..., you need to an exclusive SUB WOOFER Sub Woofer right output (Red) Do not remove the cap remote adapter (not when you are made, do not let the wire come...

